Add an account: TFSA, RRSP, FHSA, RESP, RDSP, LIRA, RRIF, non-registered, company account or crypto wallet, with its owners.
Open the account: Holdings shows what it holds, Entries the buys, sells, dividends, interest, deposits, withdrawals and transfers, Owners who owns it. Enter them by hand, or use Import a file with your broker’s CSV file or TD Direct Investing PDF statements (Importing files and keeping documents). Starting positions enter what an account held before your first import.
Prices: add them under Securities on the Investments page, or a manual valuation for a whole account. Options and stock splits are supported.
Book cost follows the Canadian average cost. The tabs Returns, Allocation and fees, Dividends and Tax pack are explained in Returns, dividends and tax pack.
Names in bold are the pages, tabs and buttons as the app shows them.
Step-by-step tutorials
Pick a way. The screens are shown with sample data.
- Add an account by handA TFSA, RRSP or FHSA, then the deposit and the buy typed from your statement. About three minutes.
- Import your broker’s fileThe CSV file from TD Direct Investing, Disnat or another broker. Nothing to type.
- See holdings, gains and returnsEvery account together, today’s prices, capital gains for your taxes and your return.
- Check your contribution roomTFSA, RRSP and FHSA room left this year, corrected with your notice of assessment.
Add an account by hand
For a new account or one with few entries. Here, an FHSA opened this year: one deposit and one ETF bought with it. Have your broker’s statement or confirmation handy.
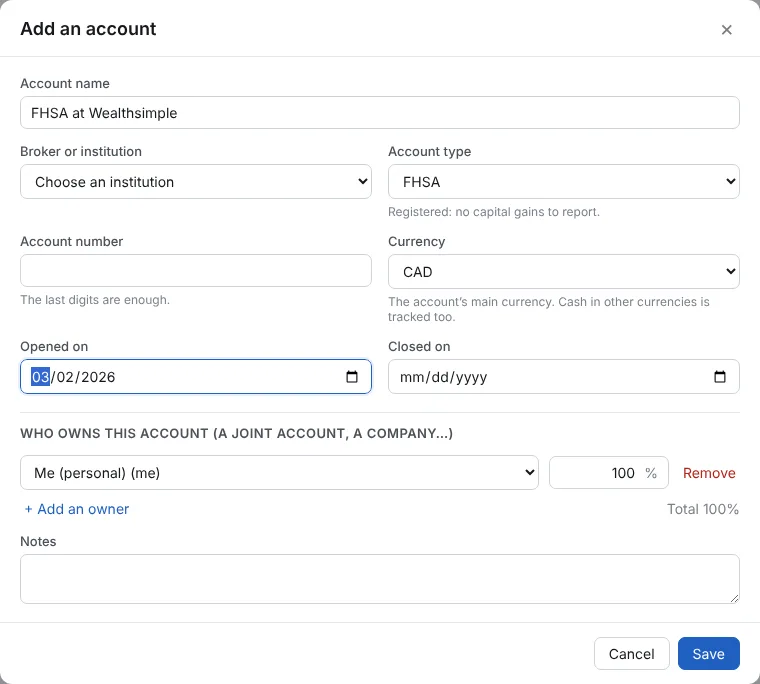
Step 1: Open Investments and click Add an account
Type the Account name and pick the Account type: TFSA, RRSP, FHSA, RESP, non-registered, company account and more. The Opened on date lets the app count the FHSA room from that year. Who owns this account is you at 100% unless it is a joint or company account. Click Save.
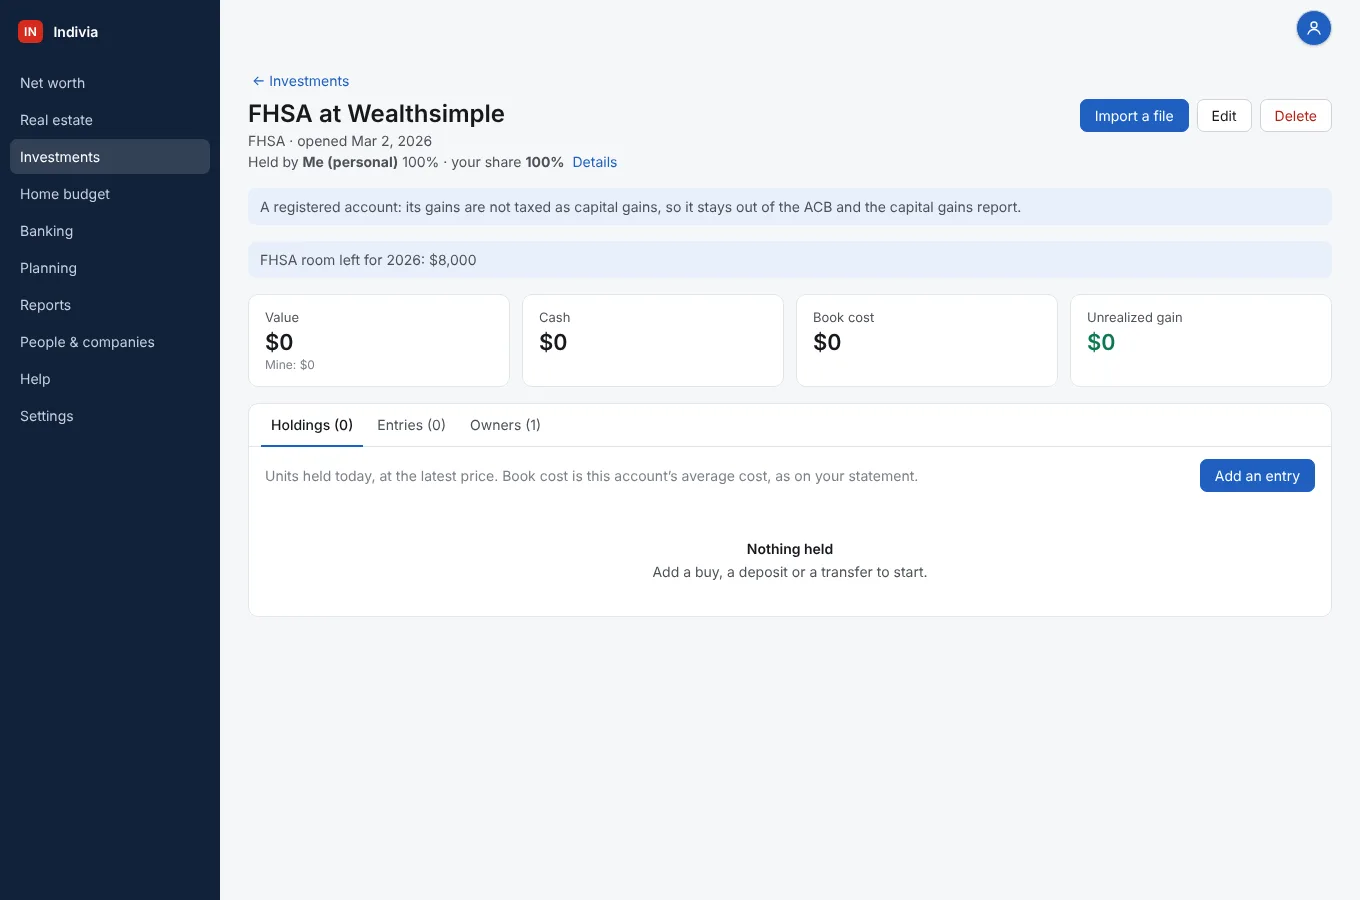
Step 2: The account opens, empty
A registered account’s gains are not capital gains, so it stays out of the ACB and the capital gains report. The blue line shows the room left this year (FHSA room left for 2026: $8,000). Click Add an entry.
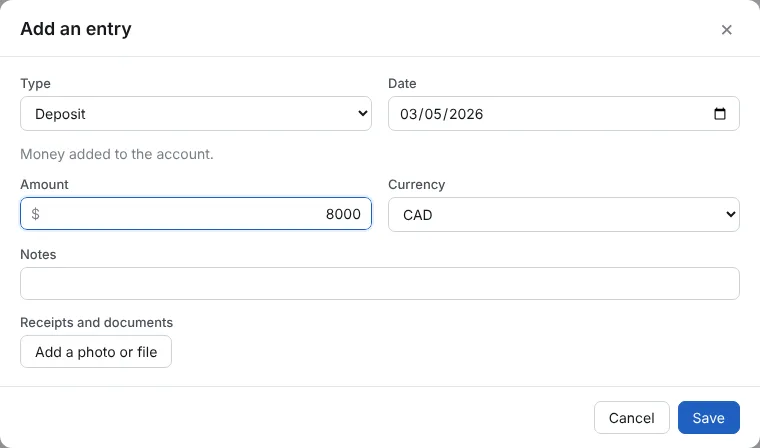
Step 3: Add the deposit
Pick Deposit in Type, the Date and the Amount. Deposits count as contributions: they lower the room left. Click Save.
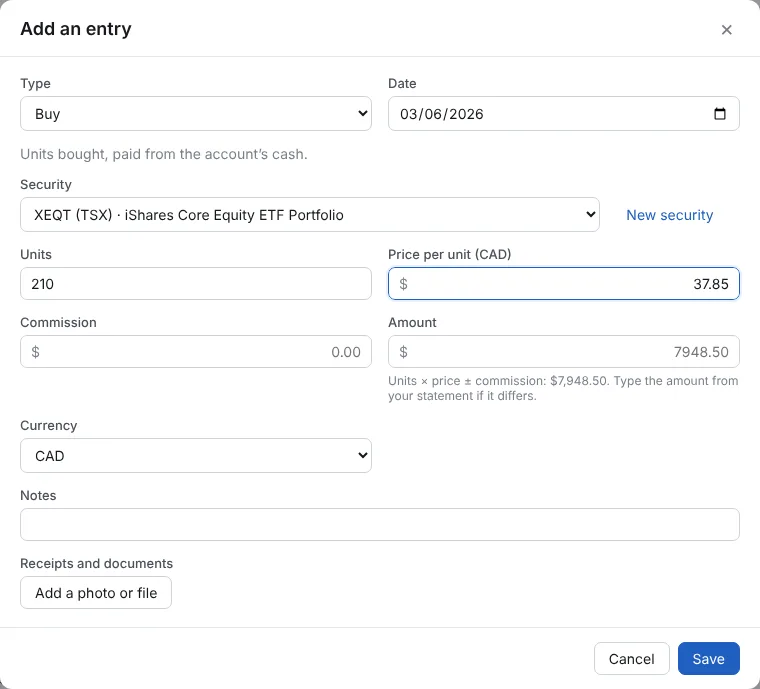
Step 4: Add the buy
Click Add an entry again and pick Buy. Choose the Security (or New security if it is not in the list), then the Units and the Price per unit. The Amount is worked out from units × price + commission; type the amount from your statement if it differs. Click Save.
Step 5: Value, book cost and gain show
The top of the page shows the Value, the Cash left, the Book cost and the Unrealized gain. The Holdings tab lists each security with its units, latest price, value, book cost and gain. The room is now $0: the year’s FHSA limit is used.
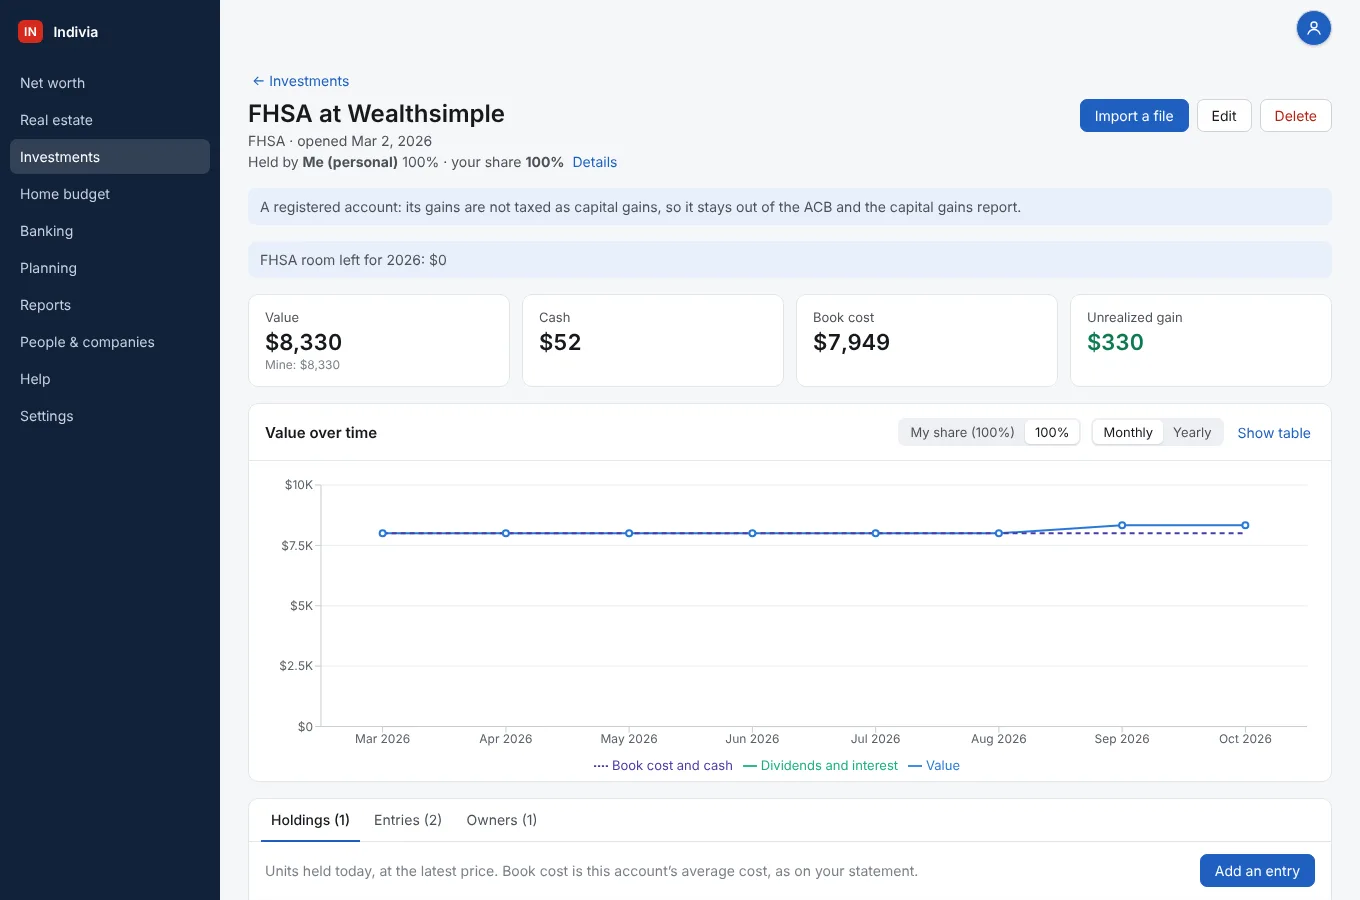

Step 6: Every entry is in the Entries tab
Newest first, with what each one did to the cash. Edit or Delete fixes a mistake. Dividends, interest, fees, withdrawals, transfers and currency conversions are added the same way.

Import your broker’s file
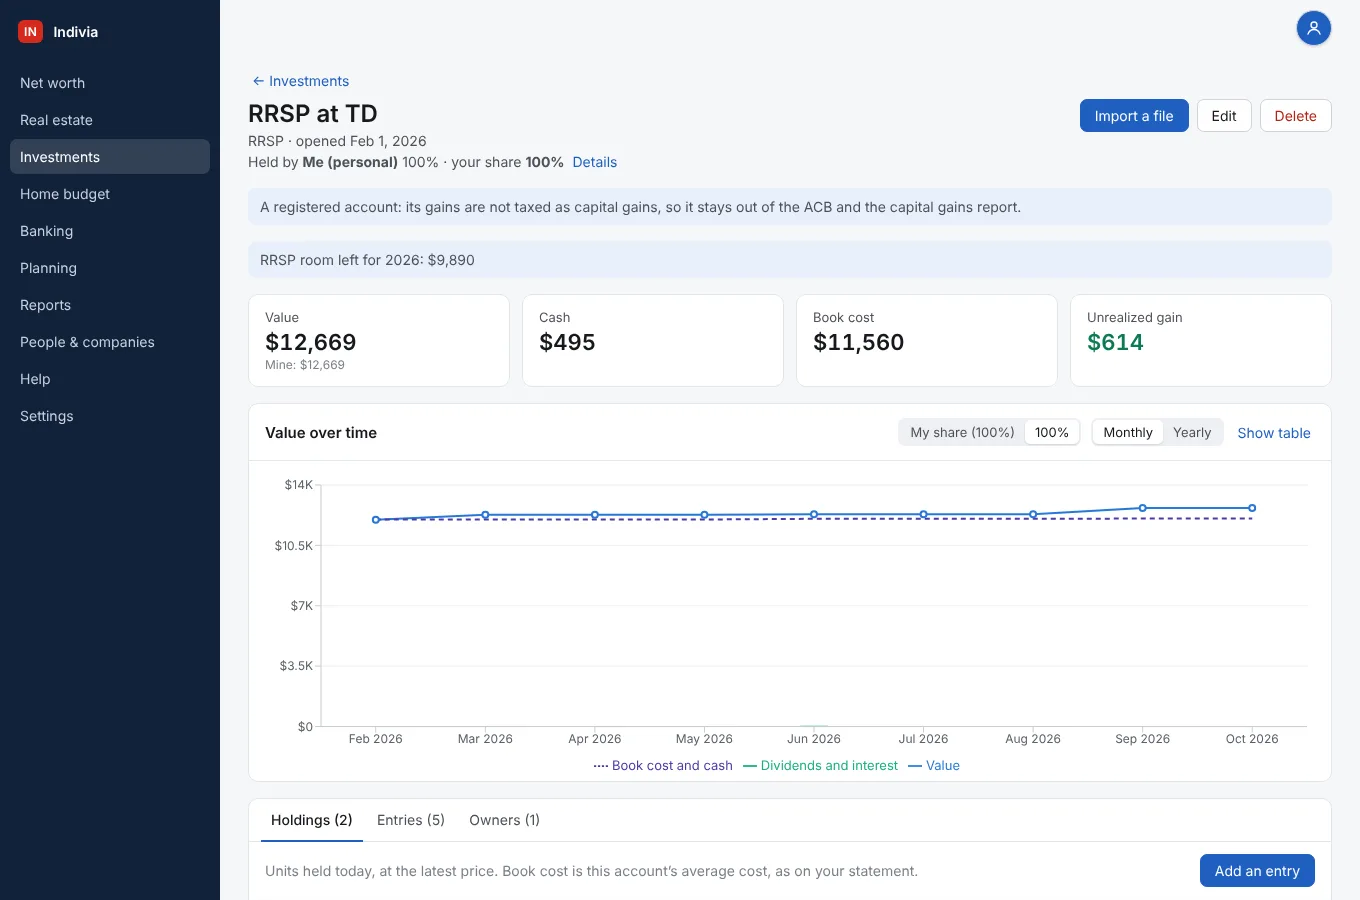
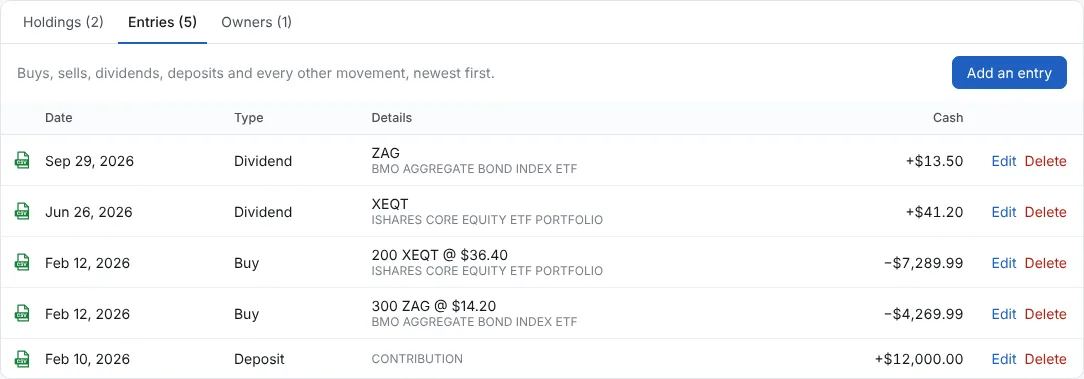
For an account with many entries. Download the activity file (CSV) from your broker’s website for the period you want. Here, a TD Direct Investing file for an RRSP: one contribution, two buys and two dividends.
Step 1: Open the account and click Import a file
Add the account first if needed (as in the first way). On its page, click Import a file, then Choose a file. TD Direct Investing and Desjardins Disnat files are recognised. TD statements in PDF can be imported too.
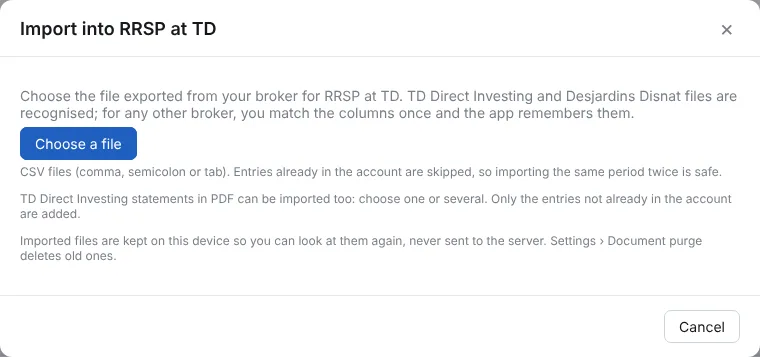
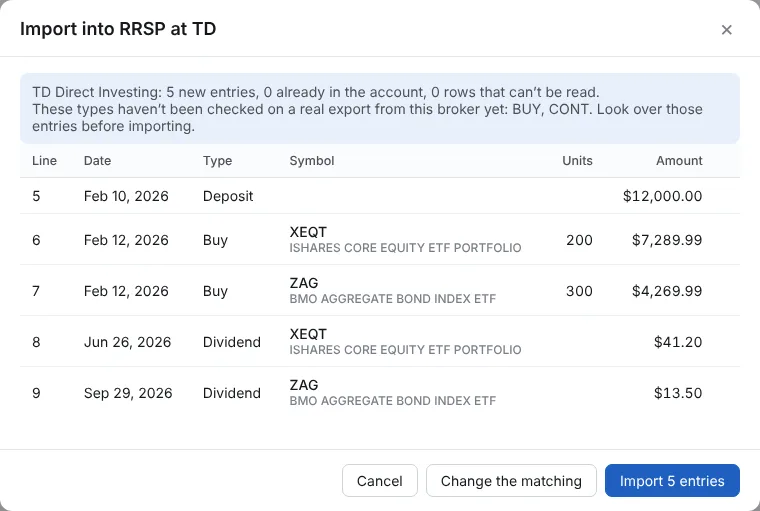
Step 2: Check the preview
Nothing is saved yet. Each line shows its date, type, security and amount. The first line counts the new entries, those already in the account and the rows that can’t be read. A note may say some types haven’t been checked on a real file from this broker yet: look over those lines. Click Import 5 entries.
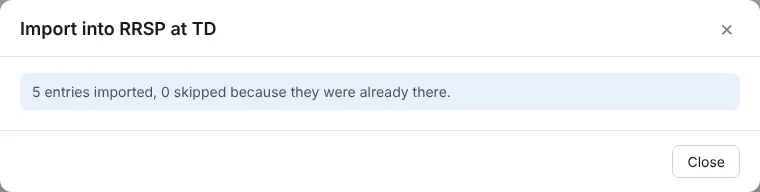
Step 3: Done
The window says how many entries were added and how many were skipped because they were already there. Click Close.
Step 4: The account is up to date
Value, cash, book cost, gain and RRSP room left are calculated from the file. In Entries, a small CSV icon marks each imported line; the description from the file shows under the symbol.
Step 5: Next month, import the new file
Entries already in the account are skipped, so importing a period twice is safe. Another broker? The app asks once which column holds what, and remembers it. To take back a whole import, open Import a file again: Earlier imports has an Undo button for each file.
See holdings, gains and returns
Once the accounts are in, the Investments page adds them up. Shown here with the sample data.
Step 1: The Overview tab
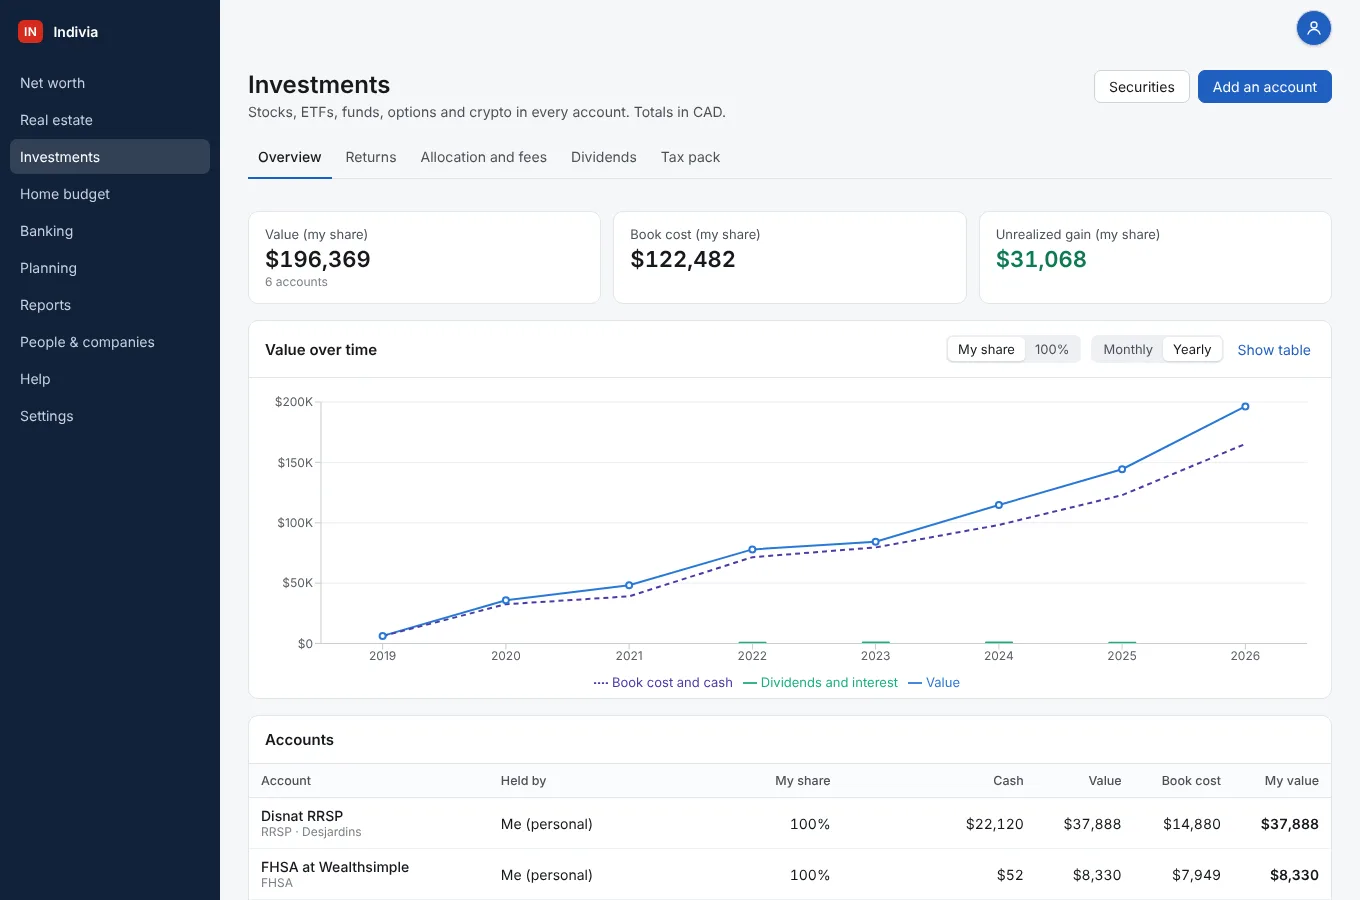
The value, book cost and unrealized gain of all your accounts at your share (a joint account held 50/50 counts for half). The chart shows the value over time; switch Monthly or Yearly, and My share or 100%.
Step 2: The list of accounts
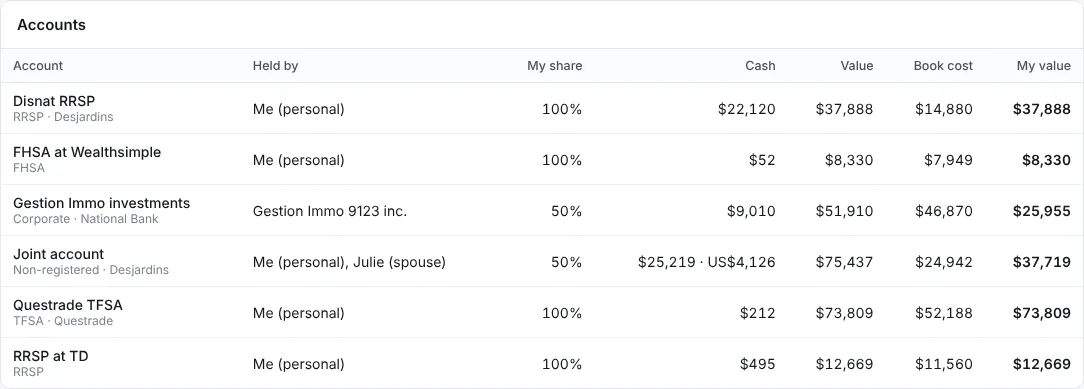
Each account with who holds it, your share, the cash, the value and the book cost. Click an account to open it.
Step 3: The holdings of an account
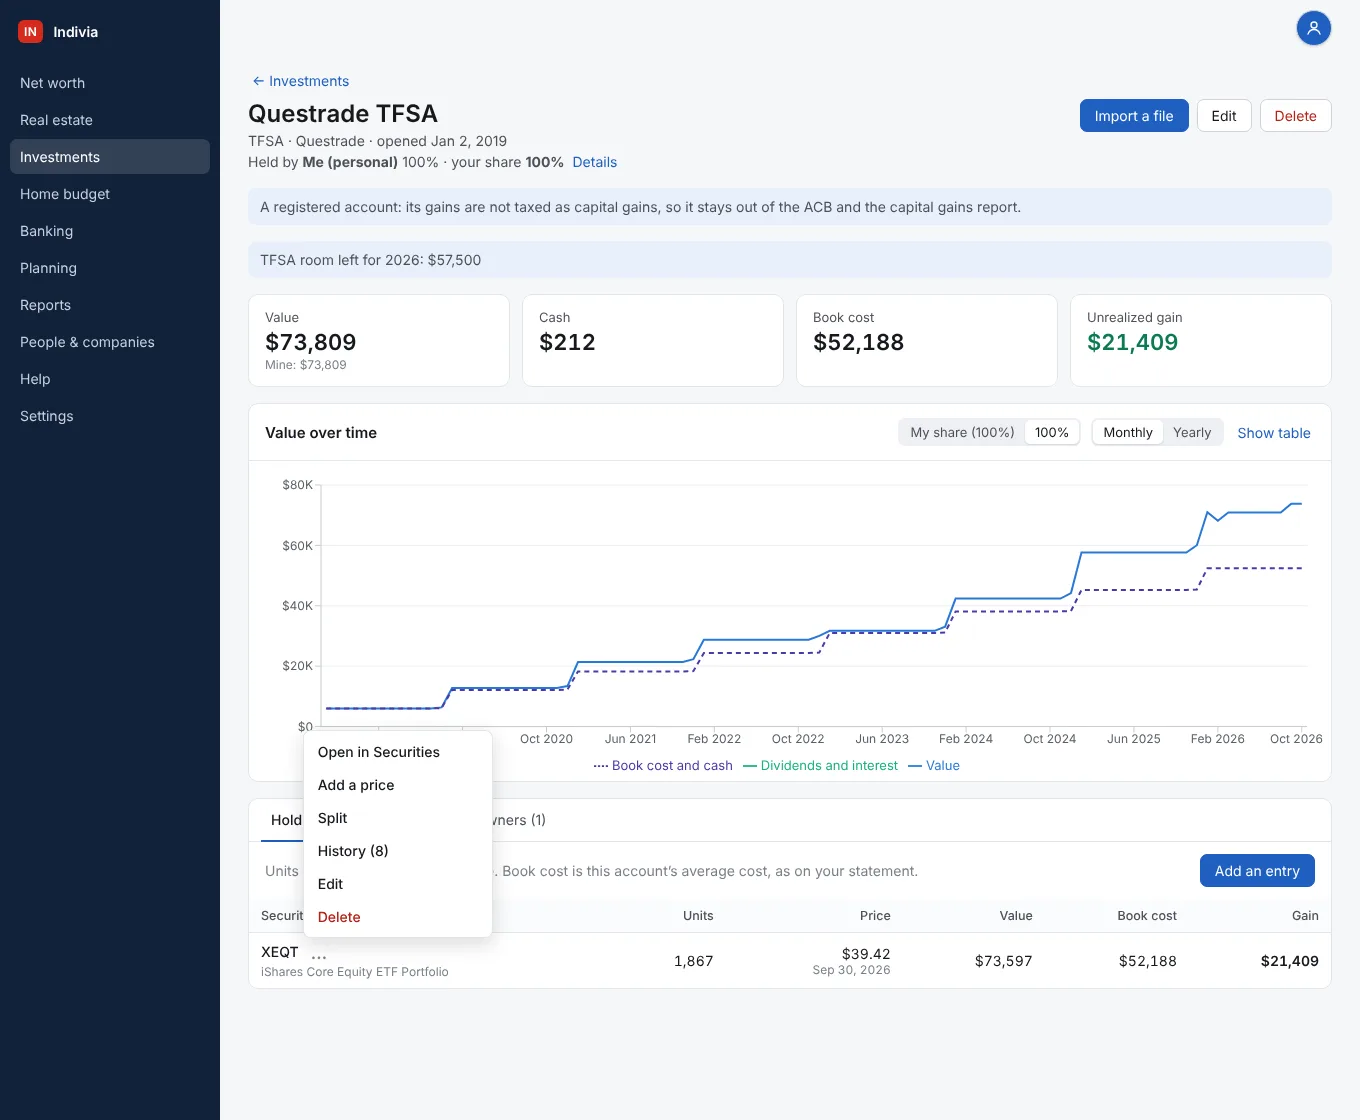
In the account, the Holdings tab gives each security’s units, its latest price and the date of that price, its value, book cost and gain.

Step 4: Keep the prices current
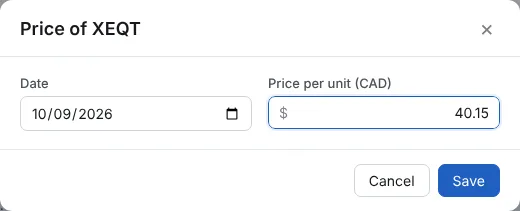
On the Investor plans, closing prices arrive after a sync every trading day. Otherwise, add a price yourself; the last buy or sell price is used when there is none. Click … next to a security and pick Add a price: the Date and the Price per unit. Every account holding it is revalued. The Securities button on the Investments page lists all of them.
Step 5: Capital gains for your tax return
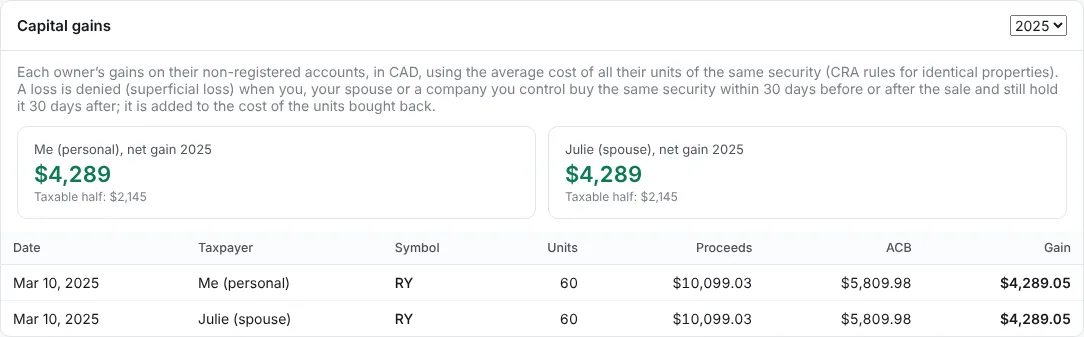
Lower on the Overview tab: each owner’s gains of the year on non-registered accounts, at the average cost (ACB), with the taxable half. Pick the year at the top right. Superficial losses are flagged.
Step 6: Your return
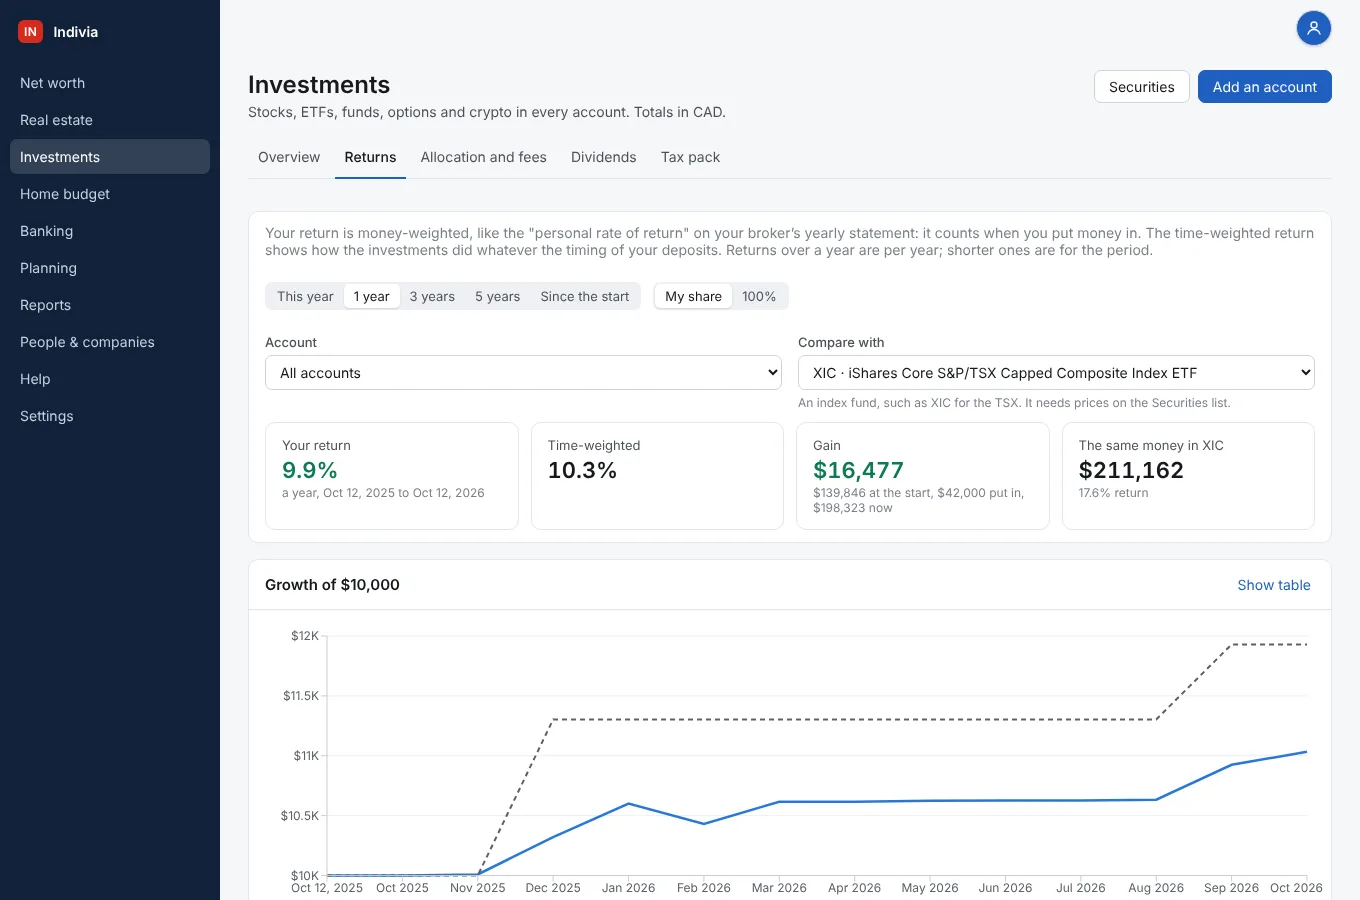
The Returns tab gives Your return (counts when you put money in, like your broker’s personal rate of return) and the Time-weighted return, for this year, 1, 3 or 5 years or since the start. Compare with an index fund such as XIC.
Check your contribution room
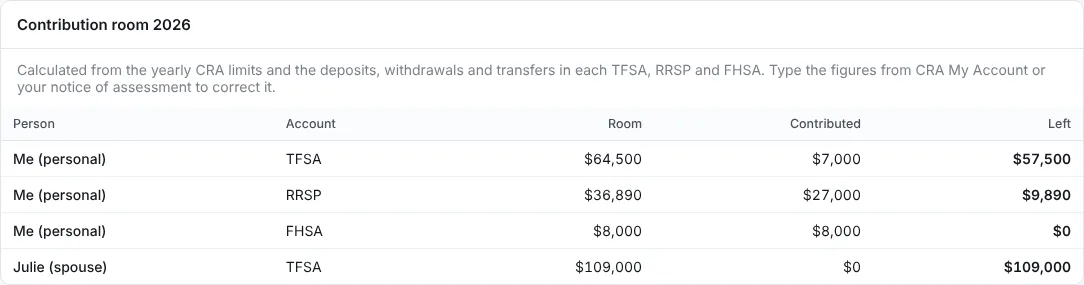
The app calculates the room from the yearly CRA limits and the deposits and withdrawals in each registered account. Type the figures from CRA My Account or your notice of assessment to make it exact.
Step 1: The Contribution room card
On the Investments page, below the accounts: for each person and each kind of account, the Room this year, what was Contributed and what is Left. An amount over the room shows in red.
Step 2: Click a person for the details
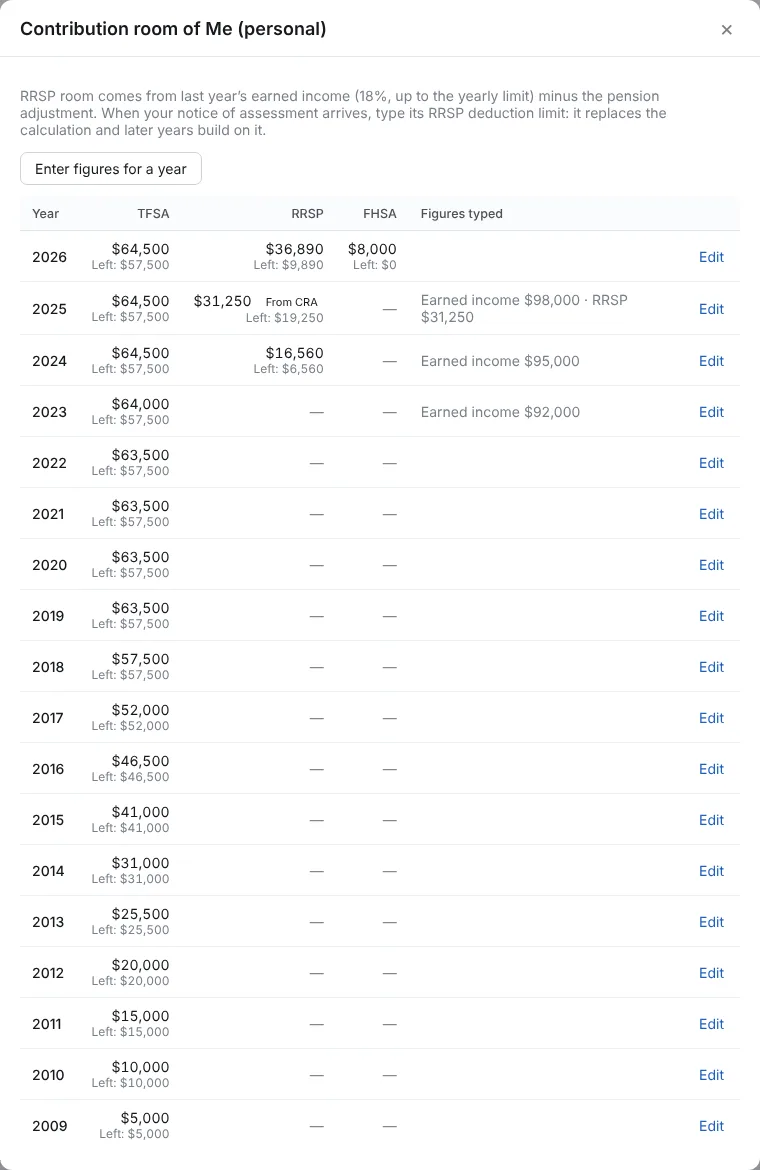
Year by year, the room and what was left. From CRA marks a figure you typed from CRA. The TFSA room needs the person’s birth year (in People & companies); the RRSP room needs the earned income.
Step 3: Type the figures from your notice of assessment
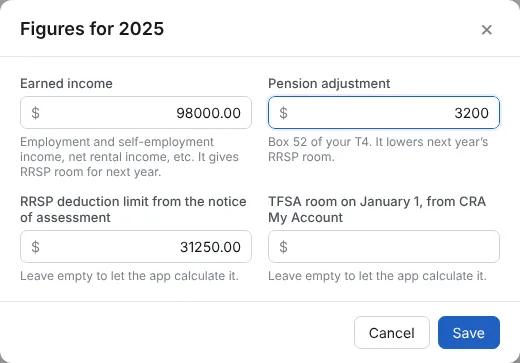
Click Edit on the year, or Enter figures for a year. Type the Earned income, the Pension adjustment (box 52 of your T4) and the RRSP deduction limit from the notice of assessment. Leave a field empty to let the app calculate it. Click Save.
Step 4: The room is recalculated
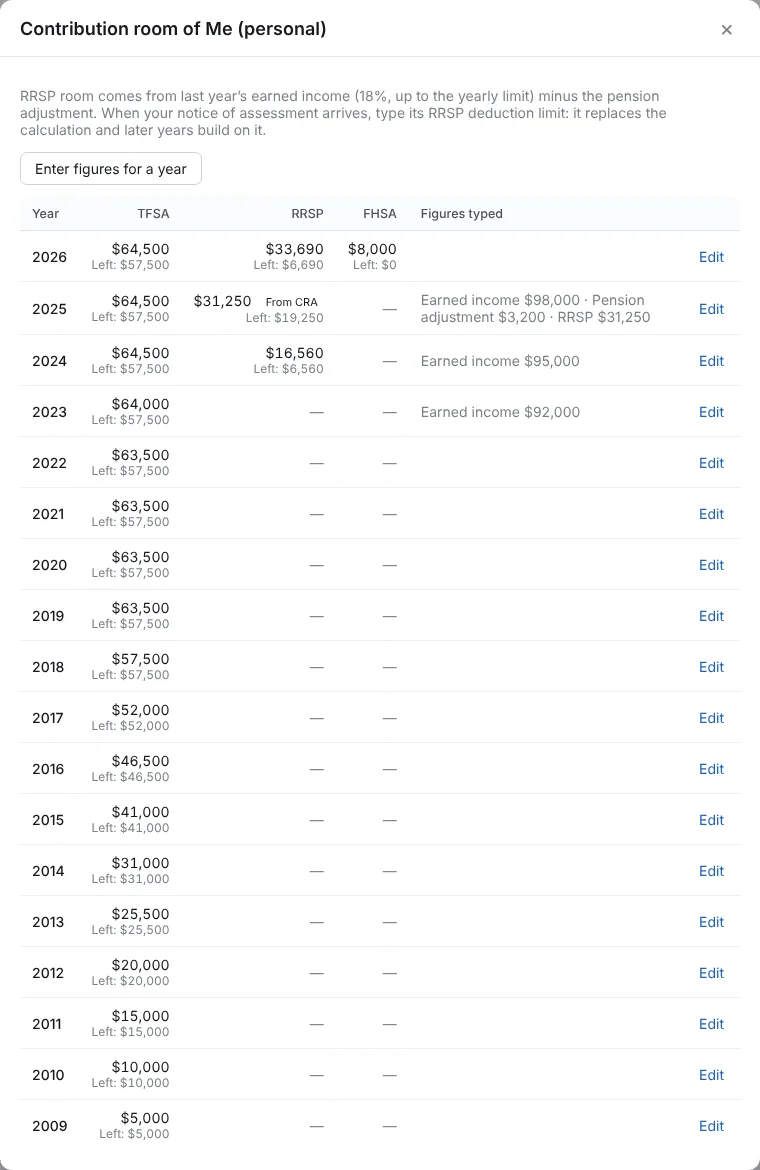
Here, the $3,200 pension adjustment of 2025 lowers the RRSP room of 2026 by the same amount.
Still a question? Write to support@indivia.app. Your message goes straight to the people who make the app.