At tax time the app adds up the year for you. Reports, Properties by tax line gives each rental line by line as on the T776 (federal) and, in Québec, the TP-128, with the CCA you claimed. Investments, Tax pack gives the capital gains with their adjusted cost base, the dividends and interest to check against your T5 and T3 slips, and the foreign property for the T1135. Export each one as CSV, print it or save it as PDF, or make a link for your accountant. Pick a way below to see each step on the real screens (shown with sample data).
Names in bold are the pages, tabs and buttons as the app shows them.
Step-by-step tutorials
Pick a way. The screens are shown with sample data.
- Rental income for the T776 and TP-128Each rental’s year, line by line as on the forms, at your share.
- Claim the CCA for the yearRecord the capital cost allowance you claim, so the net income and the recapture are right.
- The investment tax packCapital gains, adjusted cost base, dividends, interest and the T1135 for each taxpayer.
- Send it to your accountantOne link with the year’s rental summaries, the tax pack and the receipts.
Rental income for the T776 and TP-128
For a landlord filling the rental part of the return, or checking what the accountant will type. The summary is built from the revenue and expenses already recorded on each property: there is nothing to type here.
Step 1: Open Reports, Properties by tax line
Choose the Year (last year is chosen for you) and the Taxpayer: you, your spouse or a company that owns a rental. Each taxpayer gets their own copy, at their share of each property.
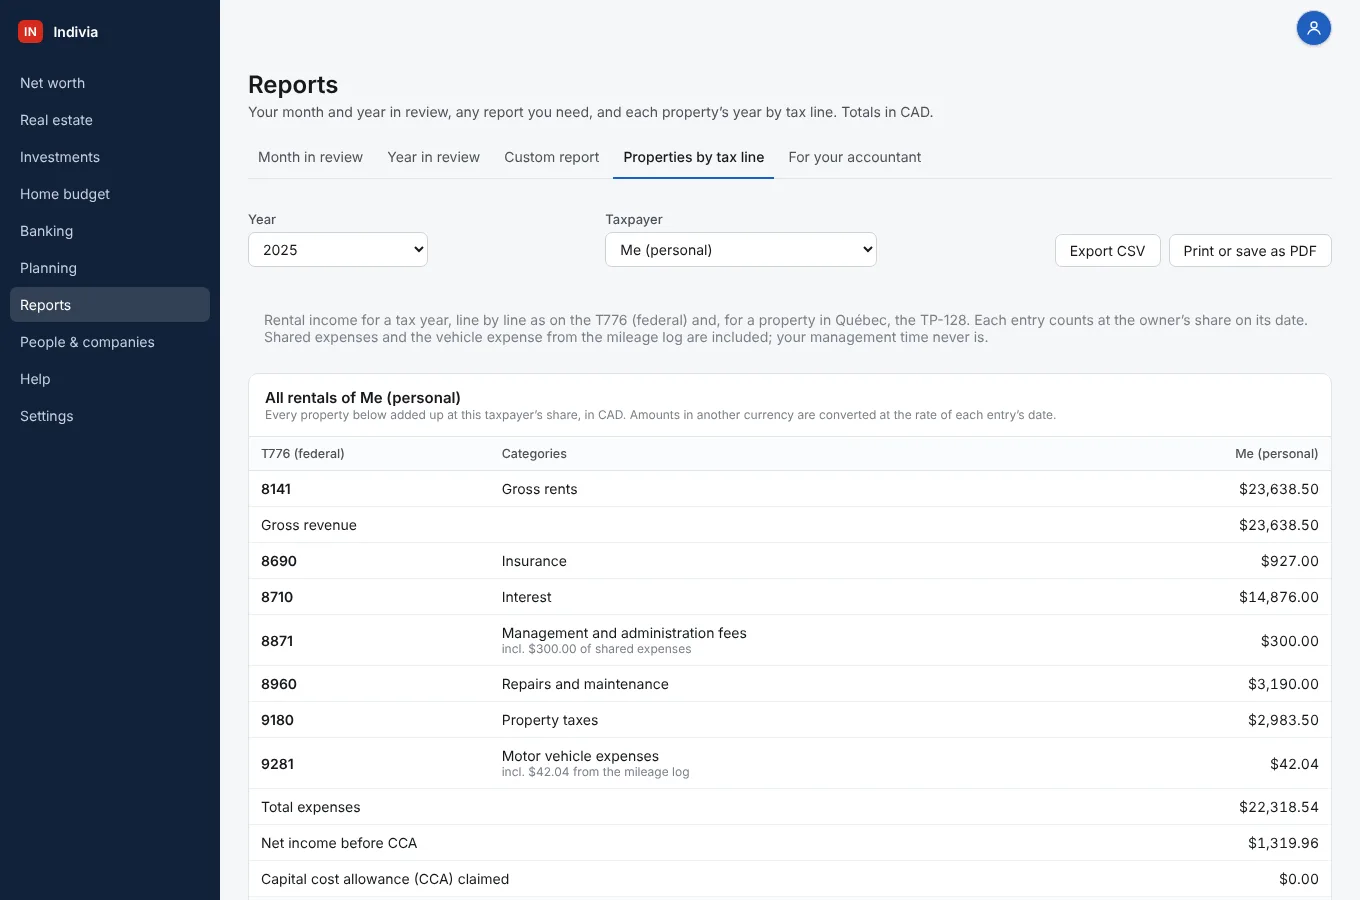
Step 2: All your rentals together
The first card adds up every rental of this taxpayer, in Canadian dollars. Each row is a line of the T776 (federal), with its number and the categories it comes from; below it, the same year on the TP-128 (Québec). Shared expenses and the vehicle expense from the mileage log are already included.
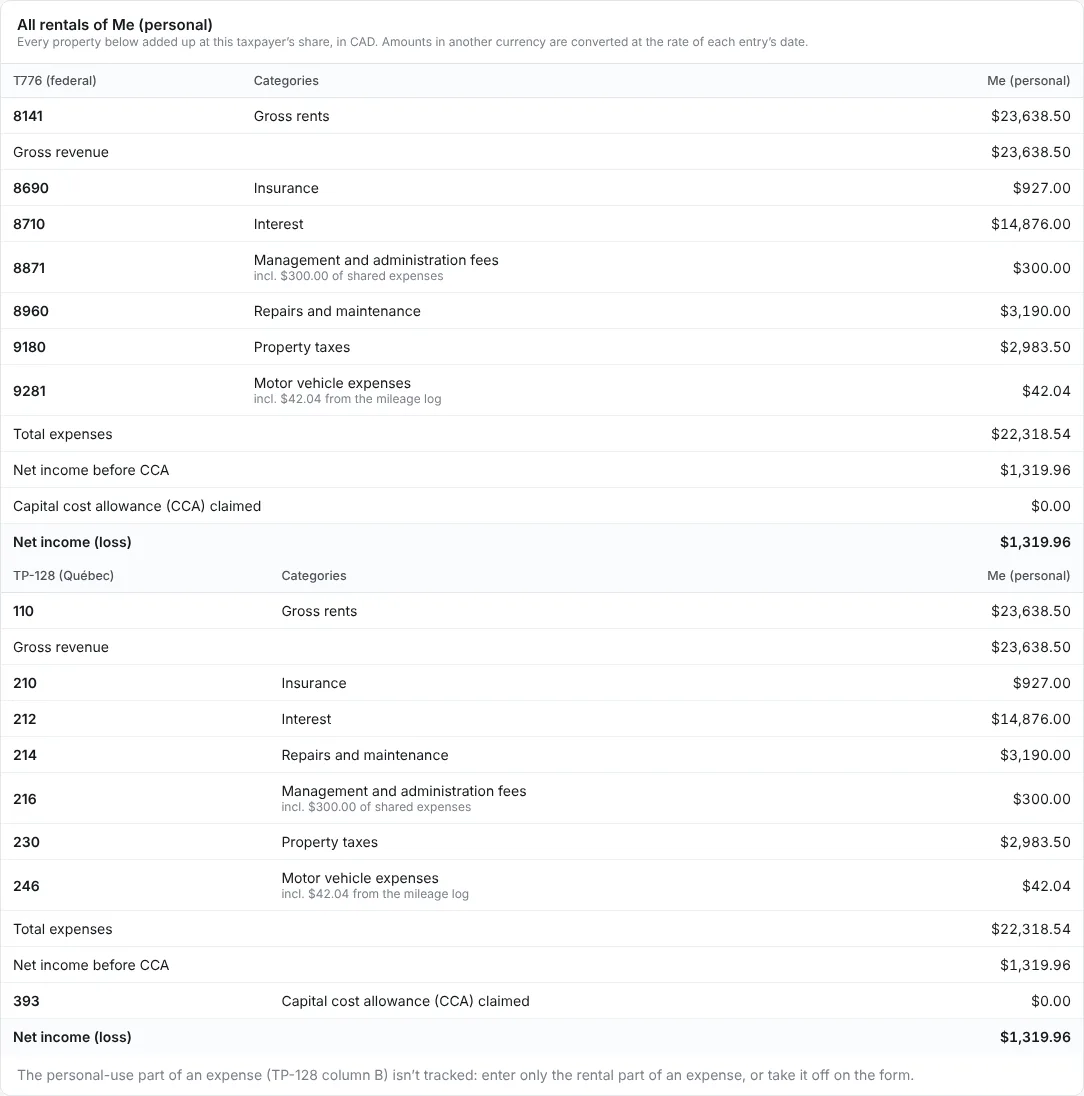
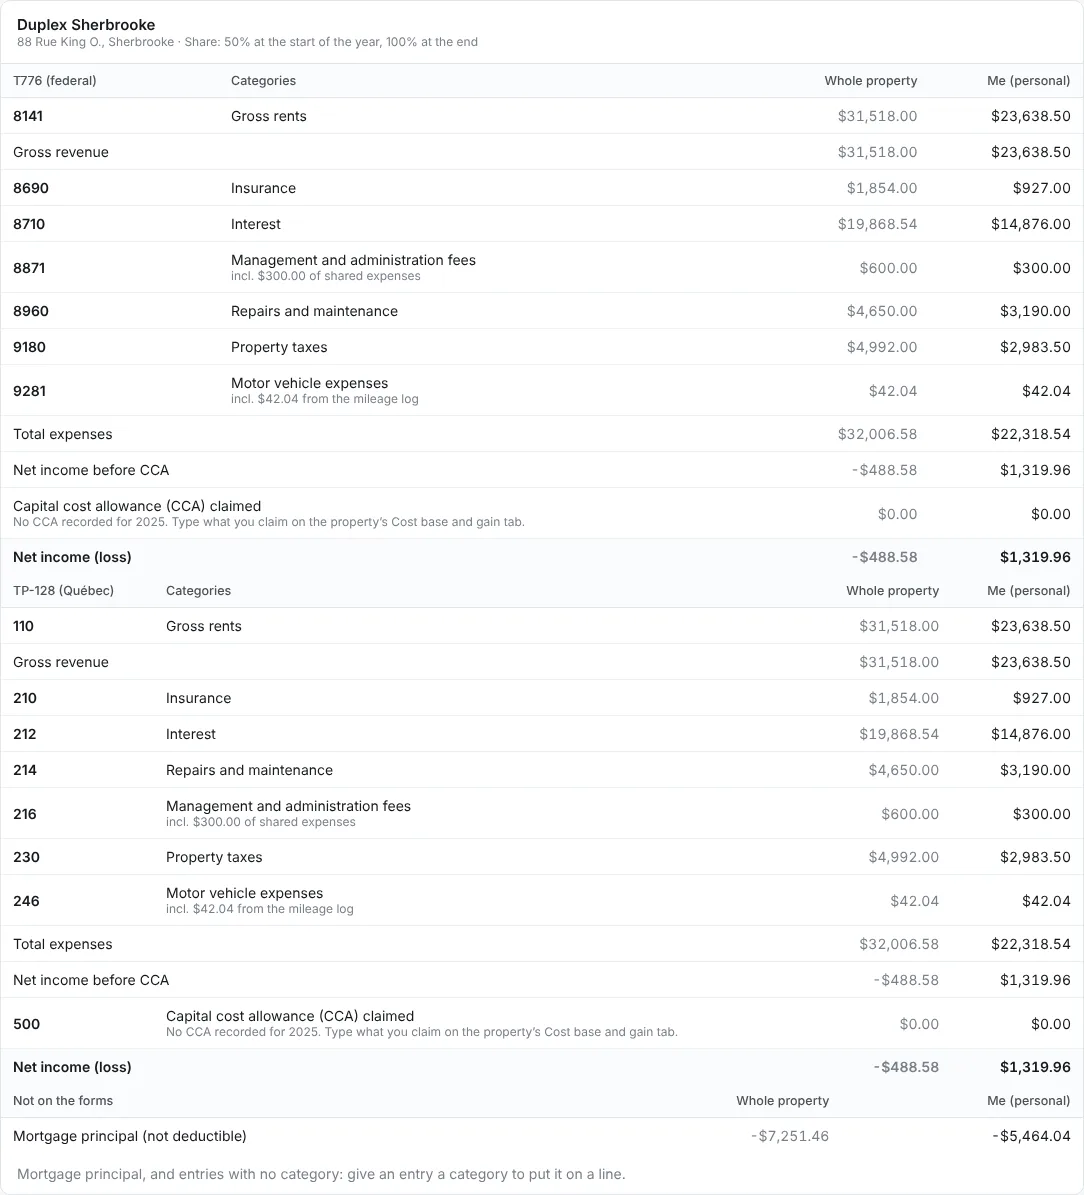
Step 3: One copy per property
Below, each property has its own card, as each one needs its own T776. When you do not own it all, Whole property shows the full amounts and the last column your share. Here the share went from 50% to 100% during the year, so each entry counts at the share of its date.
Not on the forms lists the mortgage principal and entries with no category; Capital spending (a new roof) is added to the cost of the building instead.
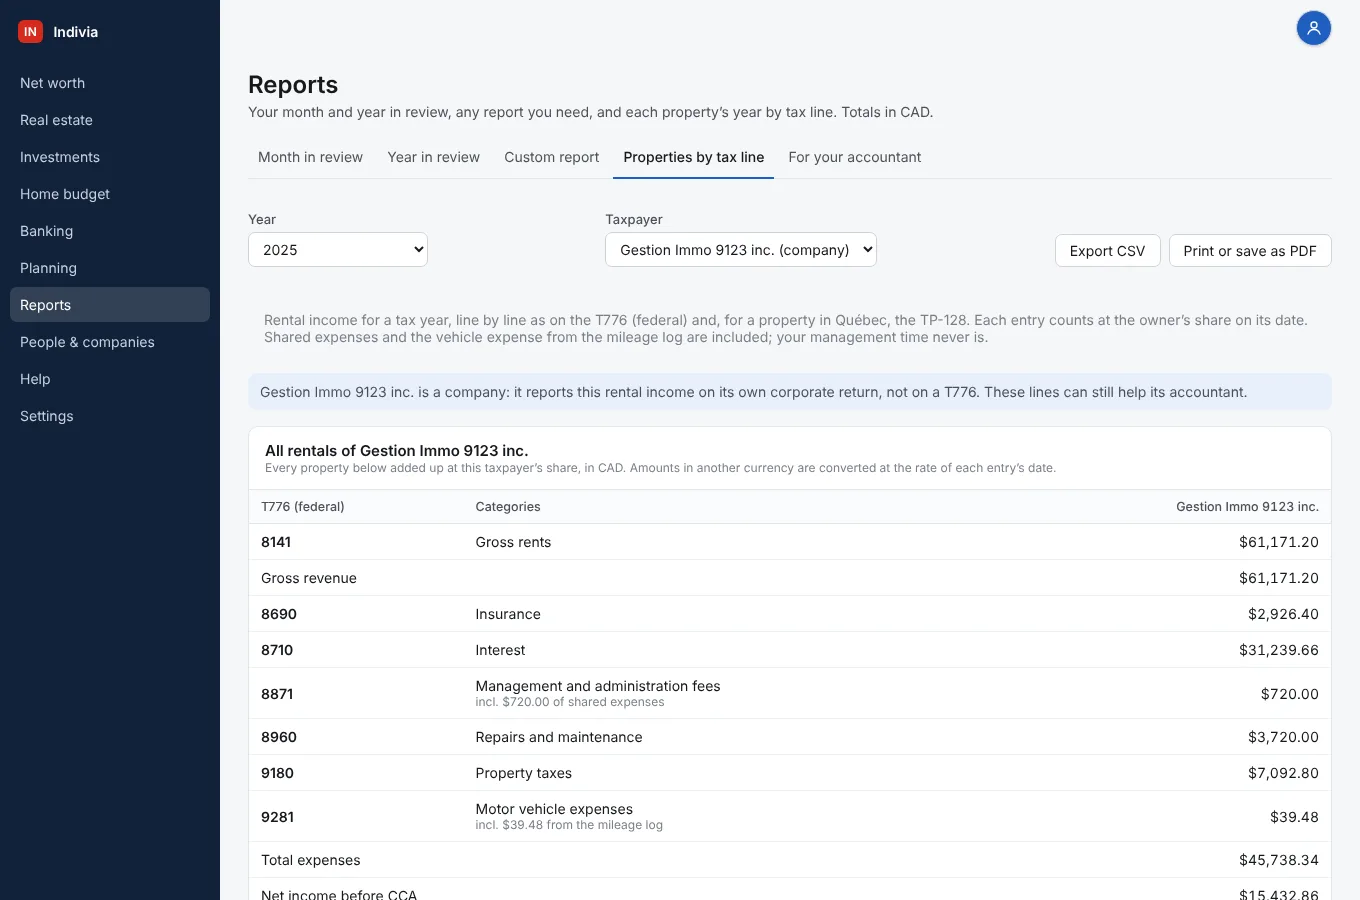
Step 4: A rental owned by a company
Choose the company in Taxpayer. A note reminds you that a company reports this income on its own corporate return, not on a T776; the lines can still help its accountant.
Step 5: Export or print it
Export CSV saves every line, per property and combined, for a spreadsheet. Print or save as PDF prints the page without the buttons, with the taxpayer and the year at the top.
Claim the CCA for the year
The capital cost allowance (CCA) is the depreciation of the building you choose to claim each year. The app does not decide it for you: you, or your accountant, pick the amount; you type it once per year and the summaries use it.
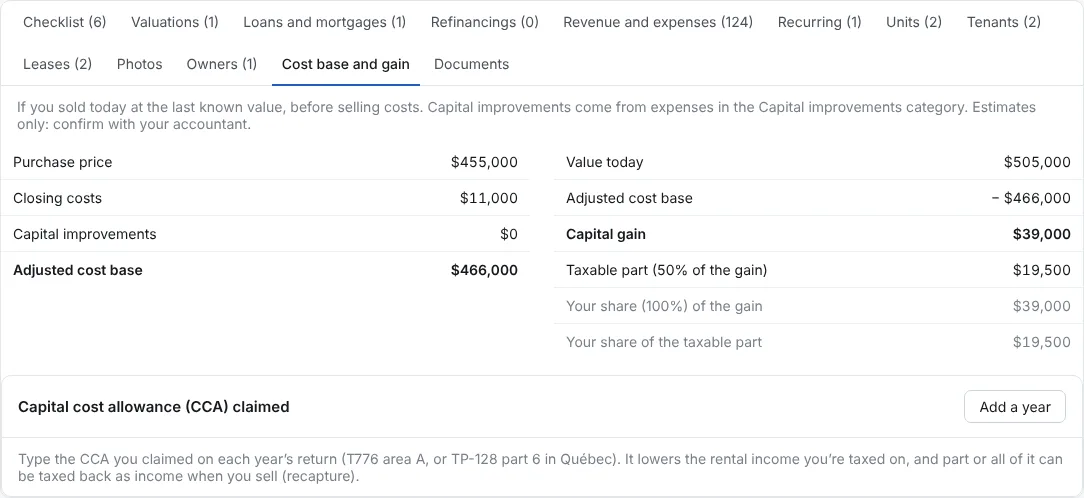
Step 1: Open the property’s Cost base and gain tab
In Real estate, open the property, then Value and loans and Cost base and gain. Below the cost base, the Capital cost allowance (CCA) claimed card lists the years already claimed.
Step 2: Add the year
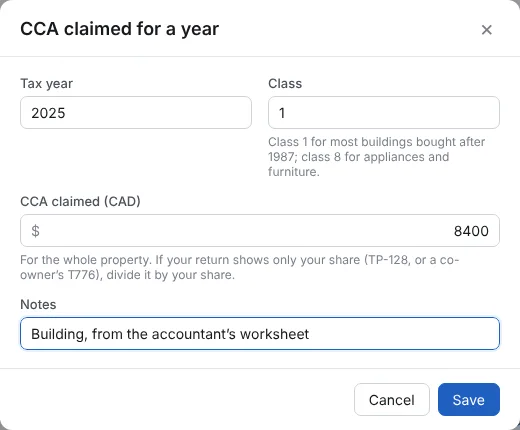
Click Add a year. Type the Tax year, the Class (1 for most buildings bought after 1987, 8 for appliances and furniture) and the CCA claimed for the whole property. If your return shows only your share, divide it by your share. Add a note if you like, then click Save.
Step 3: The years add up
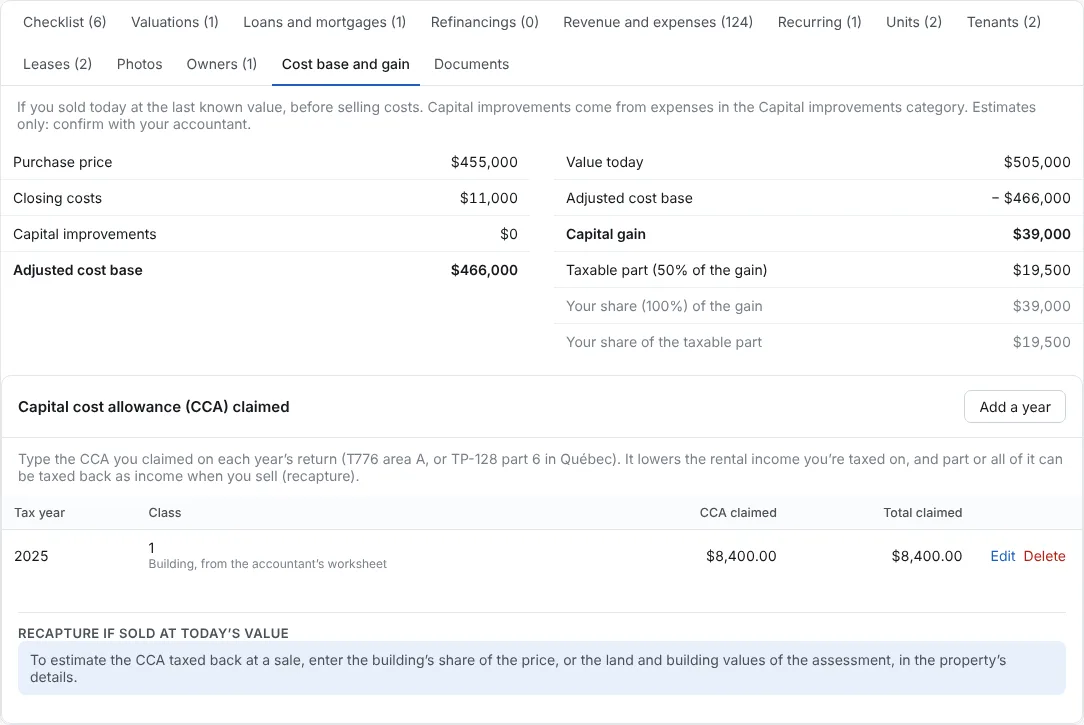
Each year is listed with the Total claimed so far. Below it, the app estimates the CCA that would be taxed back if you sold at today’s value (the recapture). For that it needs the building’s share of the price: enter it, or the land and building values of the assessment, in the property’s details.
Step 4: The summary takes it off
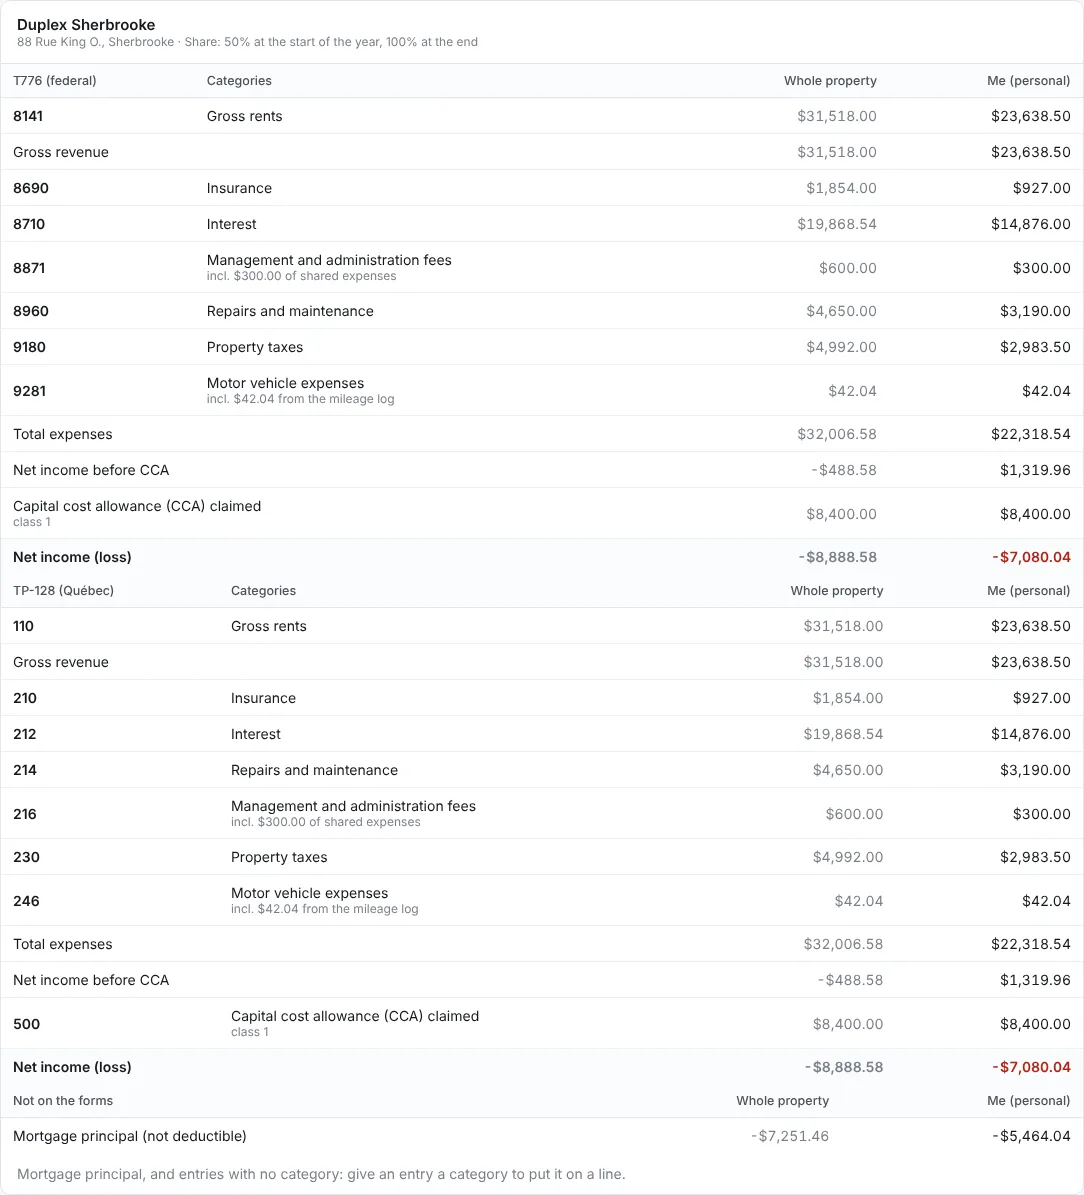
Back in Reports, Properties by tax line, the line Capital cost allowance (CCA) claimed shows the amount with its class, and the Net income (loss) is now after the CCA, on the T776 and on line 500 of the TP-128.
The investment tax pack
For anyone with a non-registered account. The tax pack is built from the buys, sells, dividends and interest you entered or imported. TFSA, RRSP and other registered accounts are left out: they are not taxed this way.
Step 1: Open Investments, Tax pack
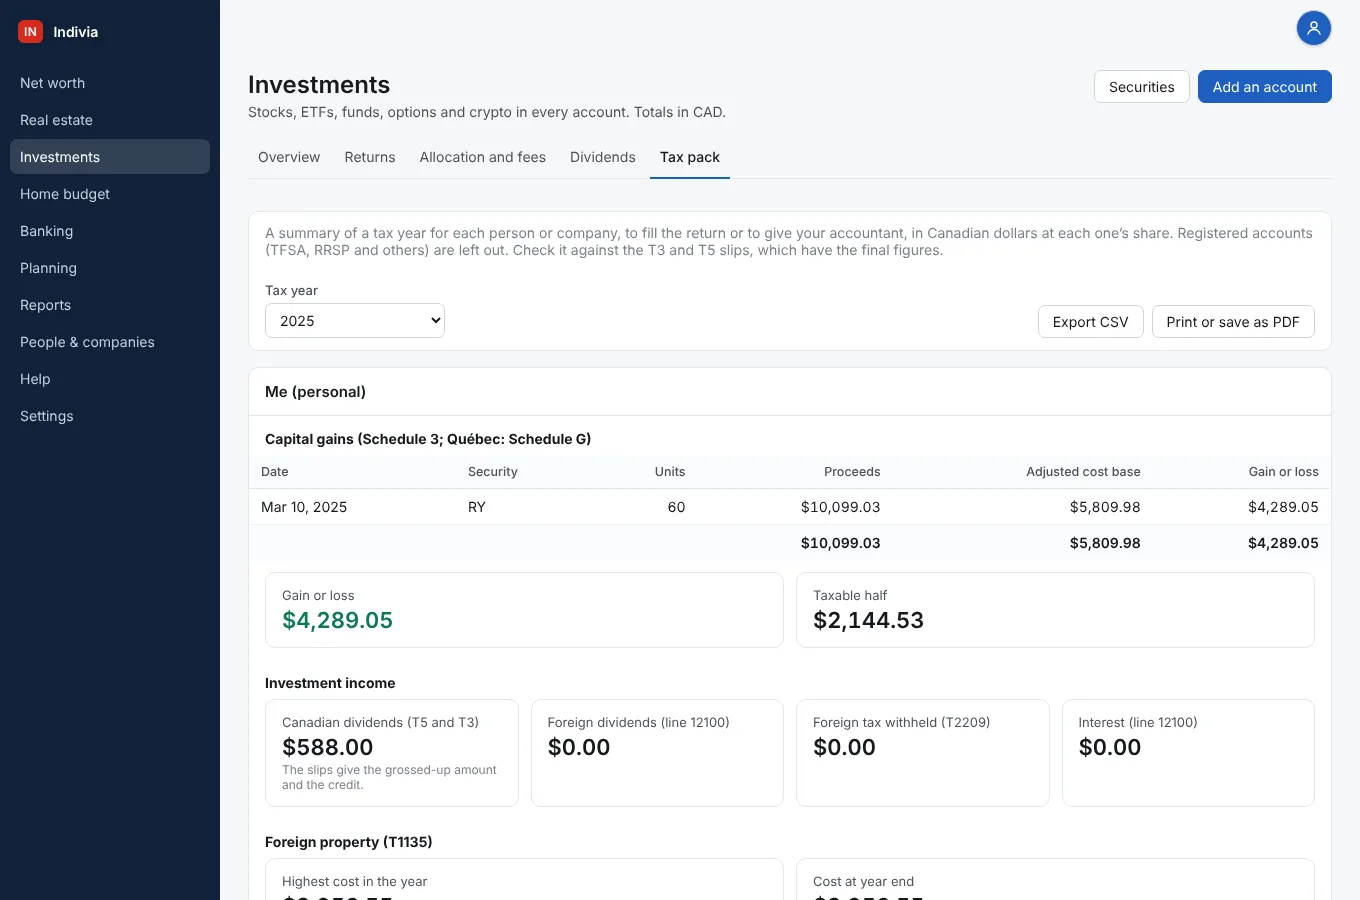
Click the Tax pack tab and pick the Tax year. There is one card per person or company, at each one’s share of joint accounts.
Step 2: Read one taxpayer’s card
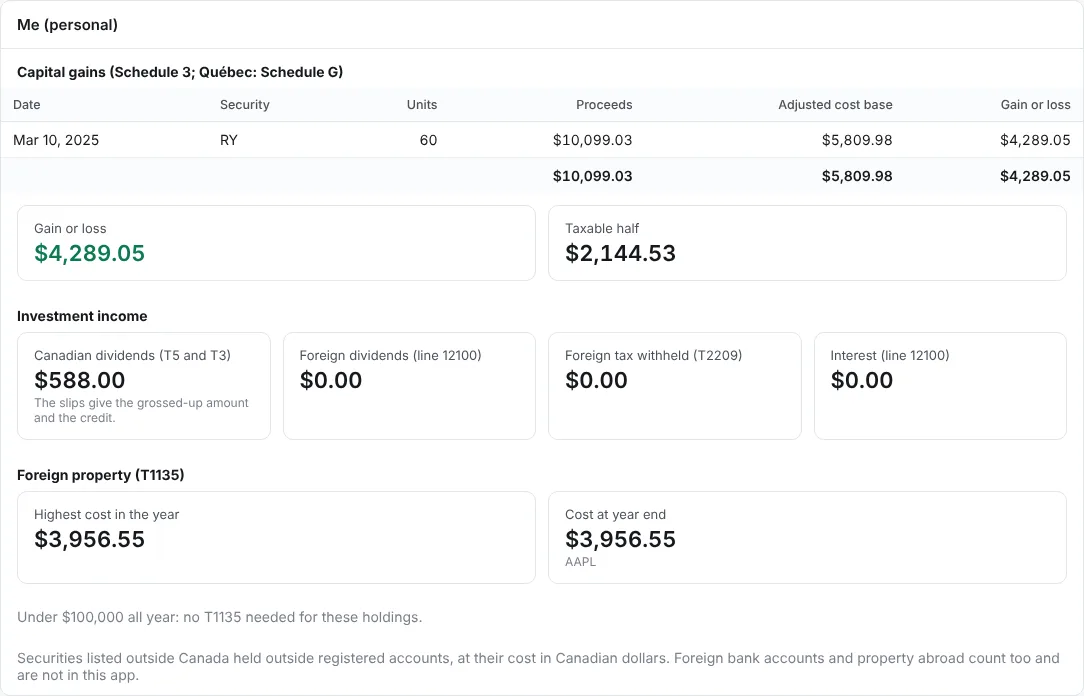
Capital gains lists every sale with the proceeds, the Adjusted cost base and the gain or loss, then the Taxable half: these go on Schedule 3 (Schedule G in Québec).
Investment income gives the Canadian dividends to check against your T5 and T3 slips, the foreign dividends and the foreign tax withheld, and the interest. Foreign property (T1135) tells you whether the form is due.
Step 3: Check the gains and the cost base
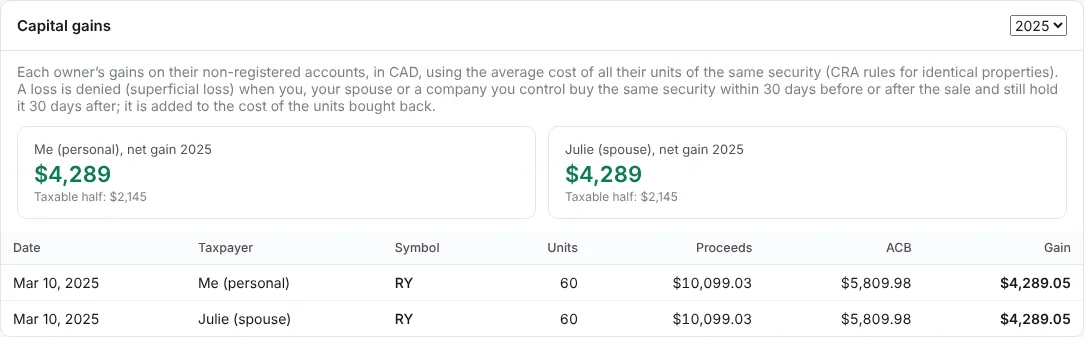
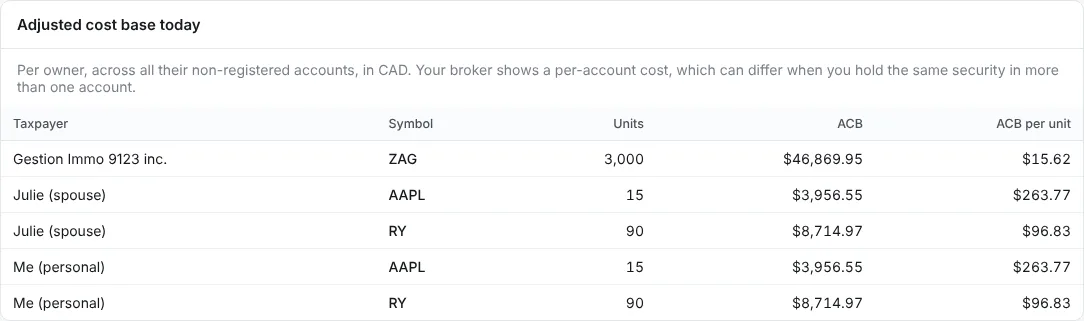
On the Overview tab, Capital gains shows each sale of the year chosen, per taxpayer. Adjusted cost base today gives each taxpayer’s cost per security, across all their accounts: it can differ from your broker’s, which counts each account alone.
Step 4: Export or print it
Back on Tax pack, Export CSV saves every sale with its taxpayer, proceeds, cost base and gain. Print or save as PDF prints the cards.
Send it to your accountant
Instead of printing everything, make one link. The accountant opens it in a browser with a code; there is nothing to install, and the link stops working on the date you choose.
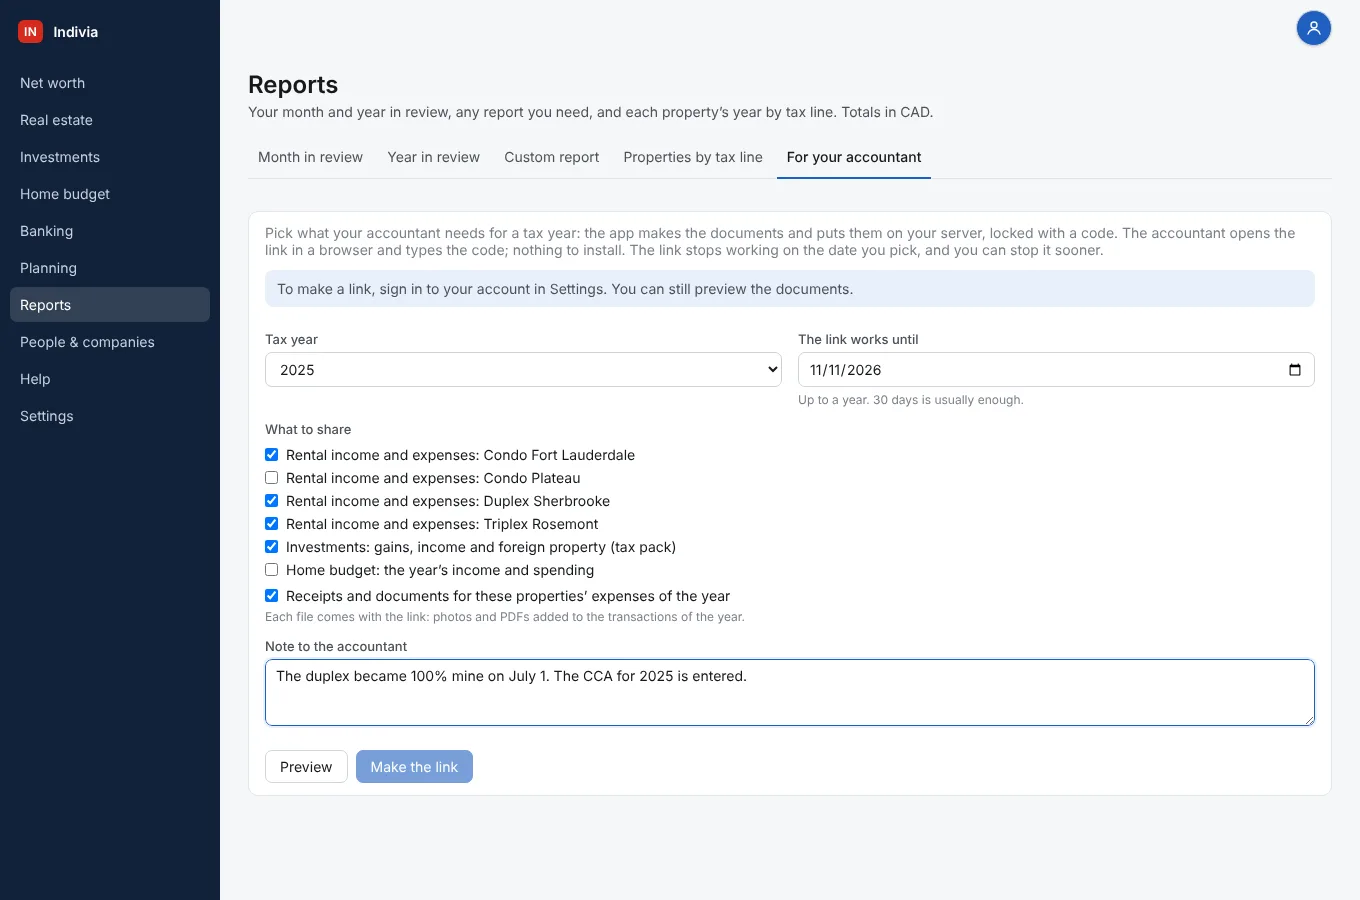
Step 1: Open Reports, For your accountant
Choose the Tax year and the date The link works until. Under What to share, check each property, the investment tax pack, the home budget if needed, and the receipts and documents of the year. Write anything the accountant should know in Note to the accountant.
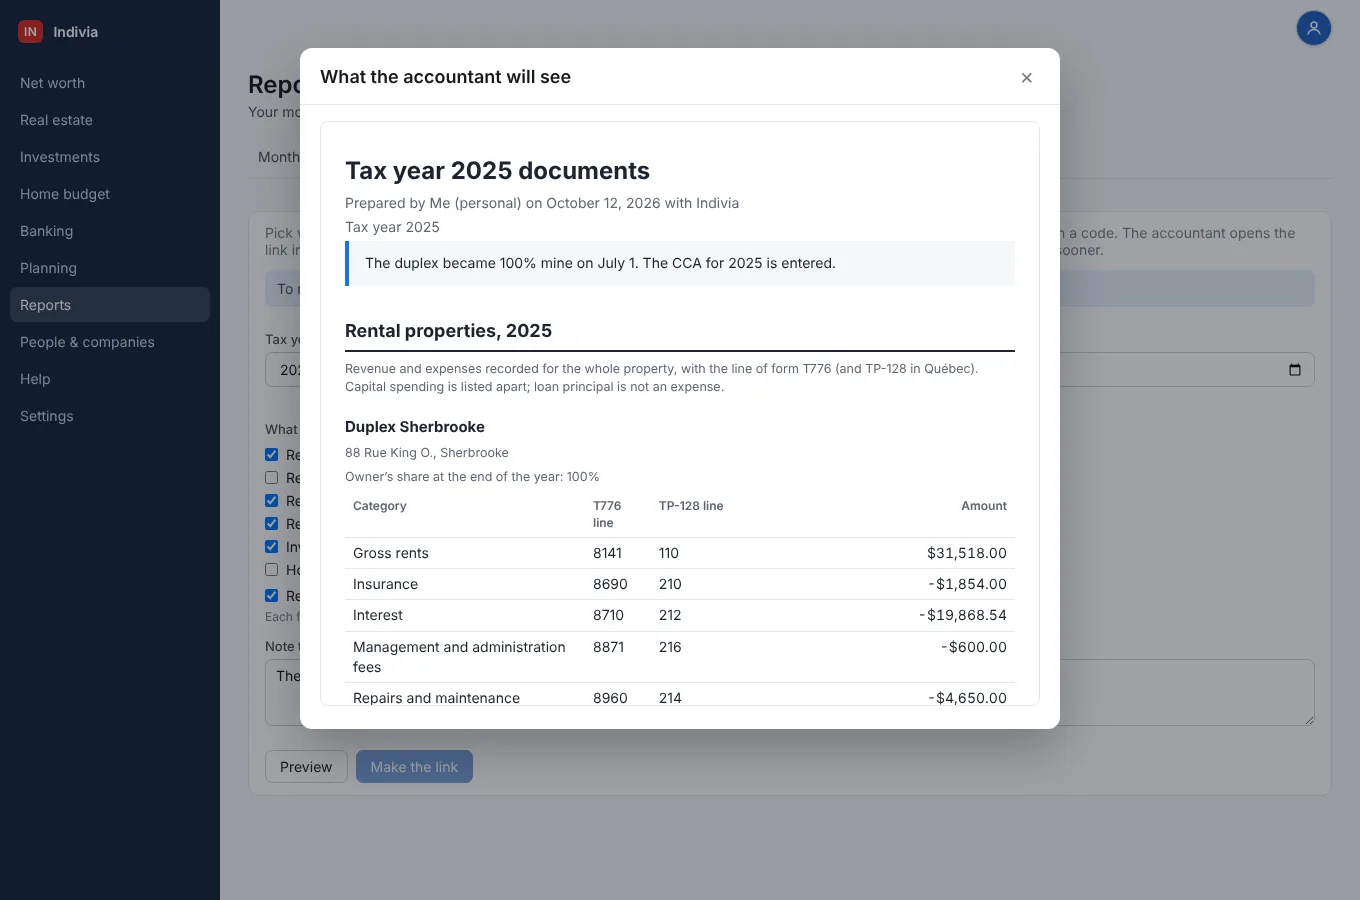
Step 2: Preview what they will see
Click Preview. It shows the documents exactly as the accountant will see them: your note, then each property’s revenue and expenses with the T776 and TP-128 lines, then the tax pack.
Step 3: Make the link
Click Make the link, then send the link and the code to the accountant, ideally by two different ways (an email and a text message). The link is listed under Your links, where you see if it was opened and can stop it sooner.
To make a link you need to be signed in to your account in Settings; without it, you can still preview the documents and print them.
Still a question? Write to support@indivia.app. Your message goes straight to the people who make the app.