Sharing, devices and safety
Sharing with your household, co-owners and an accountant
Your household: in Settings, Account and security, People in the household, invite your spouse or partner. They see and edit the same data on their own devices (or view only, if you choose).
A co-owner outside your household: open the property or account and share it with their email. They see and change only that item and what is attached to it, never the rest of your data.
Your accountant: For your accountant makes a link to the year’s documents (rental income and expenses, investments, budget, receipts). They open it in a browser with a code you send separately. The link stops working on the date you pick.
An item can also be made private: the rest of your household doesn’t see it.
Names in bold are the pages, tabs and buttons as the app shows them.
Step-by-step tutorials
Pick a way. The screens are shown with sample data.
- Co-owners and their sharesWho owns a property with you, and how much: a sister, a partner, a company.
- A co-owner from another householdThey see that property in their own app, and nothing else of yours.
- Someone in your householdYour spouse or partner sees and edits everything, on their own devices.
- Your accountantA link to the year’s documents, locked with a code, that stops on a date.
Co-owners and their shares
Record who owns what with you, even if they never use the app. Only your share counts in your net worth. Here, your sister buys 40% of your duplex; then a company you own half of shows how your share follows the chain.
Step 1: Open People & companies
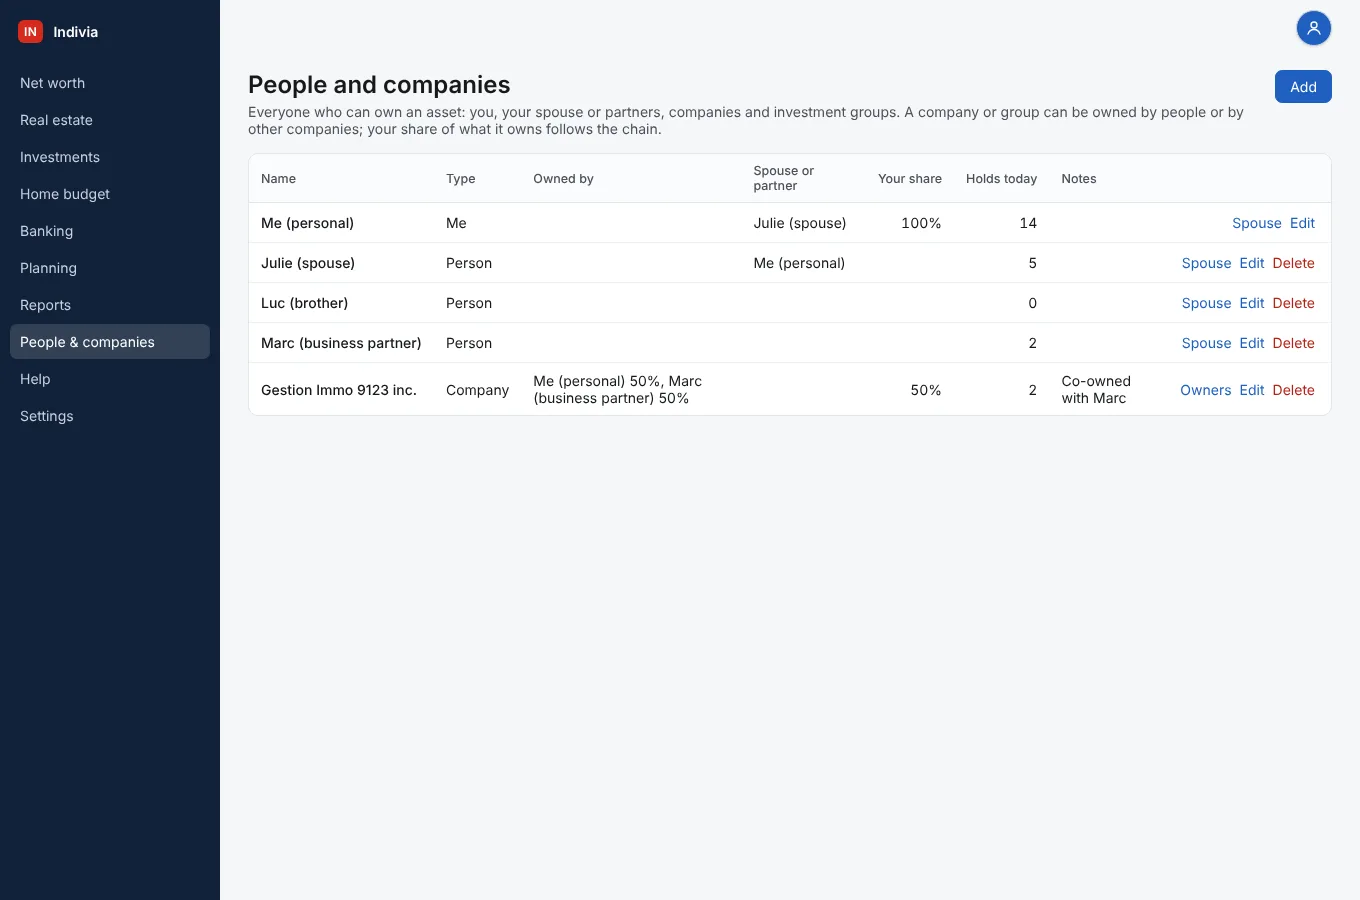
In the menu, click People & companies. The list shows you, the people and the companies that can own something, what each one holds today and your share of each company. Click Add.
Step 2: Add the co-owner
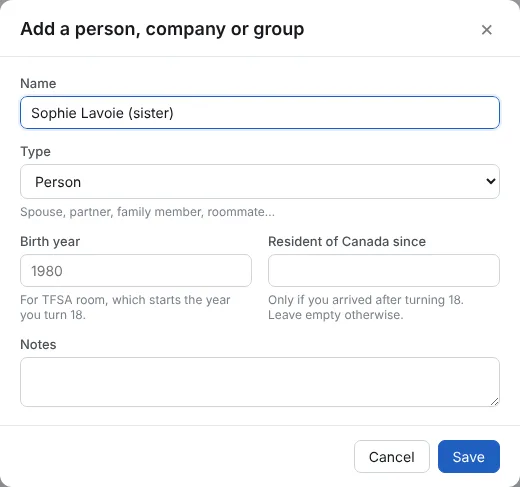
Type their Name and choose the Type: Person for a spouse, a relative or a friend; Company or Group for a business or an investment group. The birth year is only for TFSA room; leave it empty if you don’t need it. Click Save.
Step 3: Give each owner their share
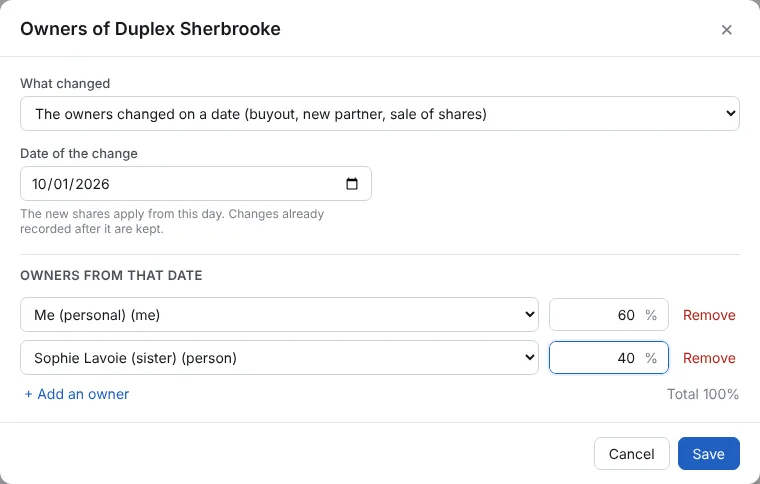
Open the property, then Property and the Owners tab, and click Change owners. In What changed, keep The owners changed on a date and type the Date of the change: the earlier owners stay in the history.
Change your own share, click + Add an owner, pick the new co-owner and type their share. The total is shown under the list. Click Save.
Step 4: Check the Owners tab
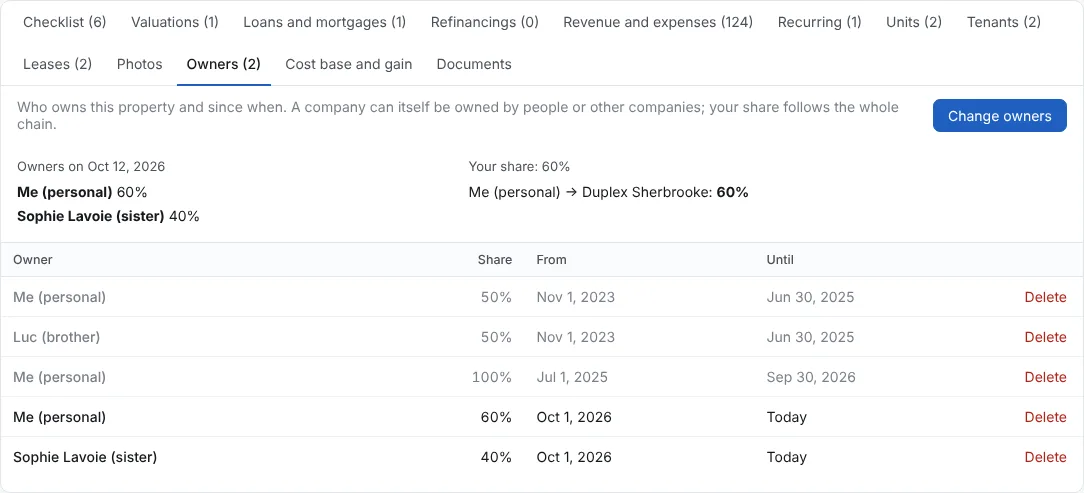
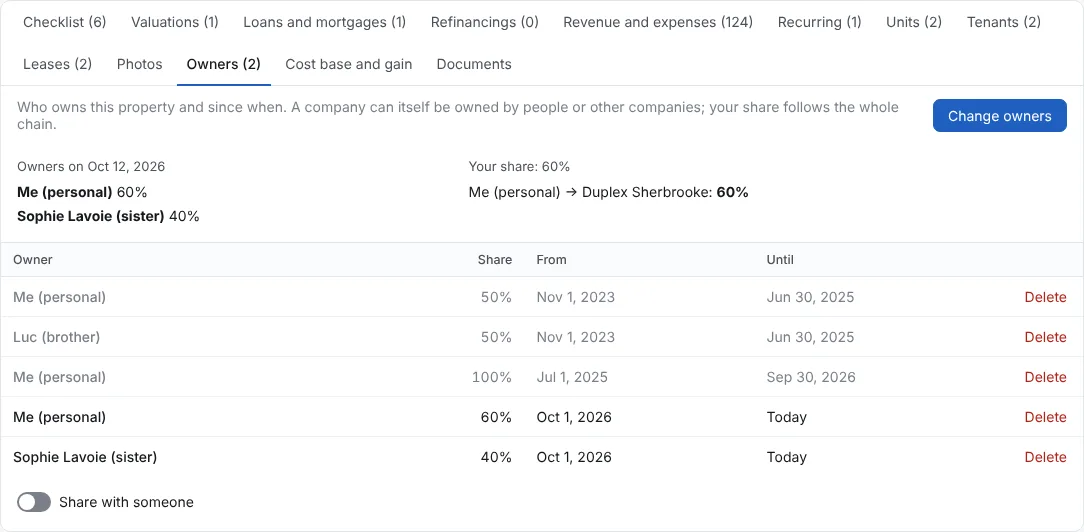
At the top: the owners today and Your share, here 60%. Below, every period since the purchase: 50% with Luc, then 100% after you bought his half, then 60% with Sophie. Reports, the net worth and the tax pages use the share of each date.
Step 5: A company and its owners
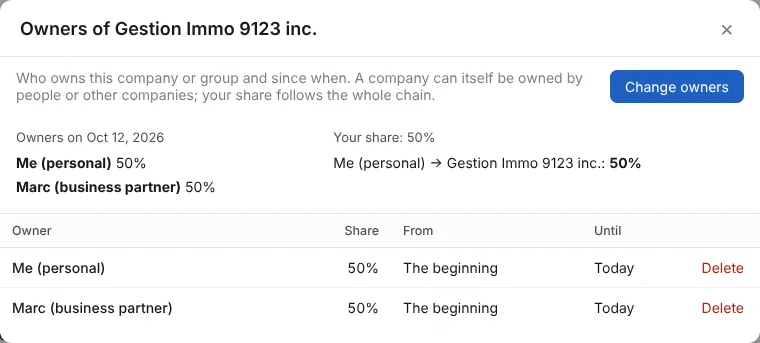
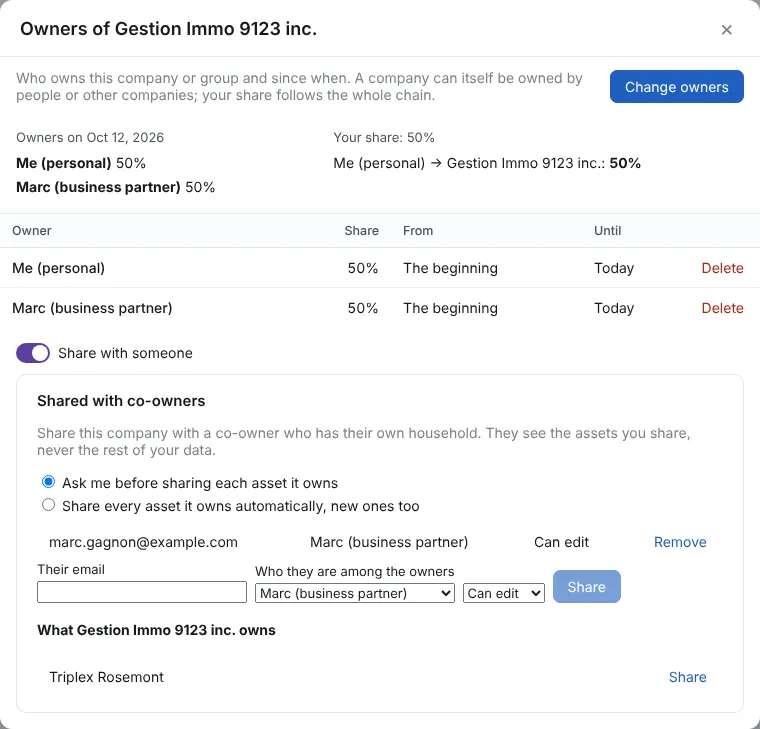
A company you own with someone works the same way. In People & companies, click Owners on the company’s row: here Gestion Immo 9123 inc. is owned 50% by you and 50% by Marc. Use Change owners after a sale of shares.
Step 6: Your share follows the chain
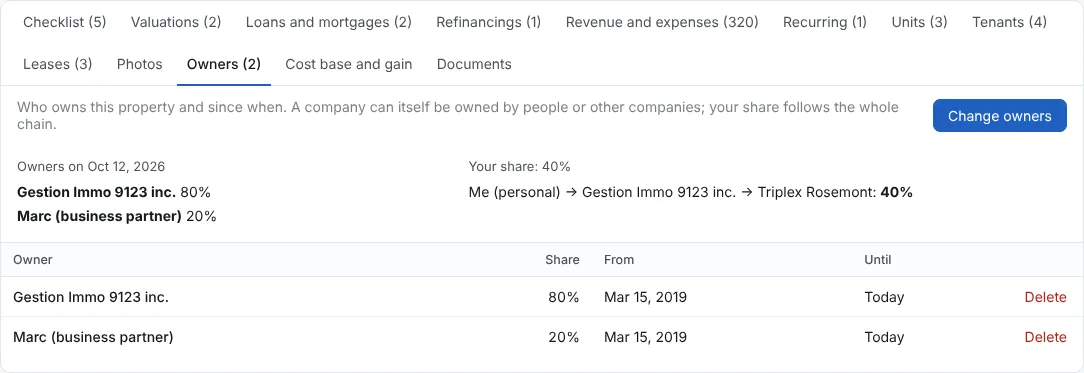
The Triplex Rosemont is owned 80% by the company and 20% by Marc. Its Owners tab shows the path: you → the company → the triplex, so your share is 50% × 80% = 40%.
A co-owner from another household
Your sister keeps her own finances in her own account. Share the duplex with her: she sees it, and her share counts in her net worth, but she never sees the rest of your data. This needs your account on Indivia’s server (Basic Connected or higher) (Settings, Account and security); the screens use a sample account.
Step 1: Turn on Share with someone
Open the property, then Property and the Owners tab. Under the owners, turn on Share with someone. Bank accounts, investment accounts and other items have the same switch on their page.
Step 2: Type their email and choose what they can do
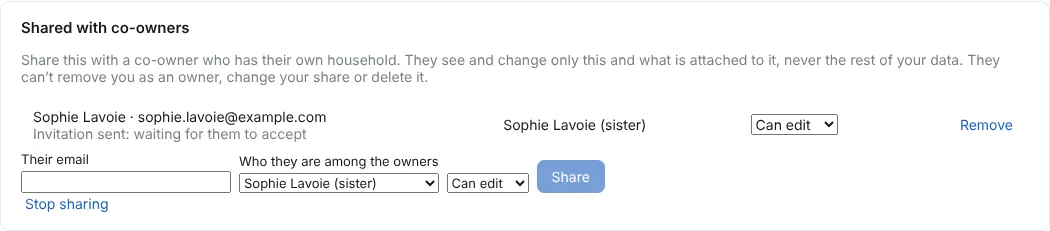
In Their email, type the email they sign in with. In Who they are among the owners, pick them, so their share is the one that counts for them. Choose Can edit or View only, then click Share.

Step 3: Waiting for them to accept
They are in the list with Invitation sent: waiting for them to accept. If they don’t have an account yet, it says Waiting for them to have an account, and they get an email.
You can change their access in the list, Remove them, or Stop sharing for everyone.
Step 4: On their side: accept
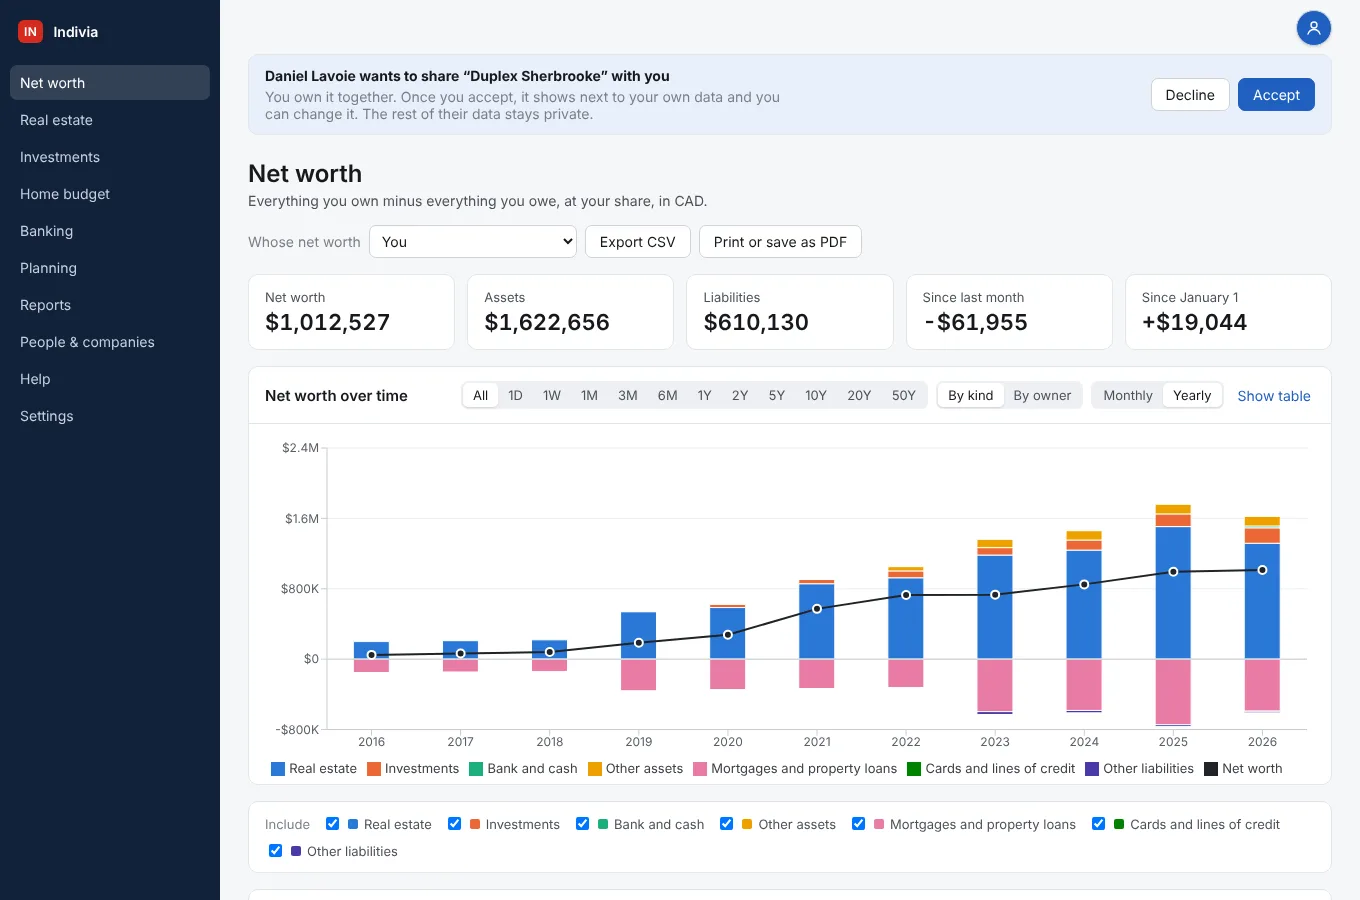
On their device, a notice shows at the top of every page: Daniel Lavoie wants to share “Duplex Sherbrooke” with you. They click Accept, or Decline if it’s a mistake.
Step 5: What they can do
The property shows in their app with the tag Shared with you, and their share is in their net worth. With Can edit, they can add expenses, valuations and documents, but not change the other owners’ shares or delete the property. Stop seeing it removes it from their devices; you keep it.

Step 6: Share a company
For a company owned with someone, open its Owners window in People & companies and turn on Share with someone the same way. Choose Ask me before sharing each asset it owns and click Share next to each one under “What it owns”, or Share every asset it owns automatically, new ones too.
Someone in your household
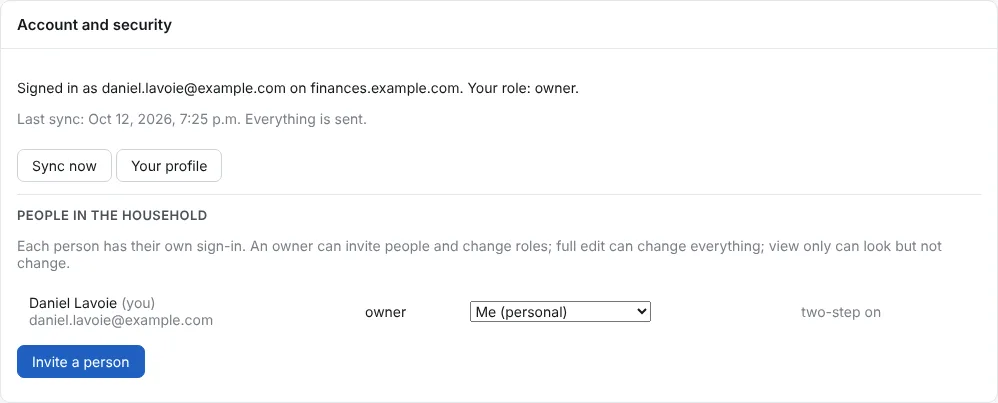
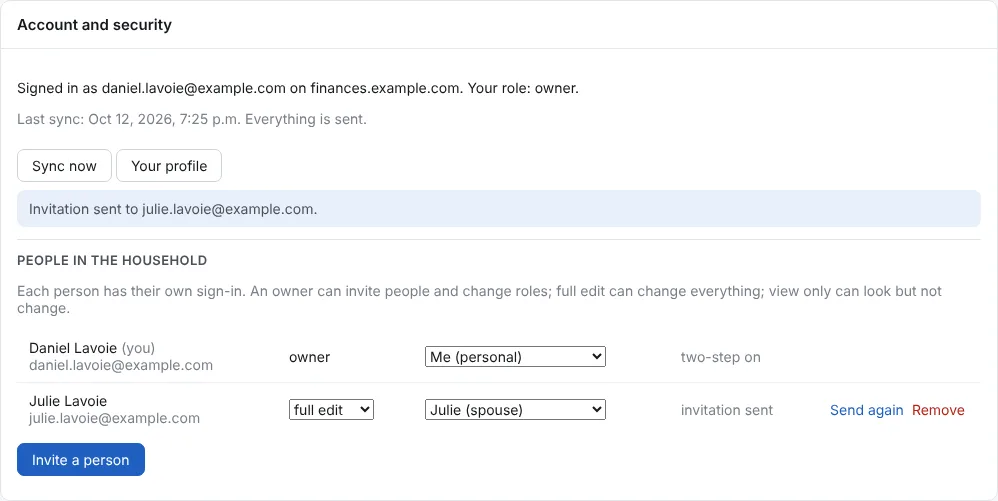
People in your household share all the data: each one has their own sign-in and their own devices. This needs your account on Indivia’s server (Basic Connected or higher); the screens use a sample account (daniel.lavoie@example.com).
Step 1: Open Settings, Account and security
In Settings, the Account and security section shows who you are signed in as and, under People in the household, everyone who can sign in. Only an owner can invite. Click Invite a person.
Step 2: Fill the invitation
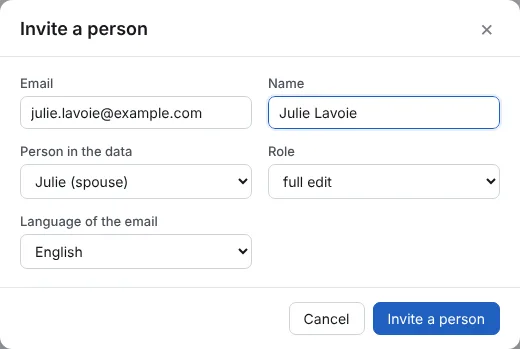
Type their Email and Name. In Person in the data, pick who they are among your people (here Julie), so the app knows which shares are theirs. Choose the Role: full edit changes everything, view only can look but not change. Pick the Language of the email and click Invite a person.
Step 3: The invitation is sent
They are in the list with invitation sent until they sign in. Send again sends the email again; Remove ends their access. You can change their role at any time.
Step 4: What they do next
They open the email, choose a password (or sign in with Google), then sign in to the app on their computer or phone with that email. Everything you entered comes over and stays up to date on every device.
Your accountant
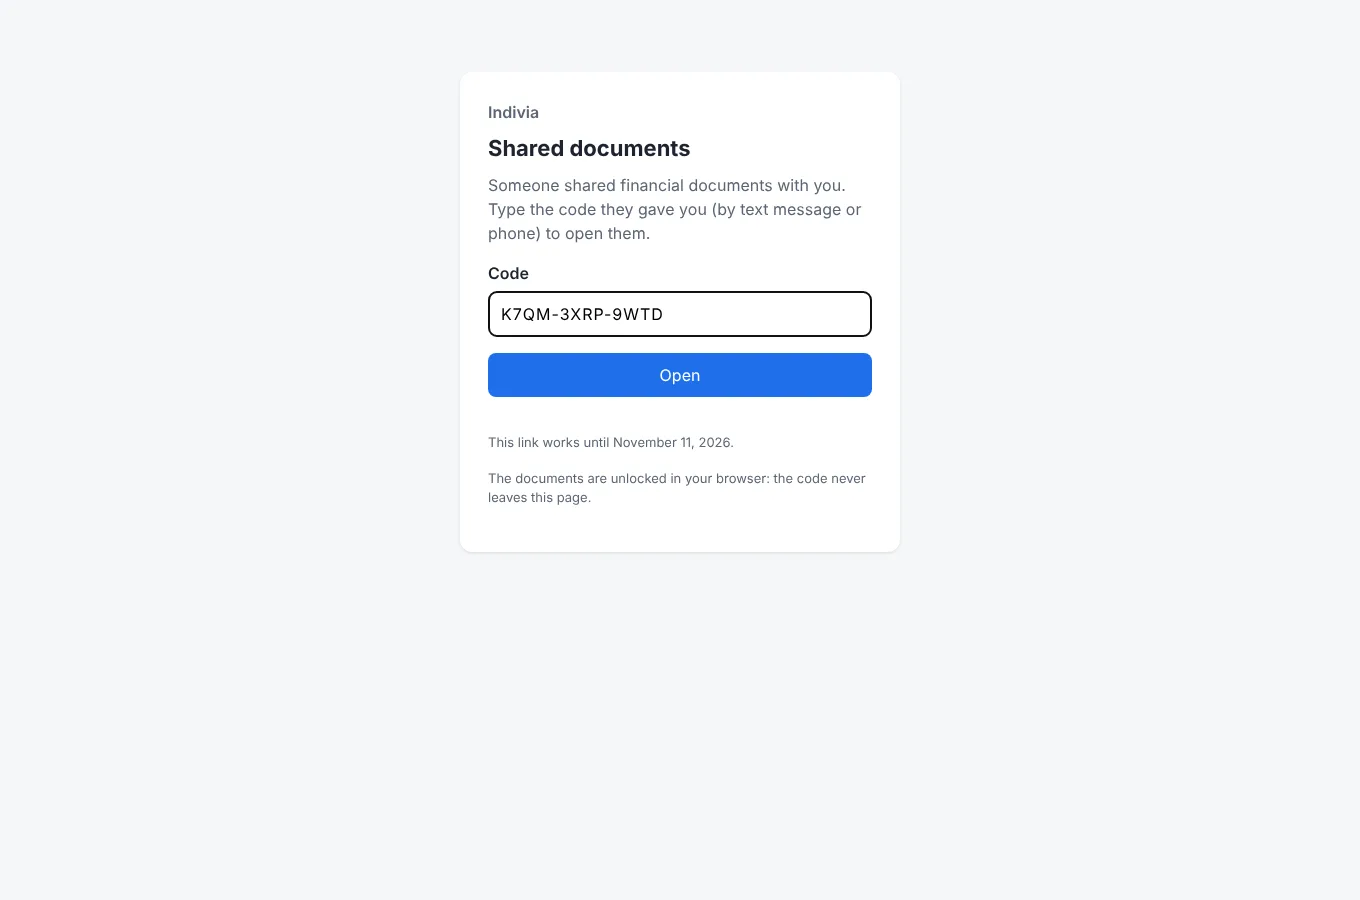
Your accountant doesn’t need an account or the app: they get a link and a code, and open the documents in a browser. Making the link needs your account on Indivia’s server (Basic Connected or higher); the preview works without it.
Step 1: Choose the year and what to share
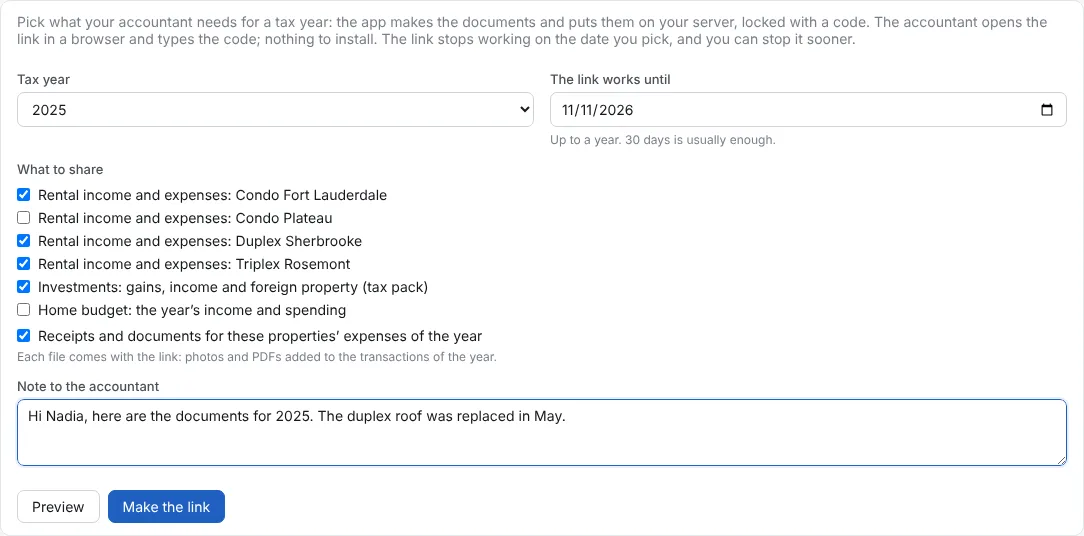
In Reports, open the For your accountant tab. Pick the Tax year and the date The link works until (30 days is usually enough).
Under What to share, tick the rental properties, the investments’ tax pack, the home budget and the receipts. Your home is left out unless you tick it. Add a Note to the accountant if you like.
Step 2: Check with Preview
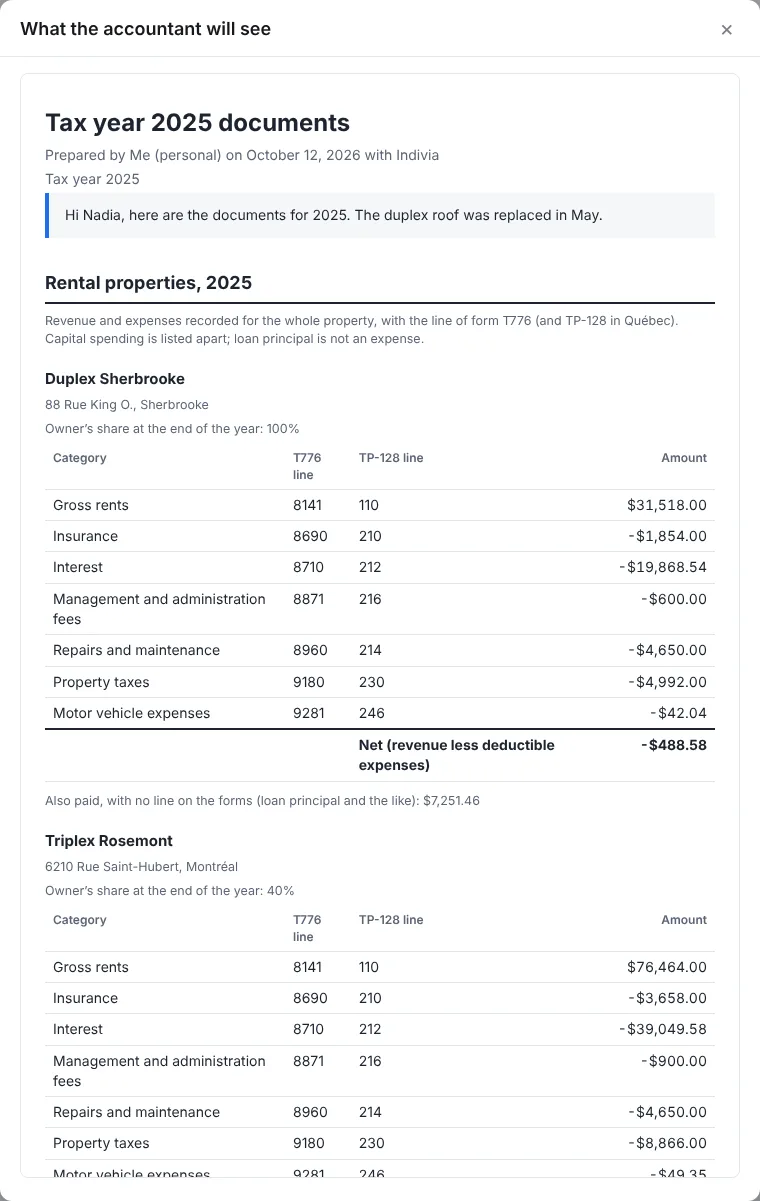
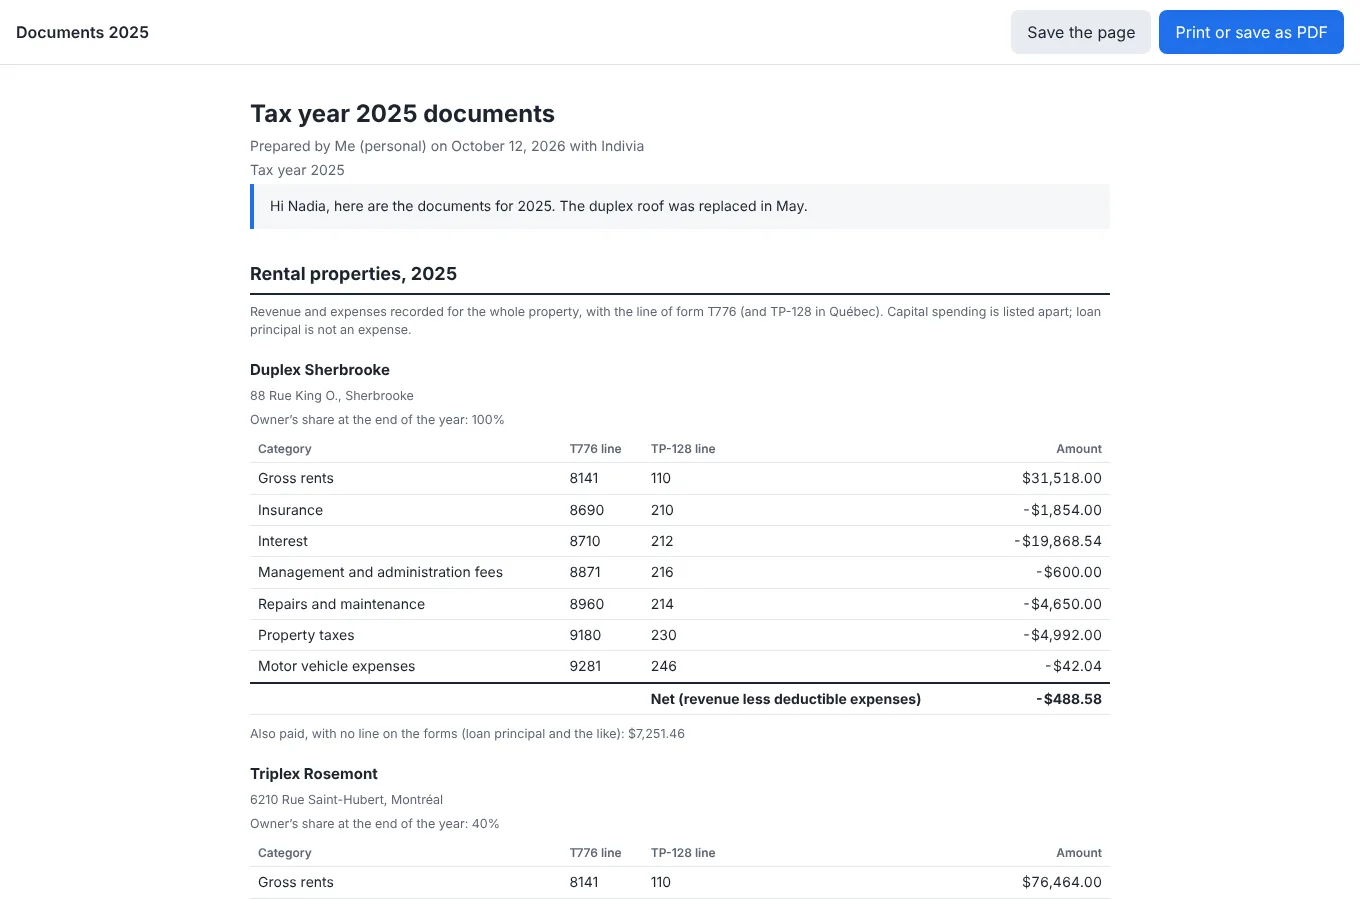
Click Preview to see exactly what the accountant will get: your note, then each property’s income and expenses with the T776 and TP-128 lines, and the rest you ticked. Close it to change your choices.
Step 3: Make the link
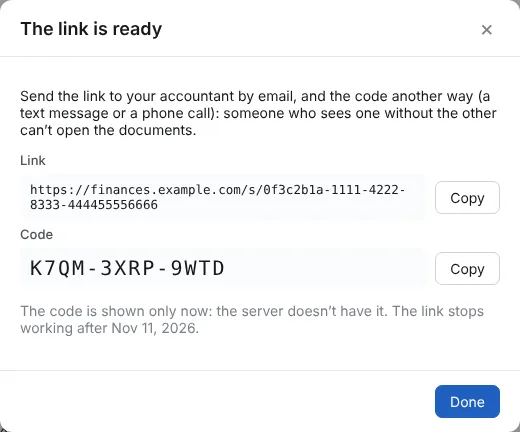
Click Make the link. Copy the Link and send it by email; send the Code another way, by text message or phone. The code is shown only now: the server doesn’t keep it. Click Done.
Step 4: Follow your links
Your links shows each link, until when it works, how many times it was opened and its status. Copy the link copies it again; Stop ends it right away.

Step 5: What your accountant sees
They open the link in any browser and type the code, then click Open. The documents open in the page, with Print or save as PDF and Save the page at the top. After the date you chose, the link no longer opens.
Still a question? Write to support@indivia.app. Your message goes straight to the people who make the app.