Before you sell, the Cost base and gain tab estimates the capital gain at today’s value, and the CCA recapture if the property is rented.
When the deed is signed, the Sell (wizard) button on the property records the sale in one go: the price, the selling costs, the mortgage paid out and the penalty, where the money goes, and what stops (loans, recurring entries, leases).
The tab then becomes Sale and gain: the capital gain, its taxable part, your share and the recapture. To fix a number, run the Sale wizard again; it replaces what it made before. Cancel the sale, in the same wizard, puts the property back as not sold. These are estimates, not tax advice.
Names in bold are the pages, tabs and buttons as the app shows them.
Step-by-step tutorials
Pick a way. The screens are shown with sample data.
- Before you sellWhat the gain and the recapture would be at today’s value.
- Record the sale with the wizardSix short steps from the notary’s papers. About five minutes.
- The capital gain and the recaptureWhat the sale means for your taxes, and what the wizard changed.
- Change or cancel a saleFix the price or a cost after saving, or cancel a sale that fell through.
Before you sell
Useful when you are thinking about selling, or to know the tax waiting on a property. You need the purchase date and price on the property. For a rental, also enter the CCA (capital cost allowance) claimed each year. The screens use the sample Triplex Rosemont.
Step 1: Open the property
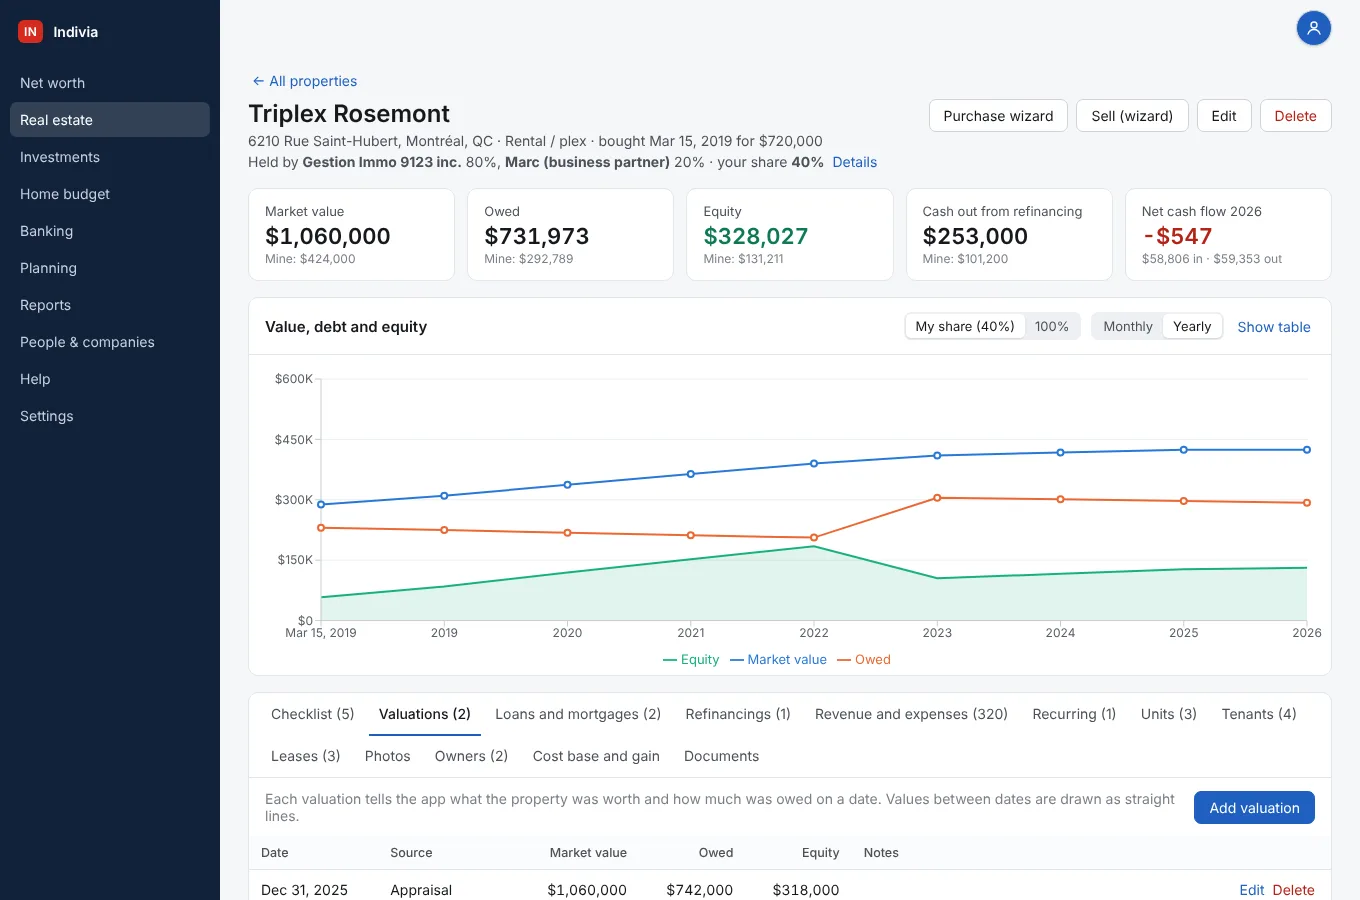
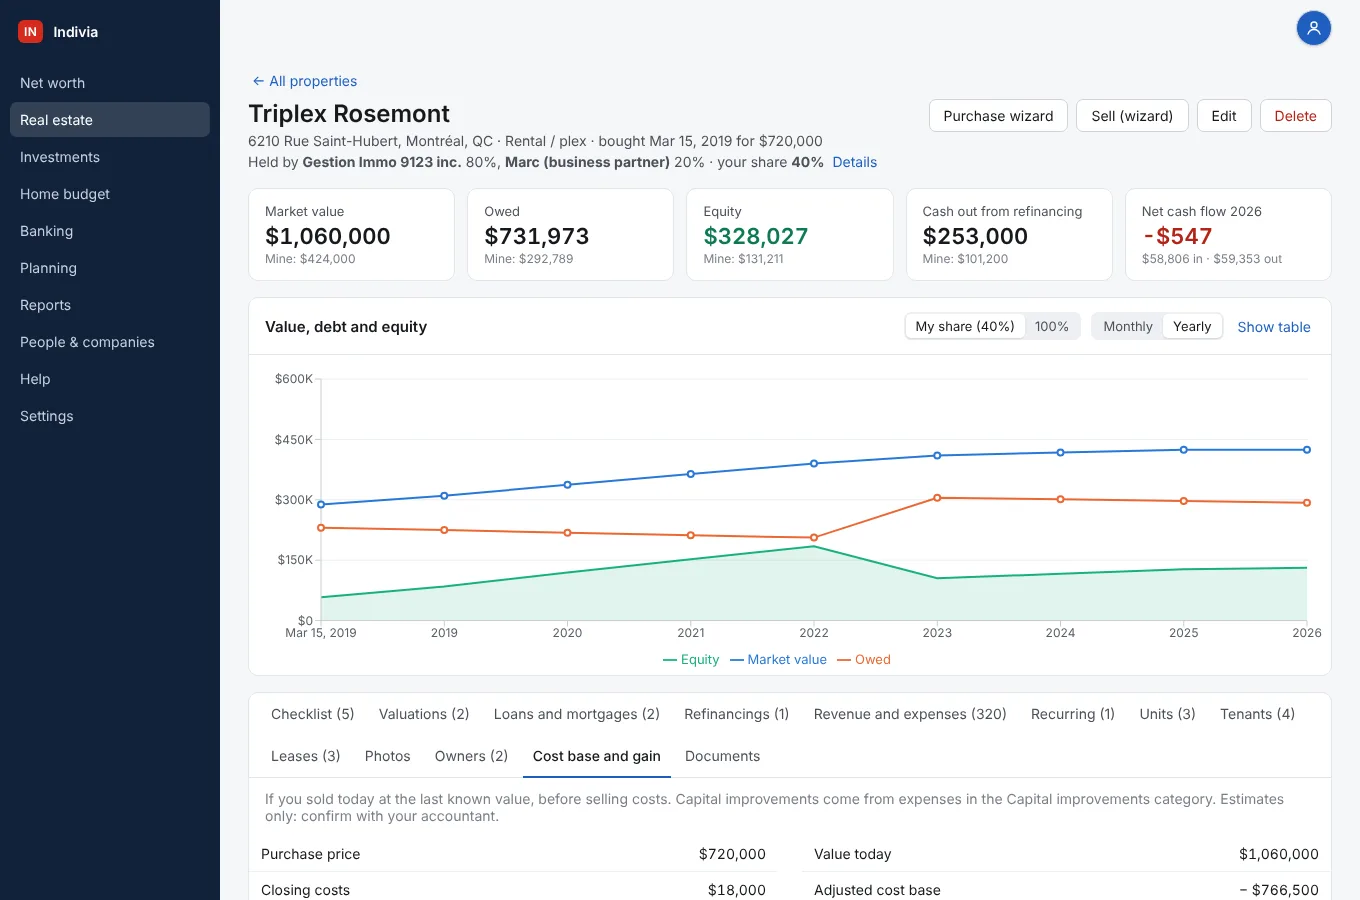
In Real estate, click the property in the list. The Sell (wizard) button is at the top right; you will use it on the day of the sale.
Step 2: Open the Cost base and gain tab
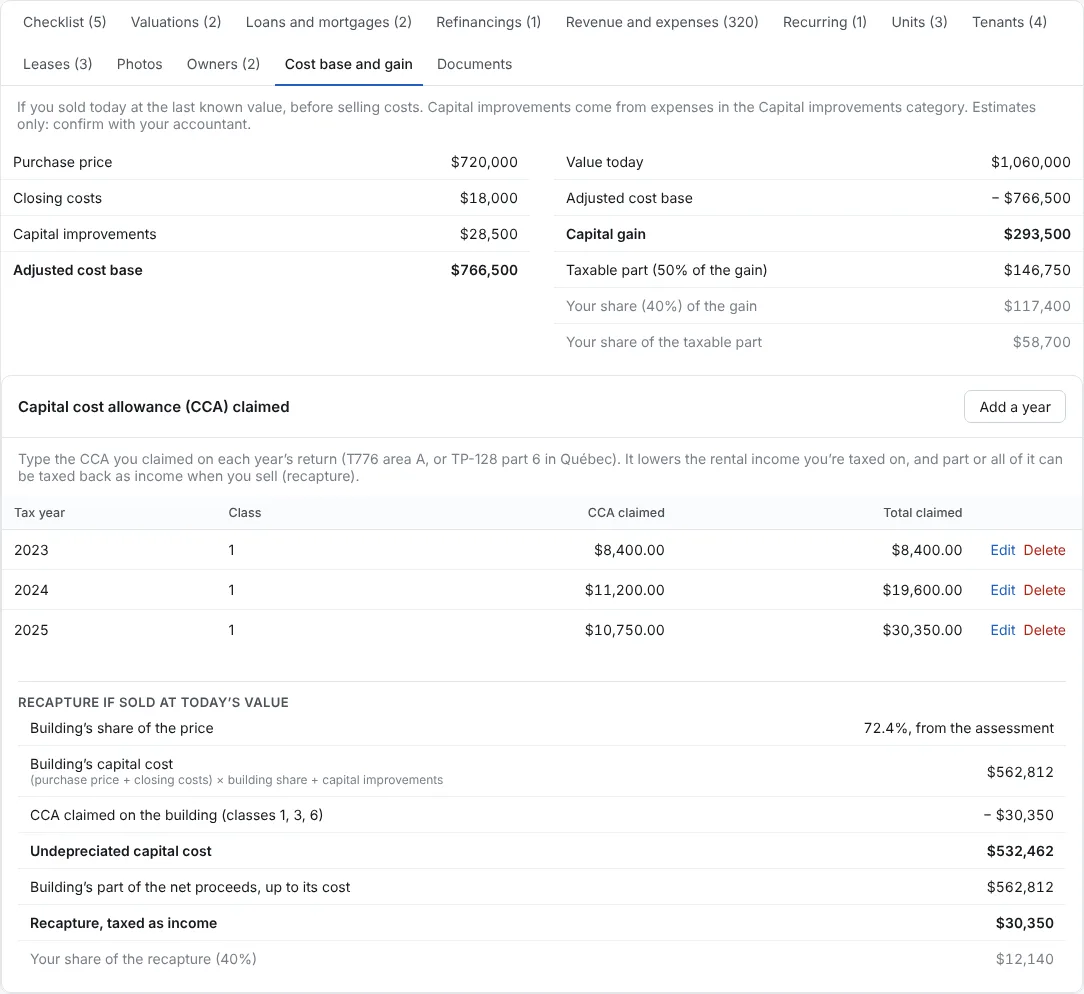
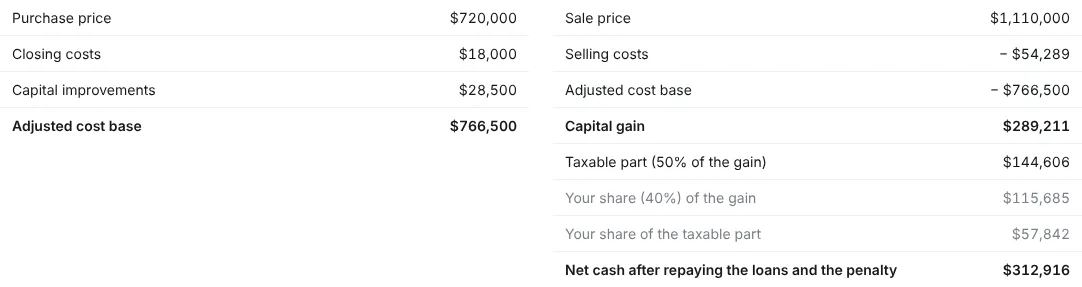
On the left, the Adjusted cost base: the Purchase price, the Closing costs and the Capital improvements (expenses in the Capital improvements category).
On the right, the Capital gain if you sold today at the last valuation, before selling costs, its Taxable part (50% of the gain) and your share. Below, the CCA claimed so far and the recapture.
Step 3: Add the CCA of a missing year
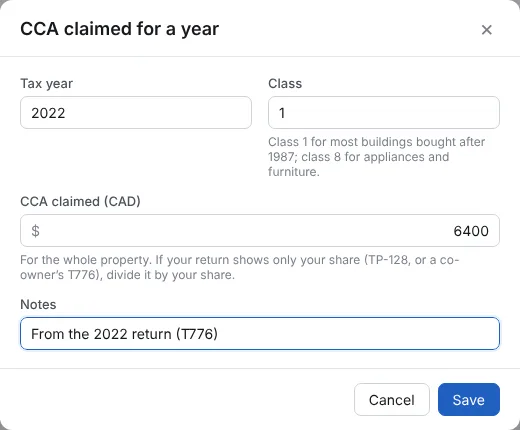
Click Add a year. Type the Tax year, the Class (1 for most buildings) and the CCA claimed for the whole property, as on your return (T776 area A, or TP-128 in Québec). A Notes line is optional. Click Save.
Step 4: Read the recapture if sold today
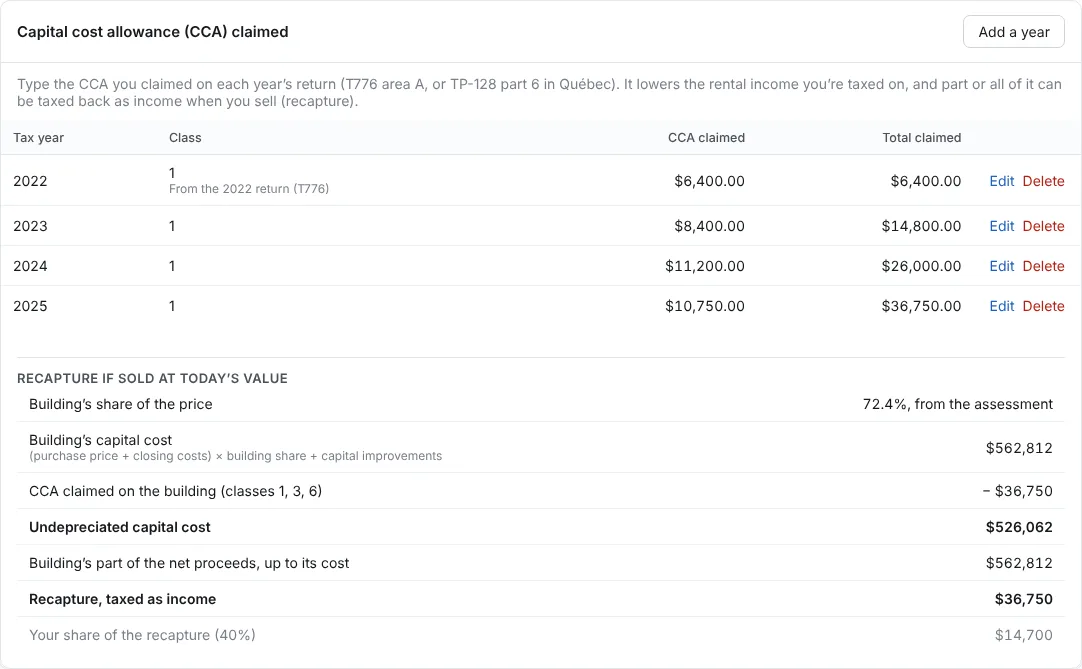
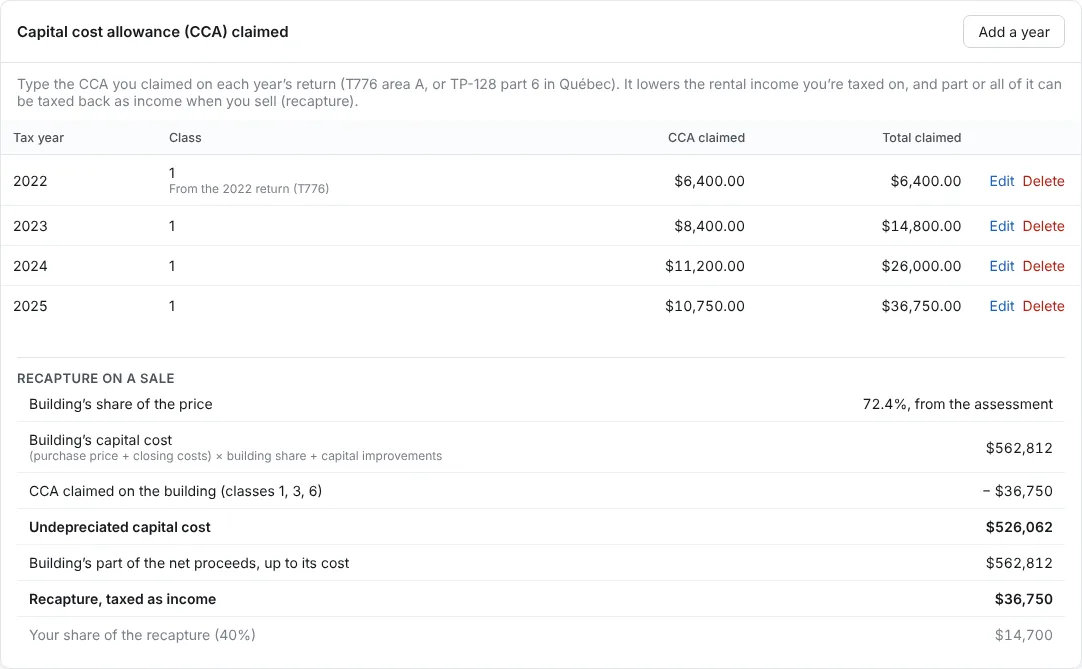
The year is in the list, with the Total claimed. Under Recapture if sold at today’s value: the Building’s share of the price (here from the municipal assessment), the Building’s capital cost, the CCA claimed, the Undepreciated capital cost, then the Recapture, taxed as income, and your share of it.
Record the sale with the wizard
For the day the deed is signed. Have the notary’s statement of adjustments and the lender’s payout statement handy. The wizard records everything in one go and marks each entry as coming from the wizard. Click Sell (wizard) on the property.
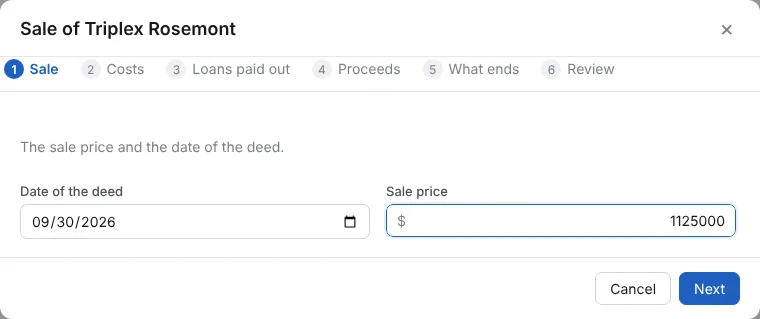
Step 1: Sale: the date and the price
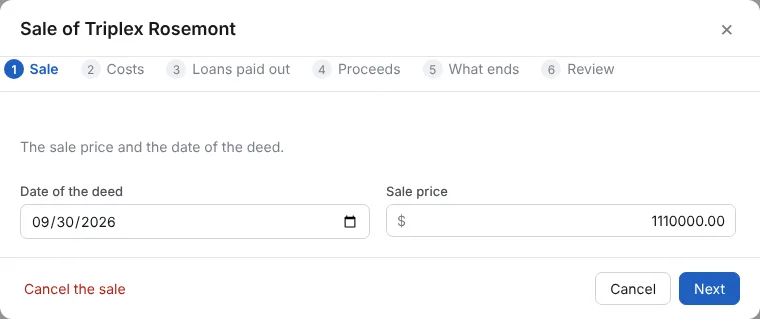
Type the Date of the deed and the Sale price of the whole property. Click Next.
Step 2: Costs: what selling cost you
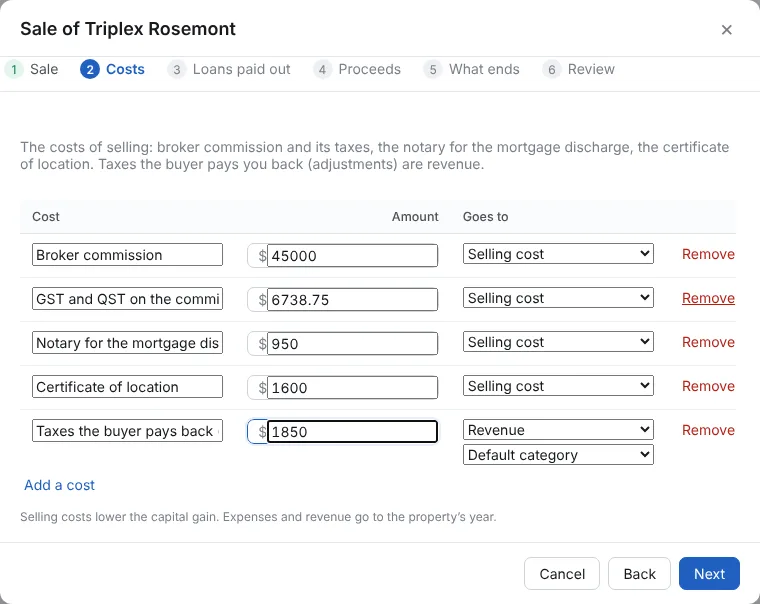
The usual lines are there: Broker commission, GST and QST on the commission, Notary for the mortgage discharge, Certificate of location. Type the amounts; leave a line empty if it doesn’t apply.
Goes to says how each line counts: a Selling cost lowers the capital gain, an Expense or a Revenue goes to the property’s year. Taxes the buyer pays back (adjustments) is a revenue. Add a cost adds a line.
Step 3: Loans paid out: the mortgage and the penalty
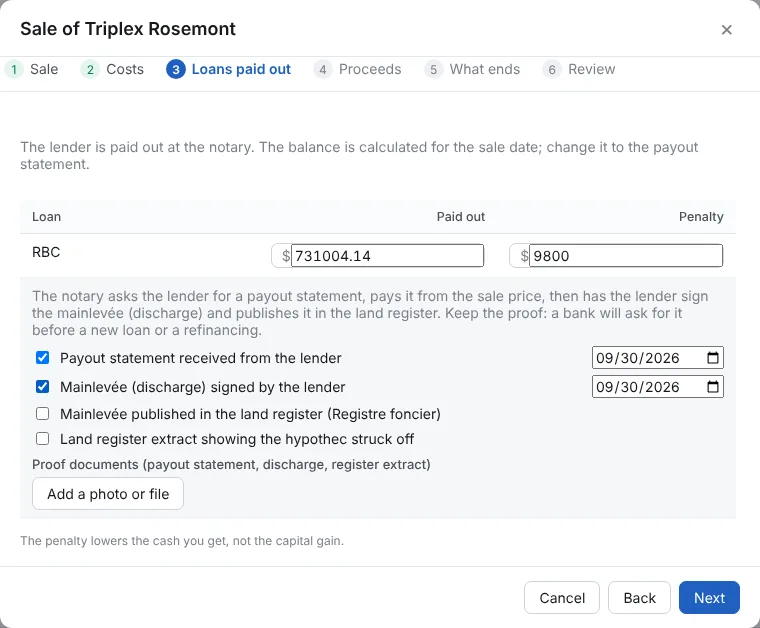
Each loan open on the sale date is listed with its balance on that day. Change Paid out to the amount on the payout statement and type the Penalty, if any. The penalty lowers the cash you get, not the capital gain.
Below, check the discharge steps as they are done (payout statement, mainlevée, land register) and add the proof with Add a photo or file: a bank will ask for it before a new loan.
Step 4: Proceeds: where the money goes
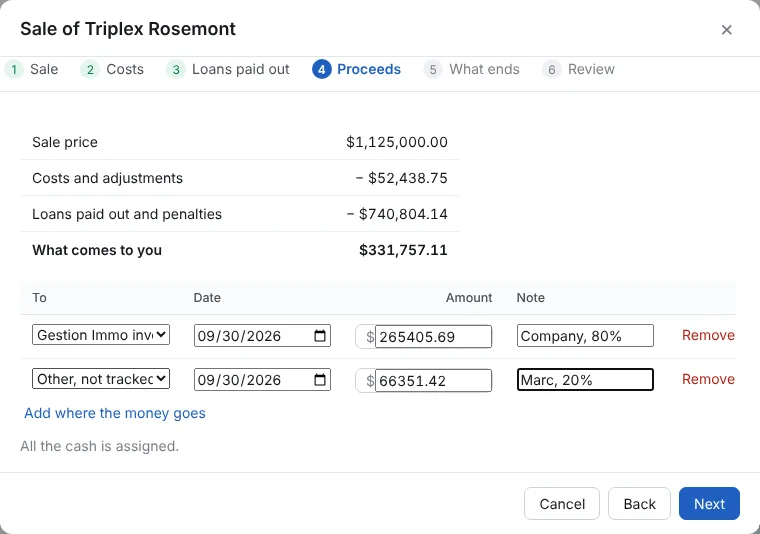
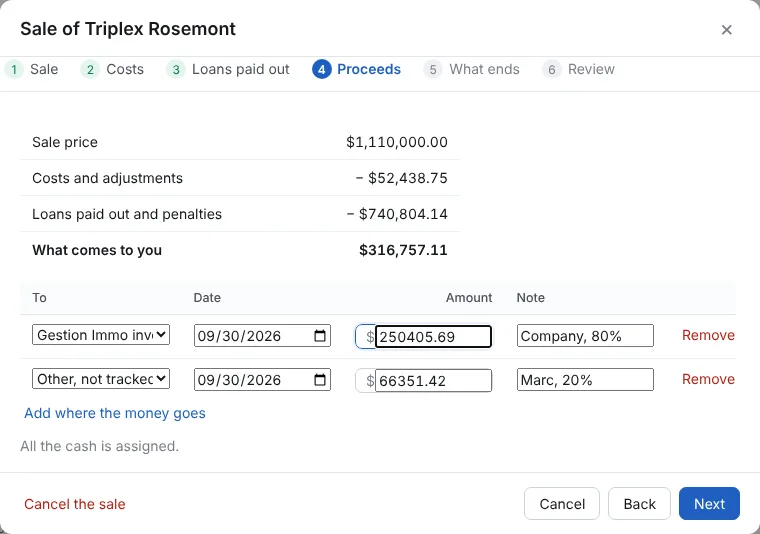
The top shows the Sale price, the Costs and adjustments, the Loans paid out and penalties, and What comes to you.
Click Add where the money goes and pick an account: the row starts with all that is left. Here the company’s 80% goes to its investment account, and a second row puts Marc’s 20% under Other, not tracked. When the message says All the cash is assigned., click Next.
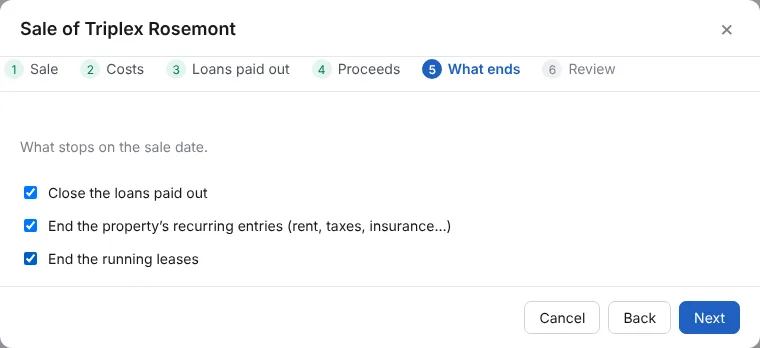
Step 5: What ends on the sale date
Close the loans paid out and End the property’s recurring entries are checked for you. Check End the running leases too if the tenants leave or their leases go to the buyer.
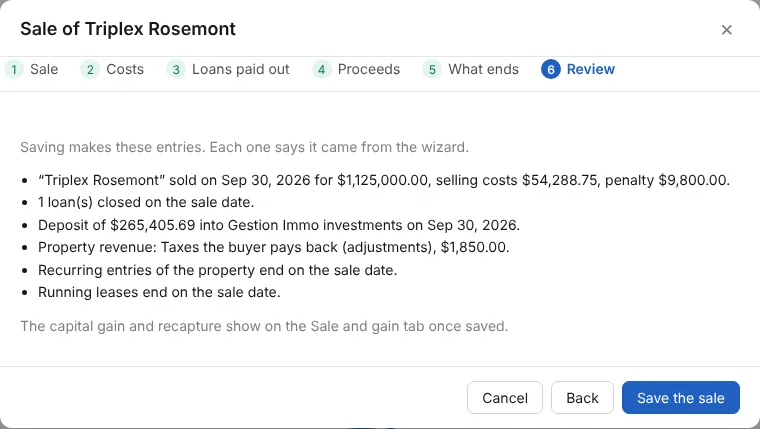
Step 6: Review, then Save the sale
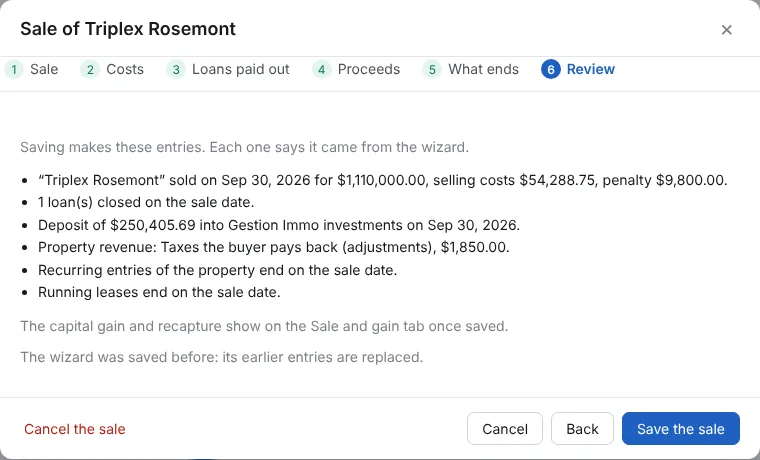
The list says each entry the wizard will make: the sale, the loans closed, the deposits, the revenue and expenses, and what ends. Use Back to fix anything, then click Save the sale.
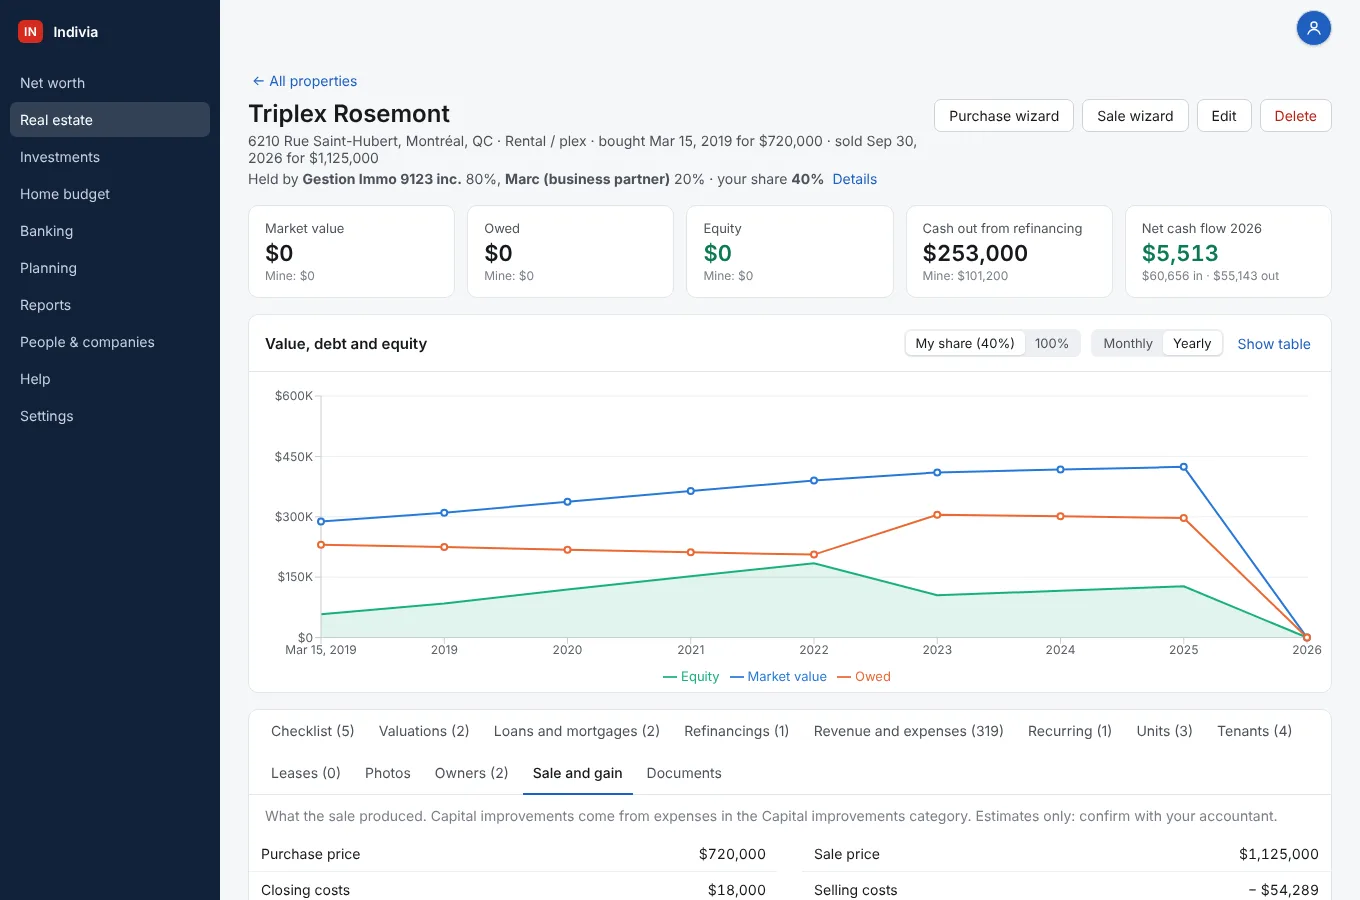
Step 7: The property is marked as sold
The top of the page says when it sold and for how much. The value, the debt and the equity drop to $0 from the sale date, so your net worth no longer counts it; the history before the sale stays.
The capital gain and the recapture
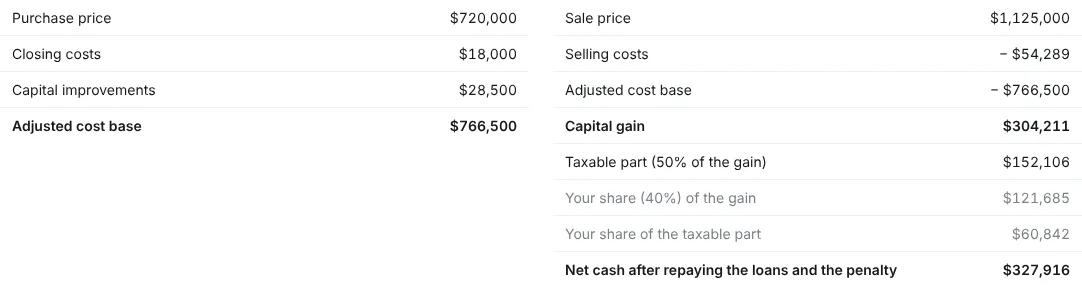
Once the sale is saved, the Cost base and gain tab is renamed Sale and gain and uses the real sale price and selling costs.
Step 1: The capital gain
The Sale price, minus the Selling costs and the Adjusted cost base, gives the Capital gain. Then come the Taxable part (50% of the gain), your share of each, and the Net cash after repaying the loans and the penalty.
For a principal residence, the exemption shows here too, with the years designated.
Step 2: The recapture on the sale
Below the CCA list, Recapture on a sale uses the sale: the building’s part of the net proceeds, up to its cost, minus the Undepreciated capital cost gives the Recapture, taxed as income. If the building sold for less than what is left, a Terminal loss, deductible shows instead.
Step 3: Check what the wizard changed
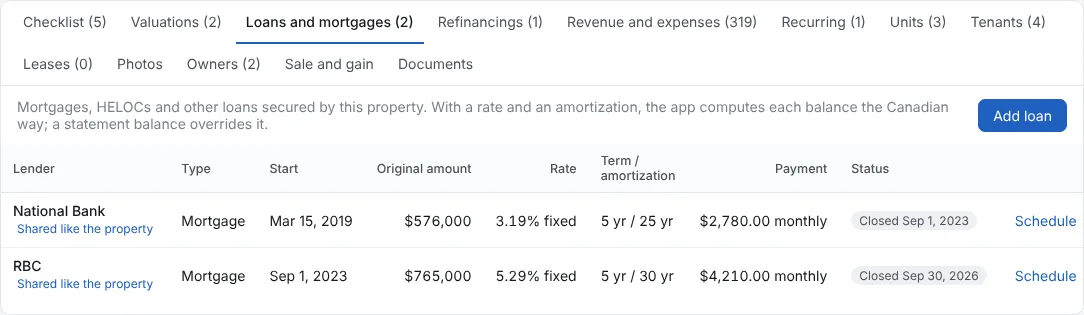
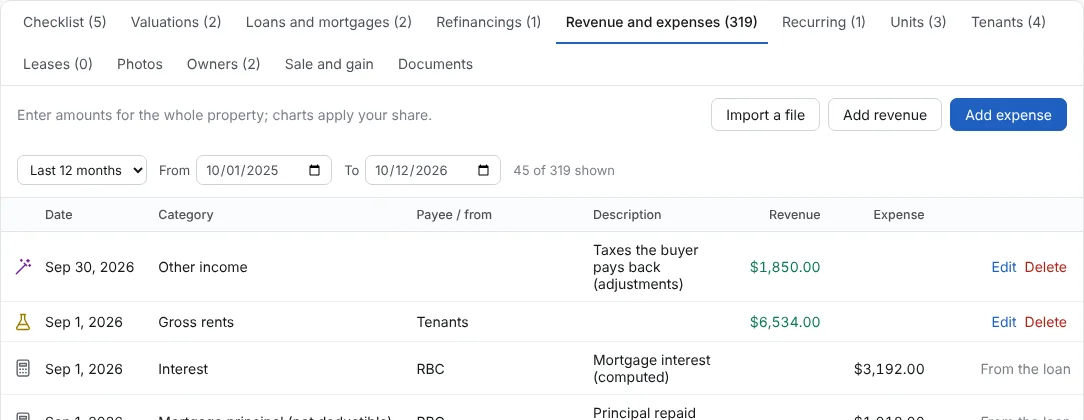
In Loans and mortgages, the mortgage shows Closed and the sale date. In Revenue and expenses, the entries made by the wizard have a magic wand icon, like the buyer’s tax adjustments here.
Change or cancel a sale
The final figures from the notary are often a little different. You don’t need to undo anything by hand: the wizard remembers what you typed and replaces its own entries when you save again.
Step 1: Click Sale wizard
On a sold property, the Sell (wizard) button is now called Sale wizard.

Step 2: Change what is wrong
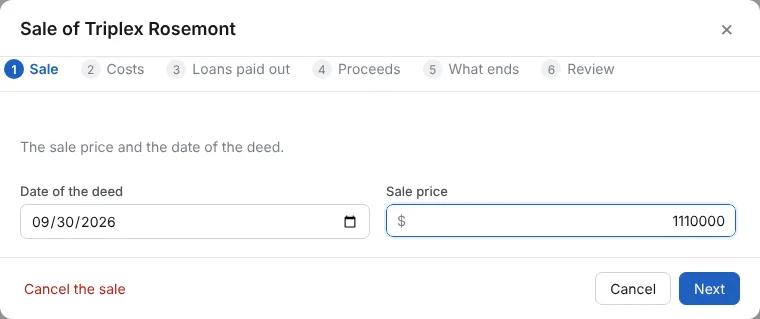
Everything you typed is back, step by step. Here the Sale price goes from $1,125,000 to $1,110,000. Click Next to go through the steps.
Step 3: Balance the proceeds again
With a lower price, the red message says how much more is assigned than needed. Lower the amount of the account row until it says All the cash is assigned.
Step 4: Save again
The review now says The wizard was saved before: its earlier entries are replaced. Click Save the sale: the old entries are removed, what it closed is reopened, then the new ones are made.
Step 5: The gain follows
The Sale and gain tab shows the new price, gain and taxable part right away.
Step 6: Cancel a sale that fell through
Open the Sale wizard and click Cancel the sale, at the bottom left. The app asks you to confirm. Its entries are deleted, the property is no longer sold, and the loans, leases and recurring entries it ended start again. The Sell (wizard) button is back.
Still a question? Write to support@indivia.app. Your message goes straight to the people who make the app.