Add an account on the Home budget page: chequing, savings, credit cards, lines of credit and cash.
Open the account and use Import a file with the file downloaded from your bank’s website (CSV, OFX, QFX or QIF), or an RBC chequing or Visa statement in PDF. Nothing is saved until you confirm the preview, and rows already imported are skipped. You can also add transactions by hand, split one between categories, and enter transfers between your accounts.
Give each transaction a category. Rules (button on the Home budget page) categorize the same merchant for you next time. The categories themselves are in Settings, Budget categories.
The monthly budget compares what you planned to what you spent, by category; the year view shows month by month. Recurring entries (pay, rent, phone) wait on To confirm when due. Reconcile checks an account against its statement.
Names in bold are the pages, tabs and buttons as the app shows them.
Step-by-step tutorials
Pick a way. The screens are shown with sample data.
- Add an accountA chequing account, a credit card or cash, in a minute.
- Import a bank fileThe file from your bank’s website, checked row by row before anything is saved.
- Categories and rulesClassify what is left once; rules suggest the category next time.
- The monthly budgetPlan an amount per category and see what is left, month by month.
Add an account
Every account you spend from goes in Home budget: chequing, savings, credit cards, a line of credit and cash. Only the name is required; the balance can come from your bank’s file.
Step 1: Open Home budget
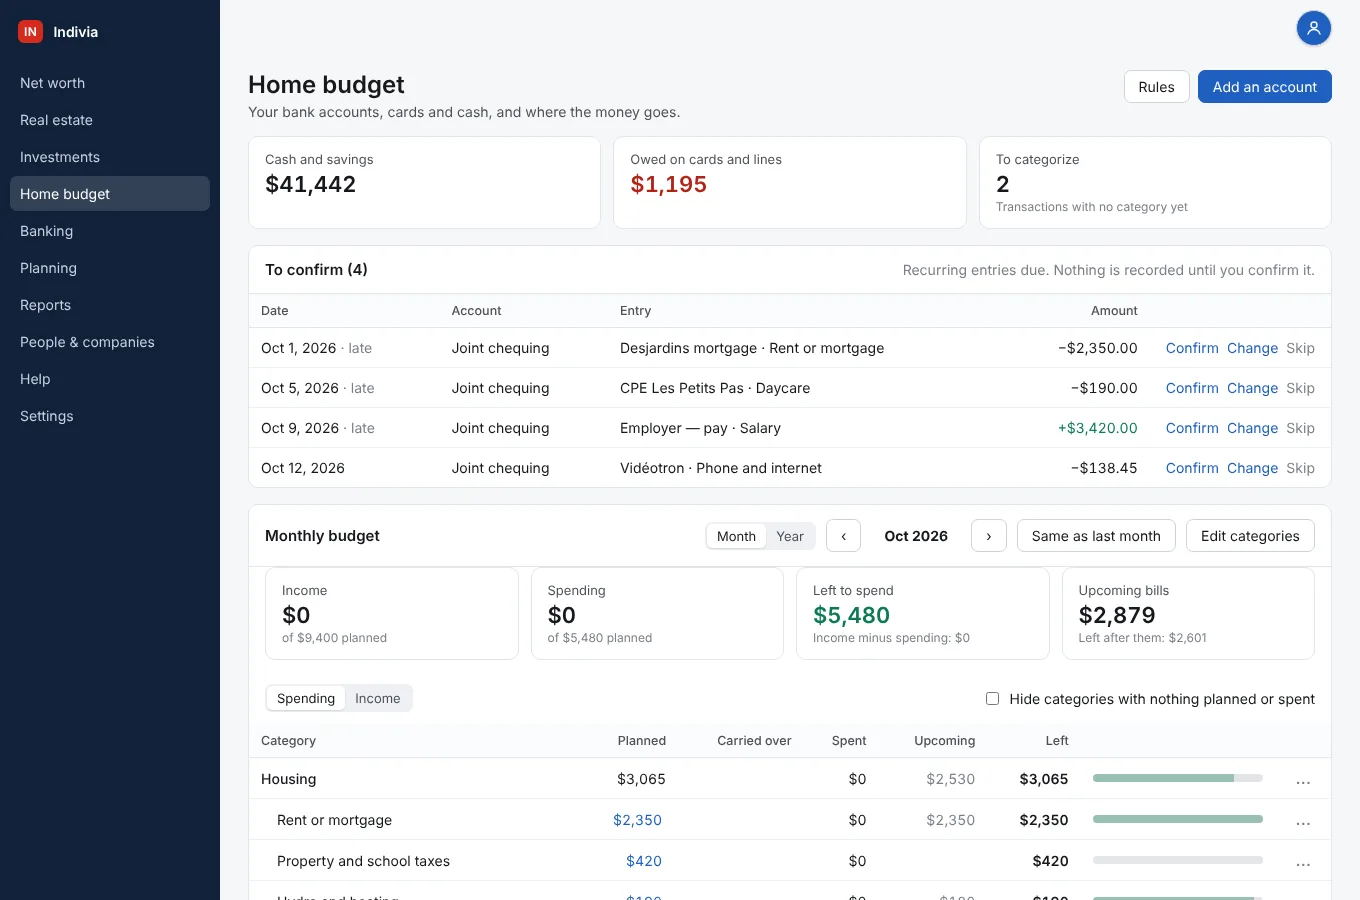
The page shows what you have in cash and savings, what you owe on cards and lines, and how many transactions still need a category. Below come the entries to confirm, the monthly budget and your accounts. Click Add an account at the top right.
Step 2: Name it and pick its bank and type
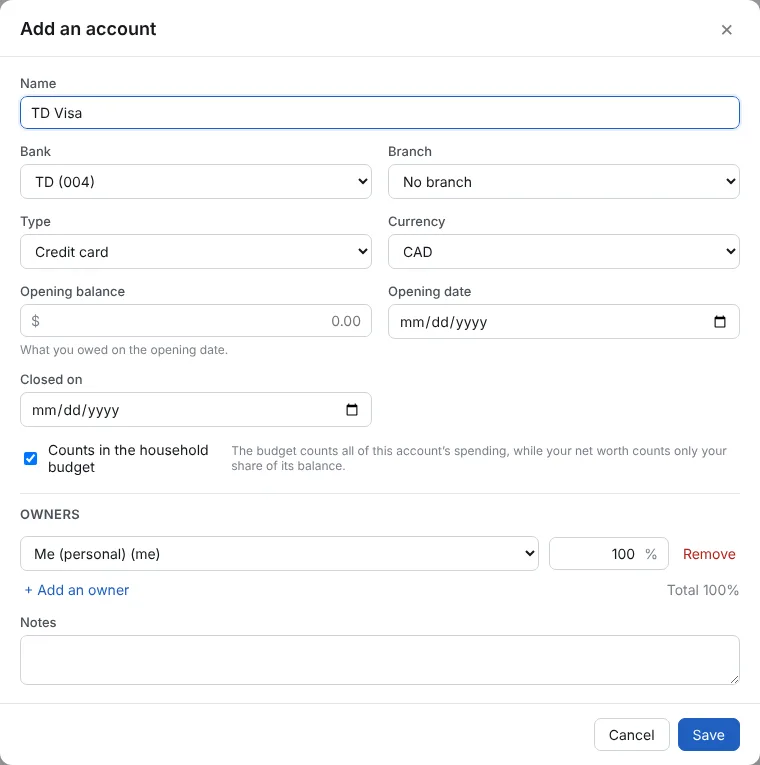
Type the Name, for example “TD Visa”, pick the Bank and set Type to Chequing, Savings, Credit card, Line of credit or Cash.
Leave the Opening balance and Opening date empty if you will import the bank’s file: the import offers to start the account at the right balance. For a card, the opening balance is what you owed.
Counts in the household budget stays checked for an account you spend from. If you share it, change the Owners shares. Click Save.
Step 3: The account opens, empty
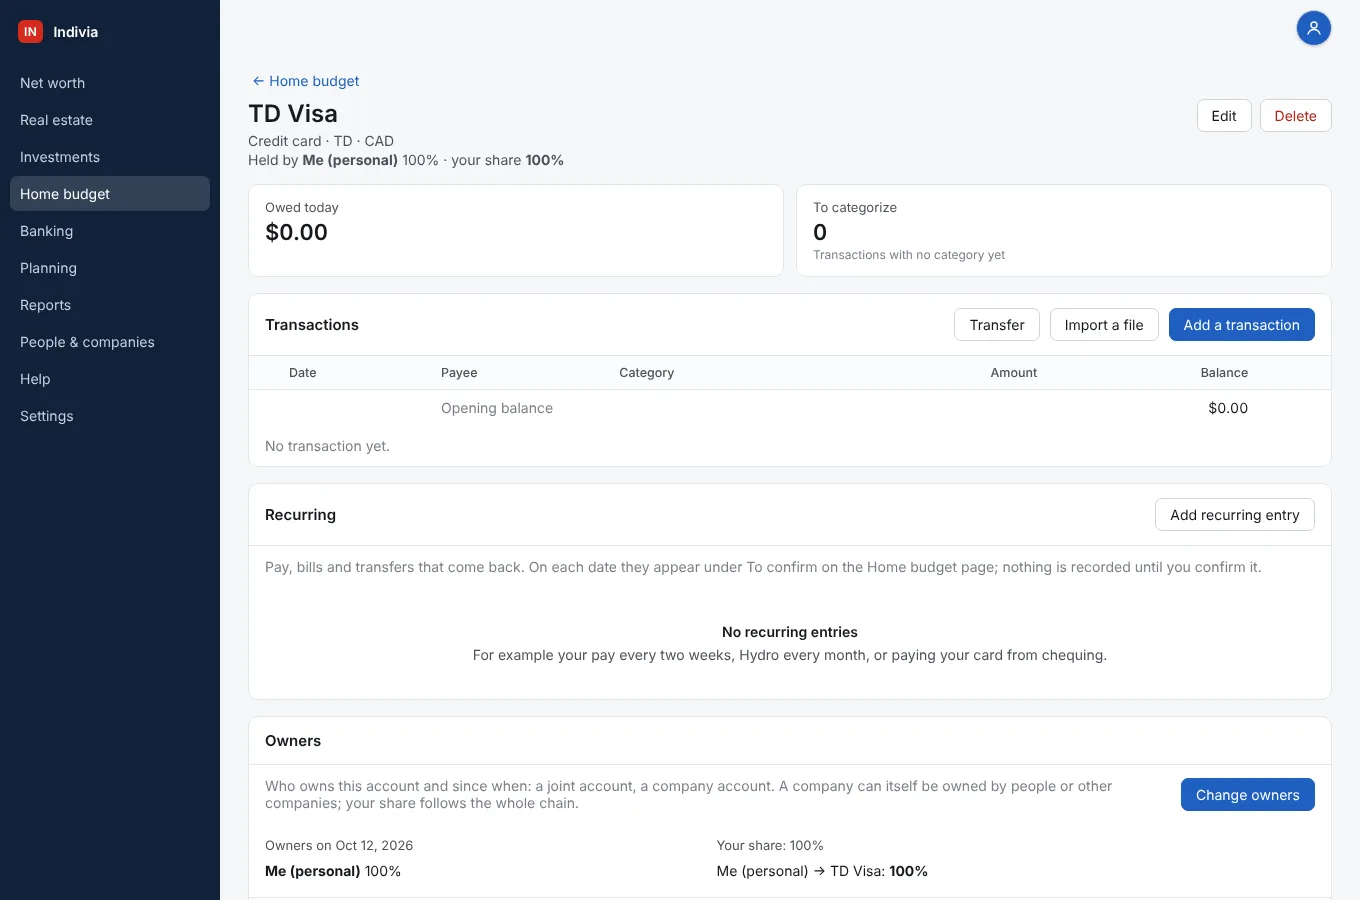
Its page shows what you owe (or the balance) and how many transactions are left to categorize. The Transactions card has the buttons to Import a file or Add a transaction by hand.
Step 4: It is in your list of accounts
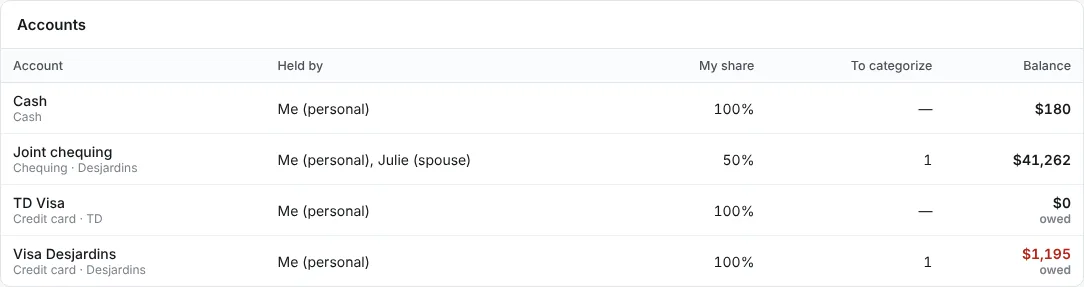
Back on Home budget, the Accounts card lists each account with who holds it, your share, how many transactions are left to categorize and its balance. A card shows what is owed. Click an account to open it.
Import a bank file
Download the activity from your bank’s website as CSV, OFX or QFX (a QIF file from Quicken works too). TD and CIBC files are recognised; for any other bank, you match the columns once. Rows already imported are skipped, so overlapping periods are safe.
Step 1: Open the account and click Import a file
Click Choose a file and pick the file you downloaded.
No file from your bank, or older history to add? Download the import template, fill one row per transaction and import it the same way.
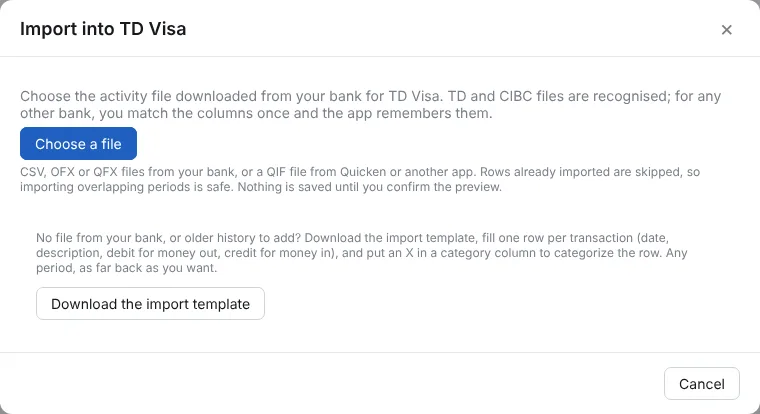
Step 2: Check the preview
The top line says which bank the file is from and how many rows are new, already imported or unreadable. The first time, check Start the account at…: the app takes the balance before the file from the bank’s own balance column.
Each row has a Becomes list, set to No category yet when the app has nothing to suggest.
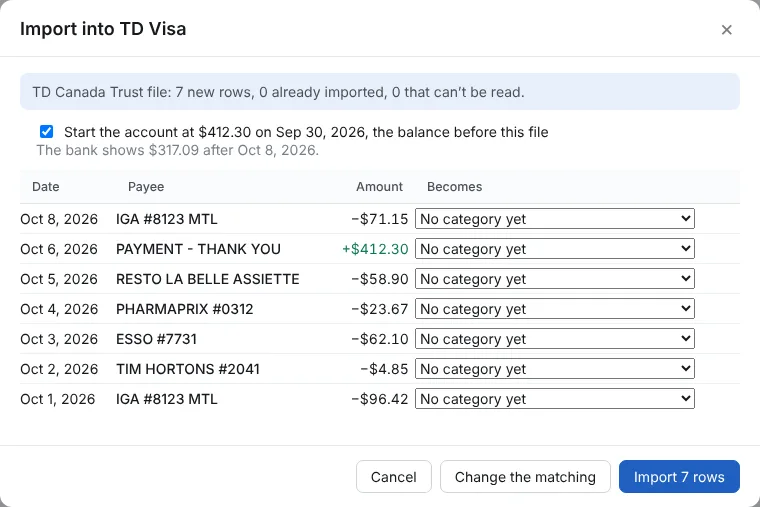
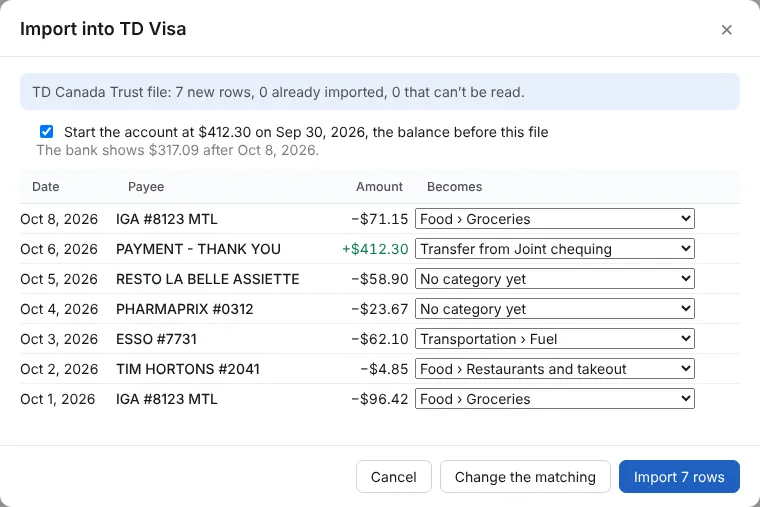
Step 3: Pick a category for each row you know
In Becomes, pick the category (Groceries, Fuel…). For a card payment, pick Transfer from your chequing account: it is not spending, only money moving between your accounts. You can also choose Don’t import for a row.
Rows you leave with no category are imported anyway and wait for you. Click Import 7 rows (the number of rows you are importing).
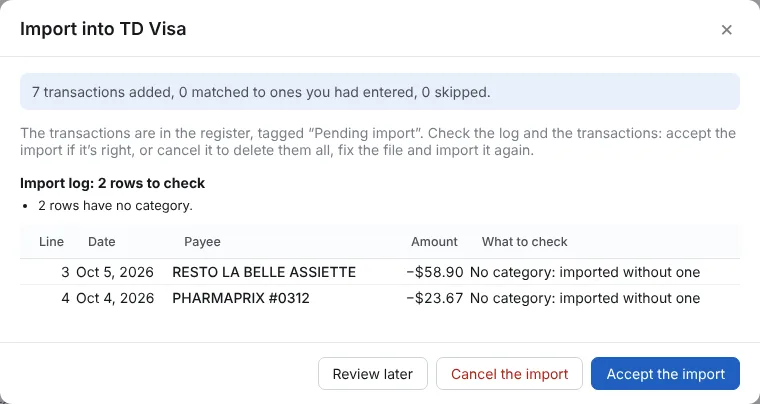
Step 4: Read the import log, then accept
The window counts what was added and lists the rows to check, here the two with no category. If something looks wrong, Cancel the import deletes every row it added. Review later keeps them tagged “Pending import” with a reminder on the account. When it is right, click Accept the import.
Step 5: The transactions are in the register
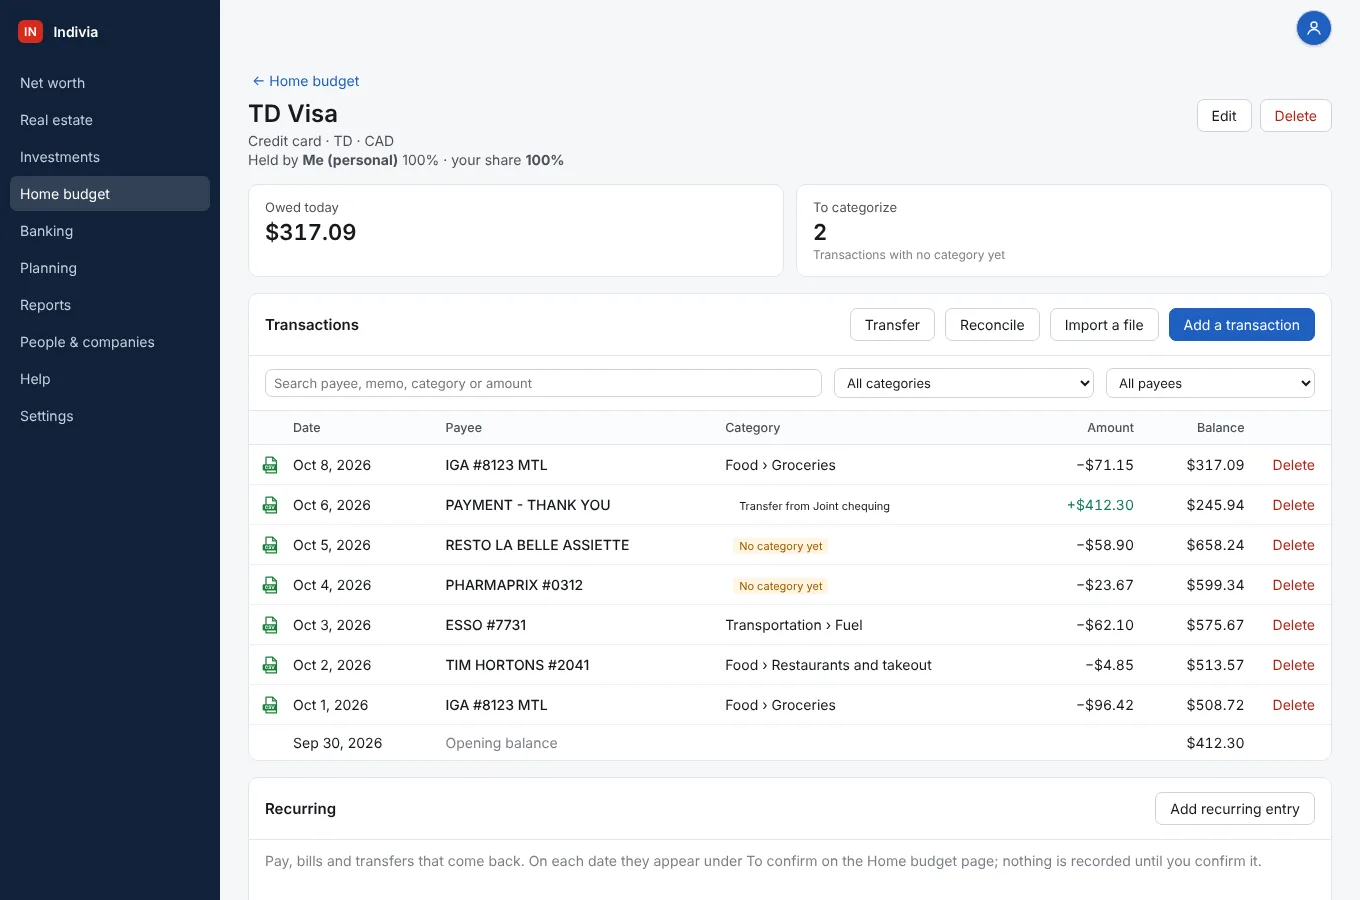
Each row shows the file icon it came from, its category (or No category yet) and the running balance, which matches the bank. Owed today and To categorize are up to date.
Step 6: Another bank: match the columns once
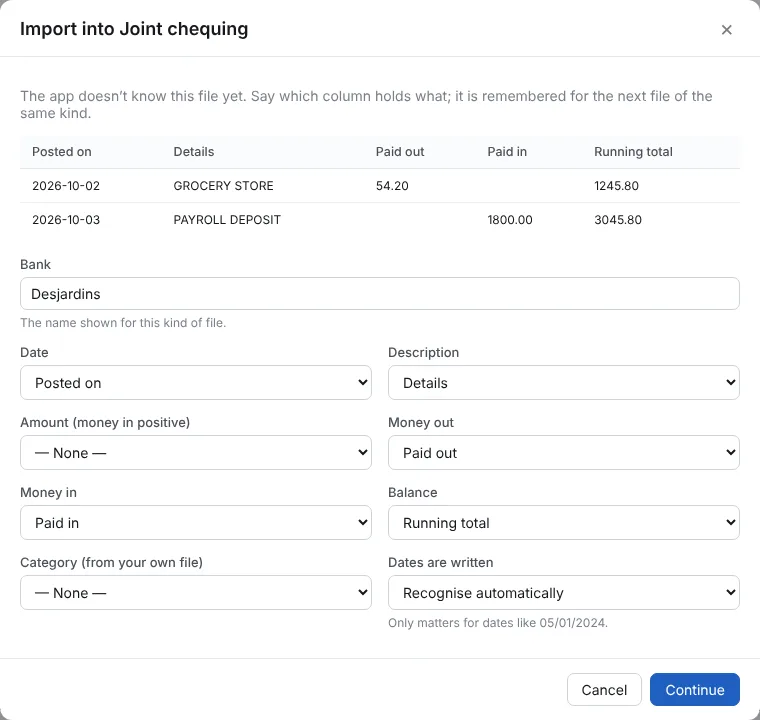
When the app doesn’t know a file yet, it shows the first rows and asks which column holds what: the Date, the Description, and either one Amount column or Money out and Money in. Balance is optional but lets the app check the import. Click Continue for the same preview as above. The matching is remembered for the next file of the same kind.
Categories and rules
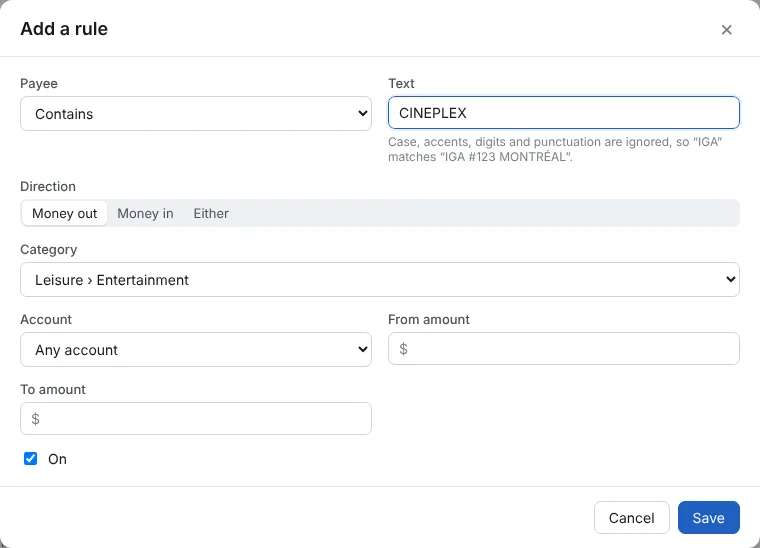
Each time you give a payee a category, the app learns it. You can also write your own rules, for example everything that contains “CINEPLEX” is Entertainment. Rules only suggest: you confirm the category, and you can always change it.
Step 1: Give a transaction its category
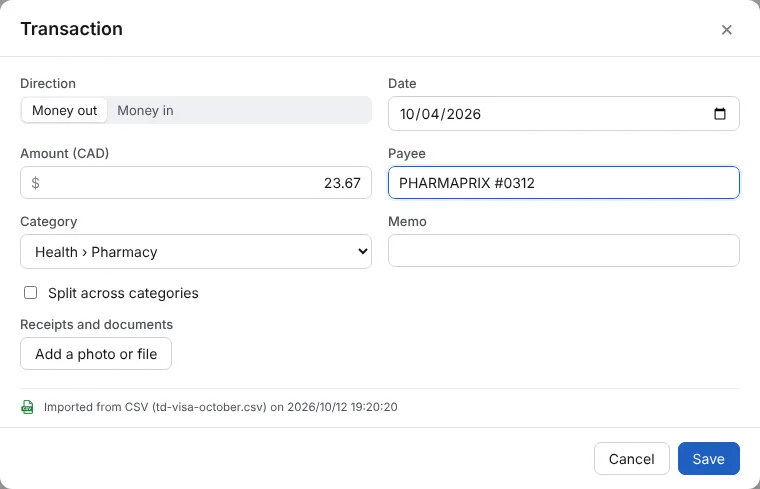
On the account, click a row marked No category yet. Pick the Category and click Save. To spread one purchase over several categories, check Split across categories.
To find them all, use the All categories filter above the register and pick No category yet.
Step 2: Every row has its category
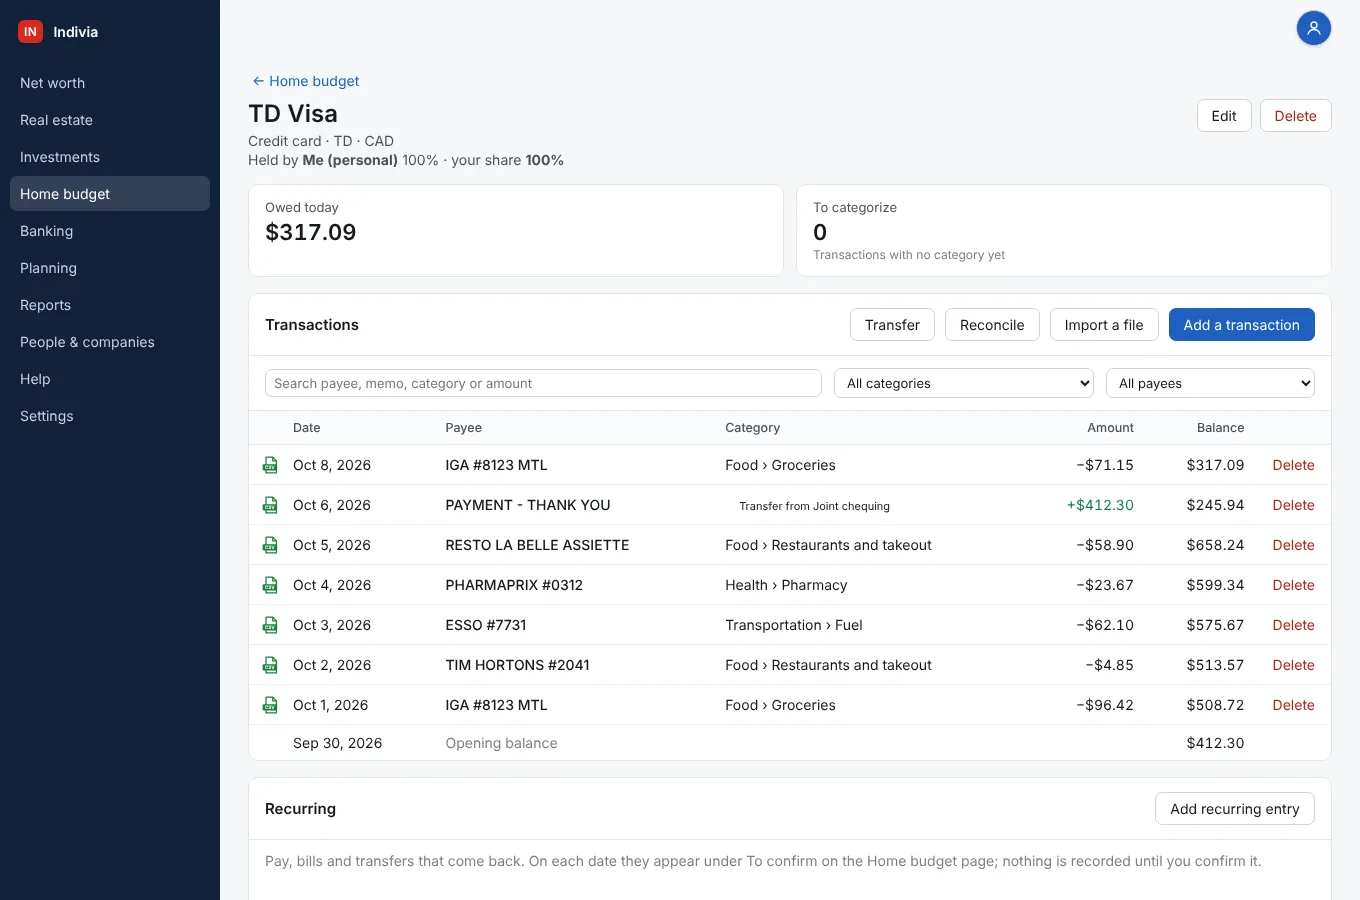
The register shows each category, and To categorize goes down as you go. The card payment is a Transfer: it does not count as spending.
Step 3: Write your own rule
On Home budget, click Rules, then Add a rule. Choose Contains or Is exactly and type the Text found in the bank’s description. Case, accents, digits and punctuation are ignored. Pick the Direction and the Category. Account, From amount and To amount narrow the rule if needed. Click Save.
Step 4: Your rules and the learned ones
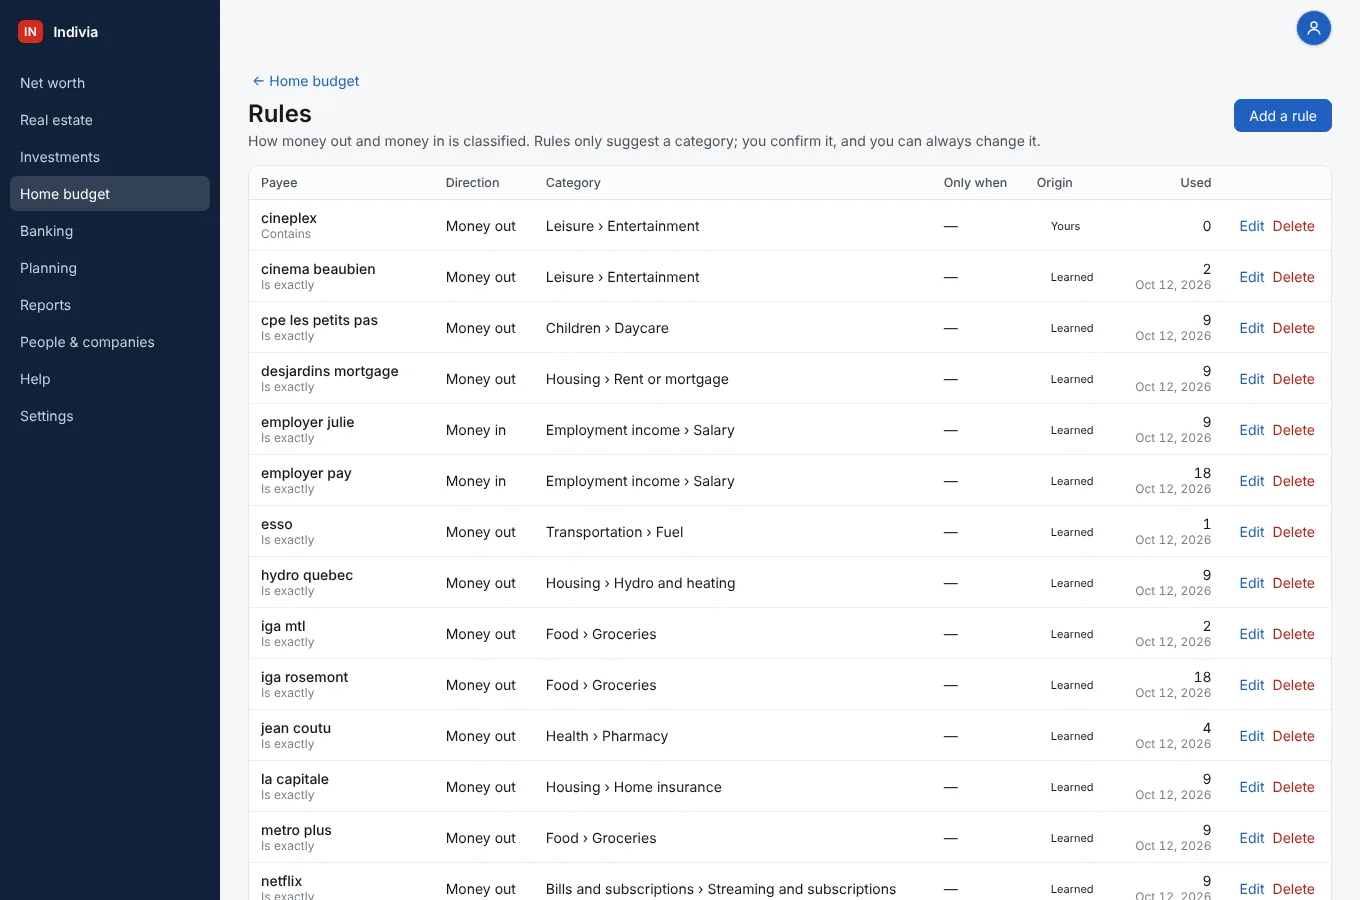
The list shows each rule with its category and its origin: Yours or Learned from how you classified a payee. Used counts how many times it matched. Click Edit to change one; your rules win over learned ones.
Step 5: The next import suggests the categories
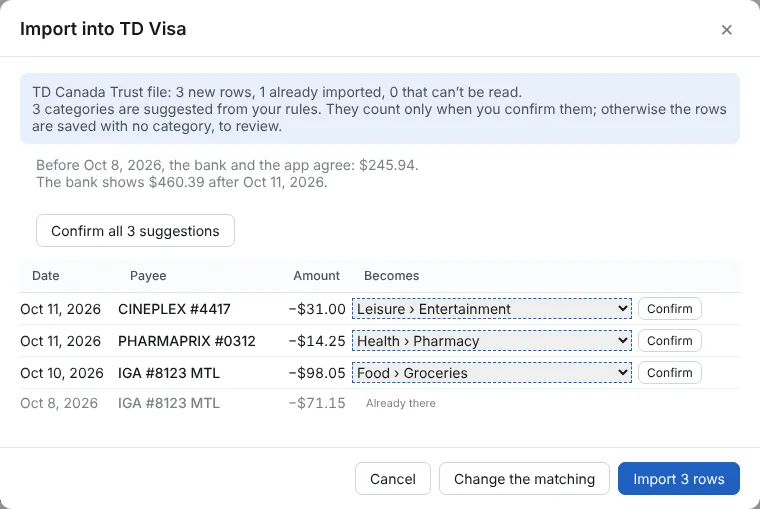
In the next file, suggested categories show with a dashed blue border and a Confirm button. Click Confirm on each one, or Confirm all 3 suggestions. A suggestion you don’t confirm is saved with no category, for you to check. The row already imported shows Already there and is skipped.
The monthly budget
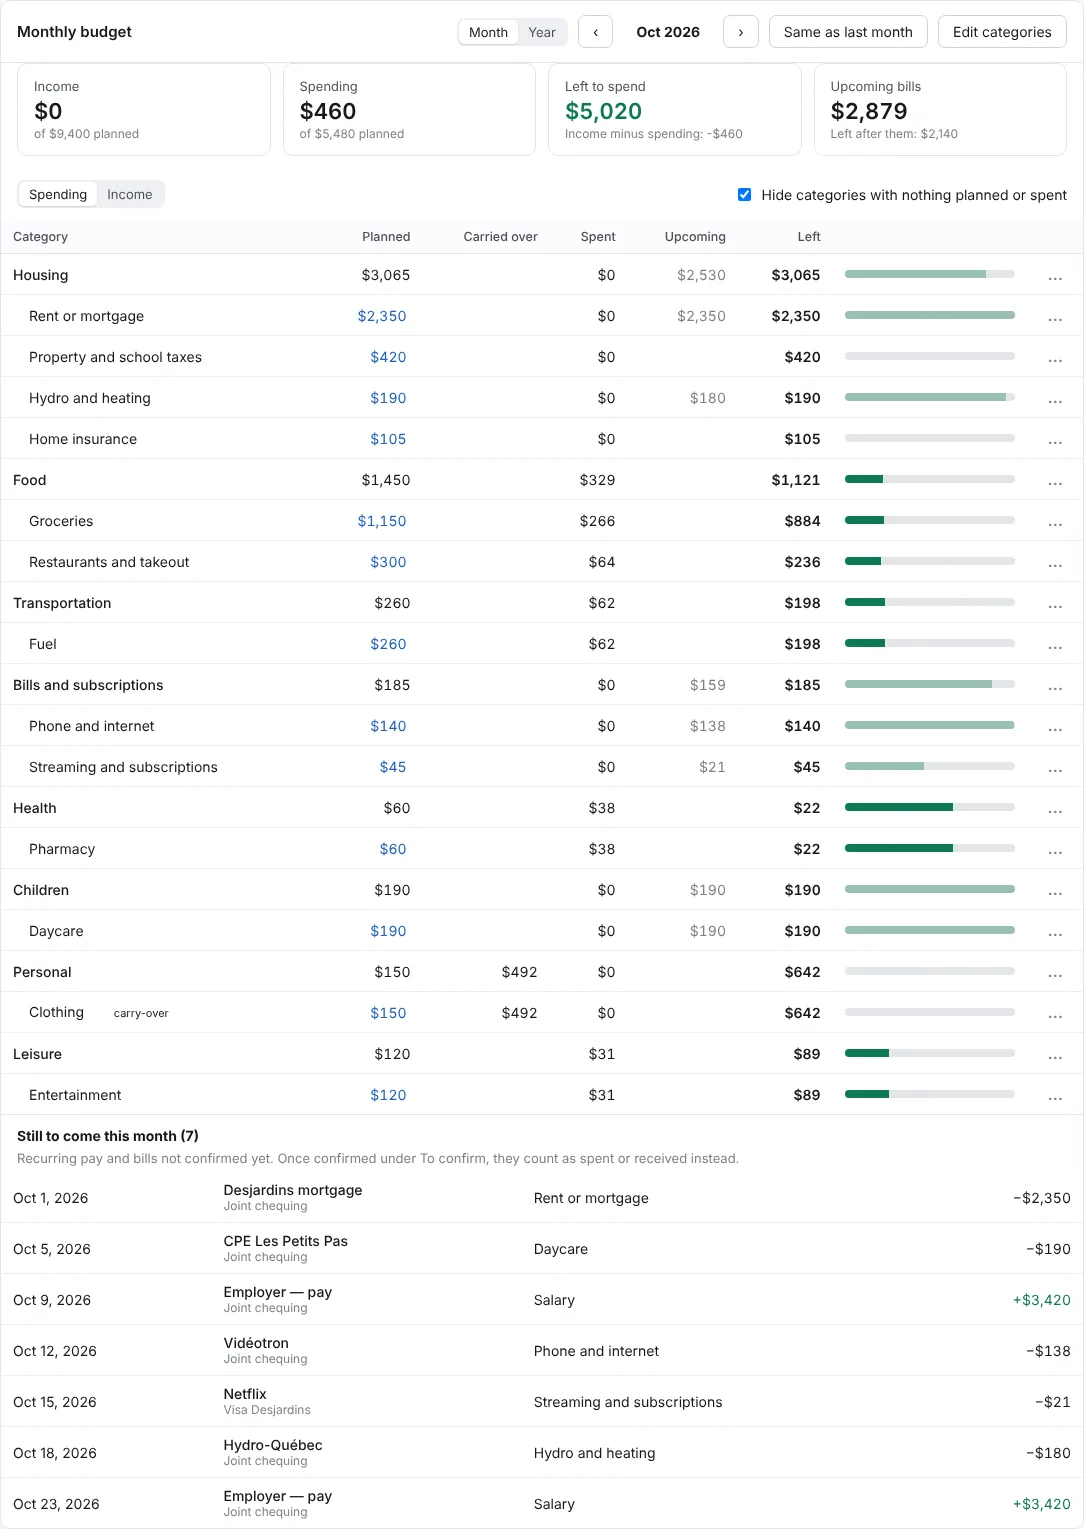
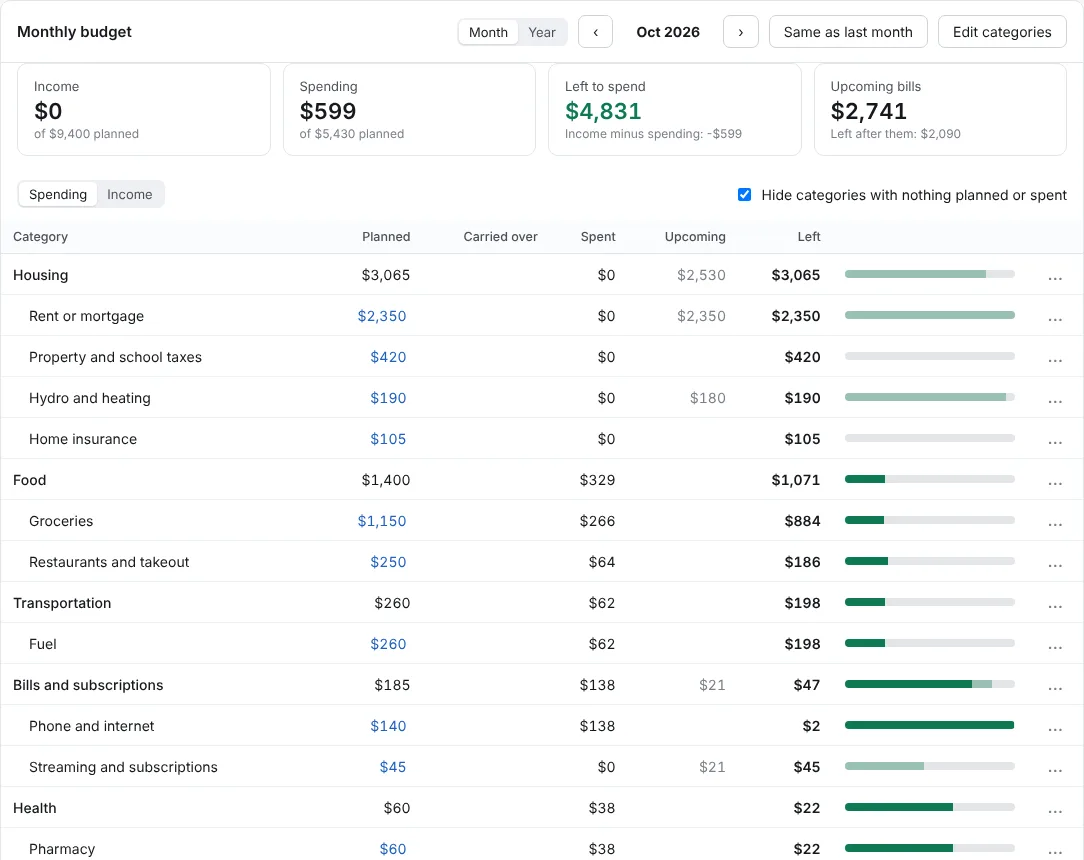
The monthly budget compares what you planned to what you really spent, from every account in the household budget. Recurring pay and bills you have set up show as upcoming until you confirm them.
Step 1: Read this month
At the top: Income, Spending, Left to spend and Upcoming bills, each against what is planned. Each category shows Planned, Carried over, Spent, Upcoming and Left, with a bar: dark for what is spent, light for what is still to come.
Check Hide categories with nothing planned or spent for a shorter list. The arrows change the month.
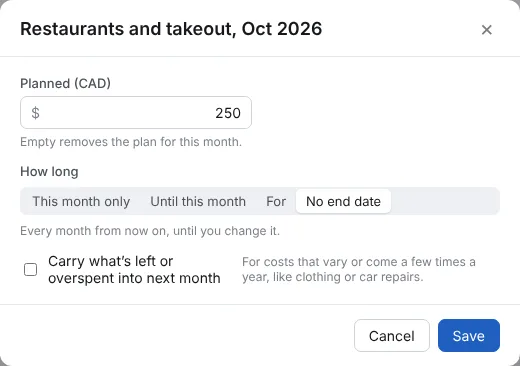
Step 2: Plan a category
Click the amount in Planned (or Plan where there is none yet). Type the amount and choose How long: This month only, Until this month, For a number of months, or No end date.
For costs that vary or come a few times a year, like clothing, check Carry what’s left or overspent into next month. Click Save.
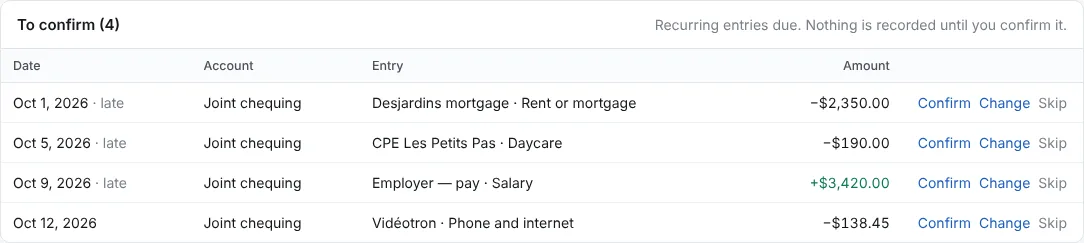
Step 3: Confirm the bills that came in
Recurring entries due show under To confirm. Click Confirm when it is in the bank, Change if the amount differs, or Skip. Once confirmed, it moves from Upcoming to Spent in the budget: here Phone and internet.
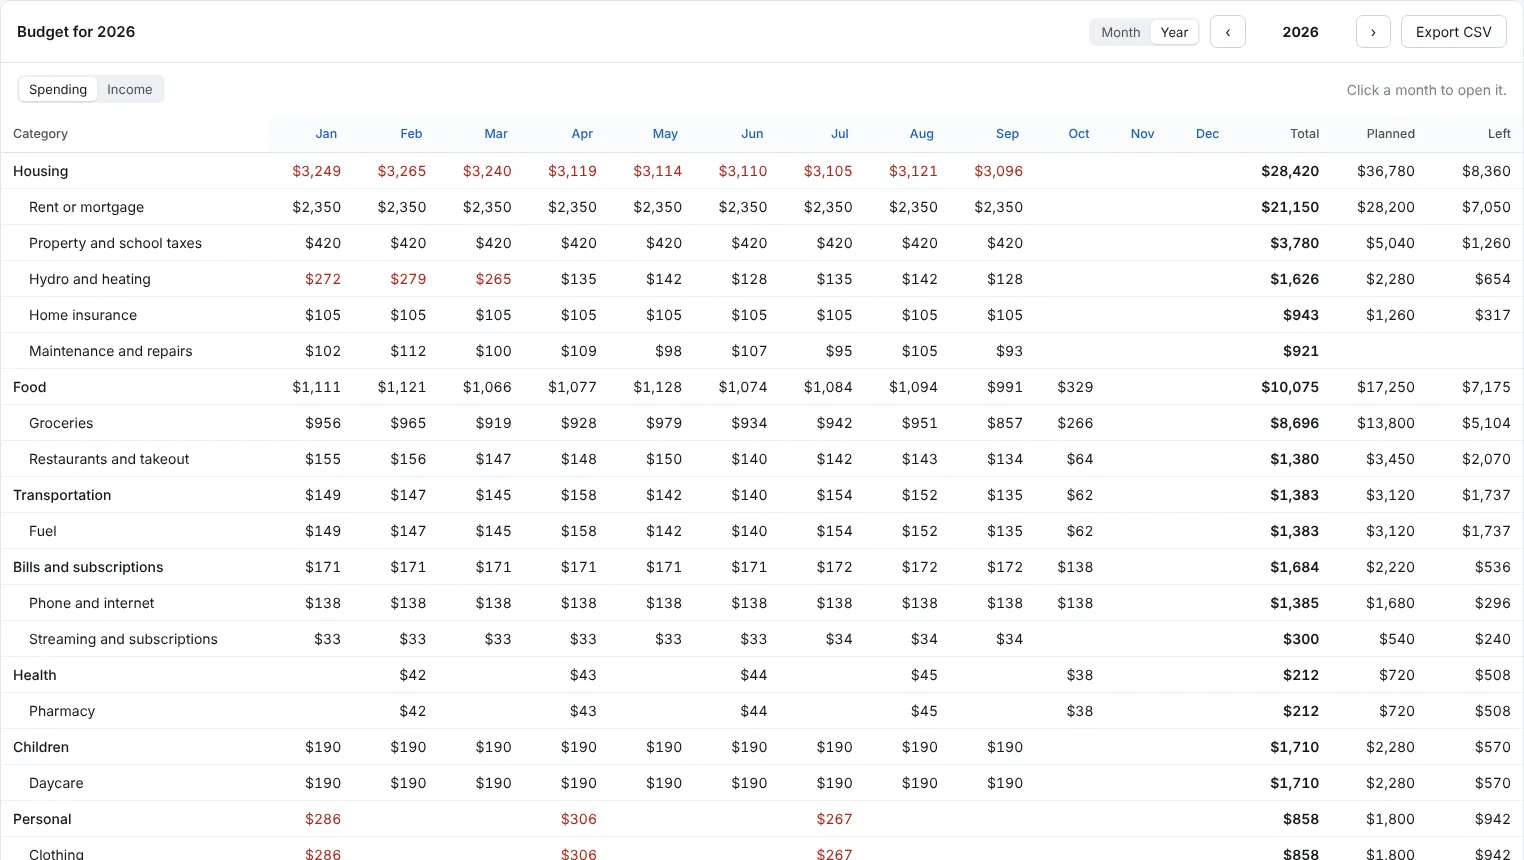
Step 4: See the whole year
Switch to Year for every category month by month, with the Total, the Planned amount and what is Left. Amounts over the plan show in red. Click a month to open it, or Export CSV to work on it in a spreadsheet.
Still a question? Write to support@indivia.app. Your message goes straight to the people who make the app.